How to Add Footers in a Word Document
Footers in a Word document can show:
- page numbers
- general information such as
- copyright notice
- author's name
- date last updated or printed
Footnotes (used to cite references) in the text are not in the footer.They are above the footer at the bottom of the page.
Information in the footer appears at the bottom of every page unless you create a new footer with different information in a new section.
For example, page numbers may change from Roman numerals in one part (e.g., Table of Contents) to Arabic numerals in another part (e.g., in the main text).
Microsoft Word allows you to easily add footers to a document.
See how to add multiple footers in Microsoft Word if you want to add different footers to your document.
How to Insert a Footer in Microsoft Word
Add the Same Footer on Every Page in a Word Document
Method A
Double click at the very bottom of the page.
The Header & Footer tab will appear in the Microsoft Word menu bar (see Figure 1).
There are several useful features, for example, inserting page numbers, date and pictures.
You can also enter information in the Footer area.
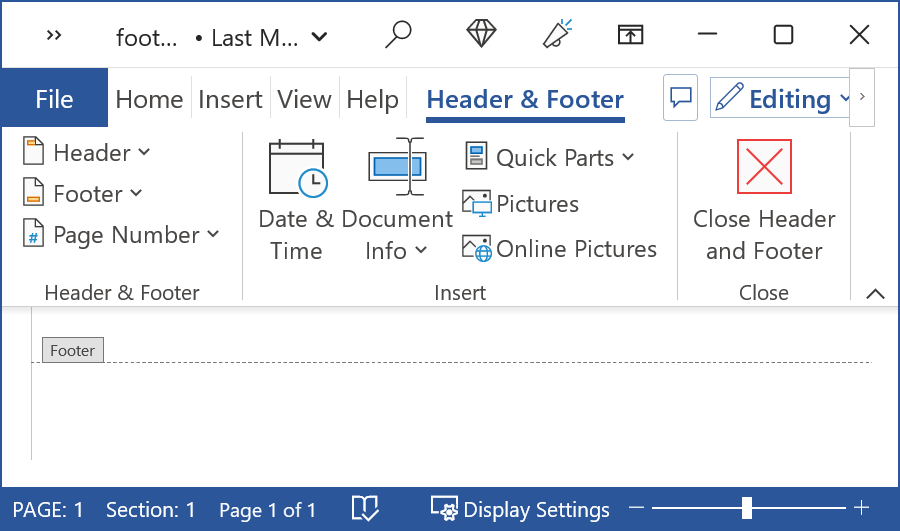 Figure 1: Open Footer Menu and Area
Method B
Right mouse click at the very bottom of the page to produce a prompt to edit the footer (see Figure 2).
 Figure 2: Edit Footer Prompt.
Select the Edit Footer prompt to open the Header and Footer menu and the Footer area (as shown in Figure 1).
Method C
Use menus to display the footer.
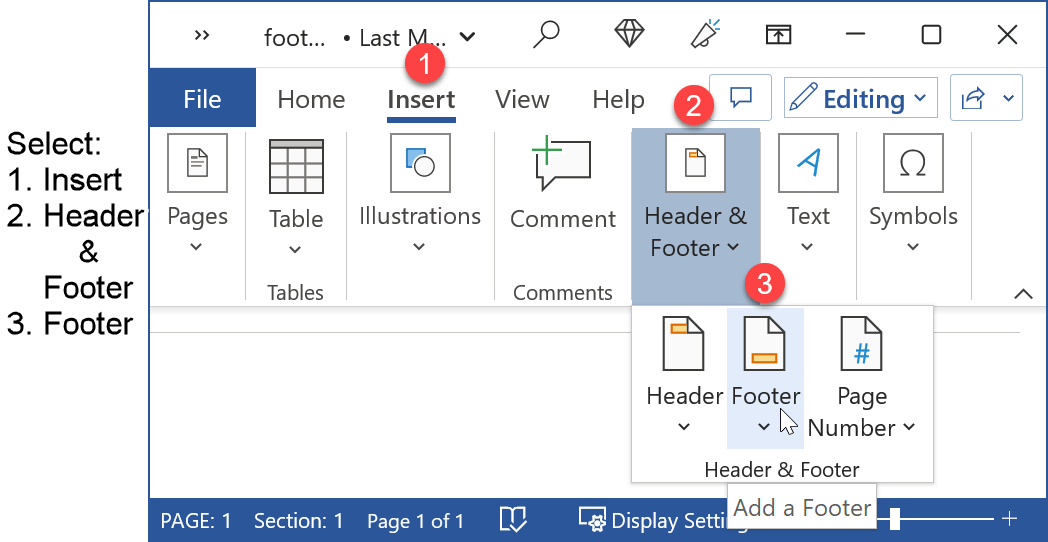 Figure 3: Display Footer From Menus
Written instructions for Figure 3 are:
- Select the Insert tab.
- Select Header & Footer.
- Select Footer in the Header & Footer section.
- Select the format of the Footer you want, for example, blank footer or a three-column footer.
- Enter the information you want in the footer.
You can format the footer in Microsoft Word as you like - change the font size, font type, underline, color, and so on.
This footer will appear on every page of your Word document if you have only one section or do not remove the "Link to Previous".
How to Add Different Footers in a Word Document
You can have different footers in the same Word document.
For example, you may want:
- a copyright notice on the first page only,
- page numbers in Roman numeral format in the Table of Contents, and
- page numbers in Arabic numeral format for the rest of the document.
Or any other combination you desire.
You create different footers as follows:
- Insert a section break at the end of the page (or groups of pages) with that footer.
- Remove the link between that footer and the footer in the previous section.
Figure 4 shows two documents as an example.
The left-hand document has:
- an empty footer in the Title page and the Table of Contents
(Microsoft Word gives you one empty footer by default) - a footer with page numbers after the Table of Contents
One section break has been inserted after the Table of Contents page.
The right-hand document has:
- an empty footer in the Title page
- a footer with Roman numerals (i, ii) for page numbers of the Table of Contents
- a footer with Arabic numerals (1, 2) for page numbers after the Table of Contents
Two section breaks have been inserted as follows:
- one after the Title page
- one after the Table of Contents
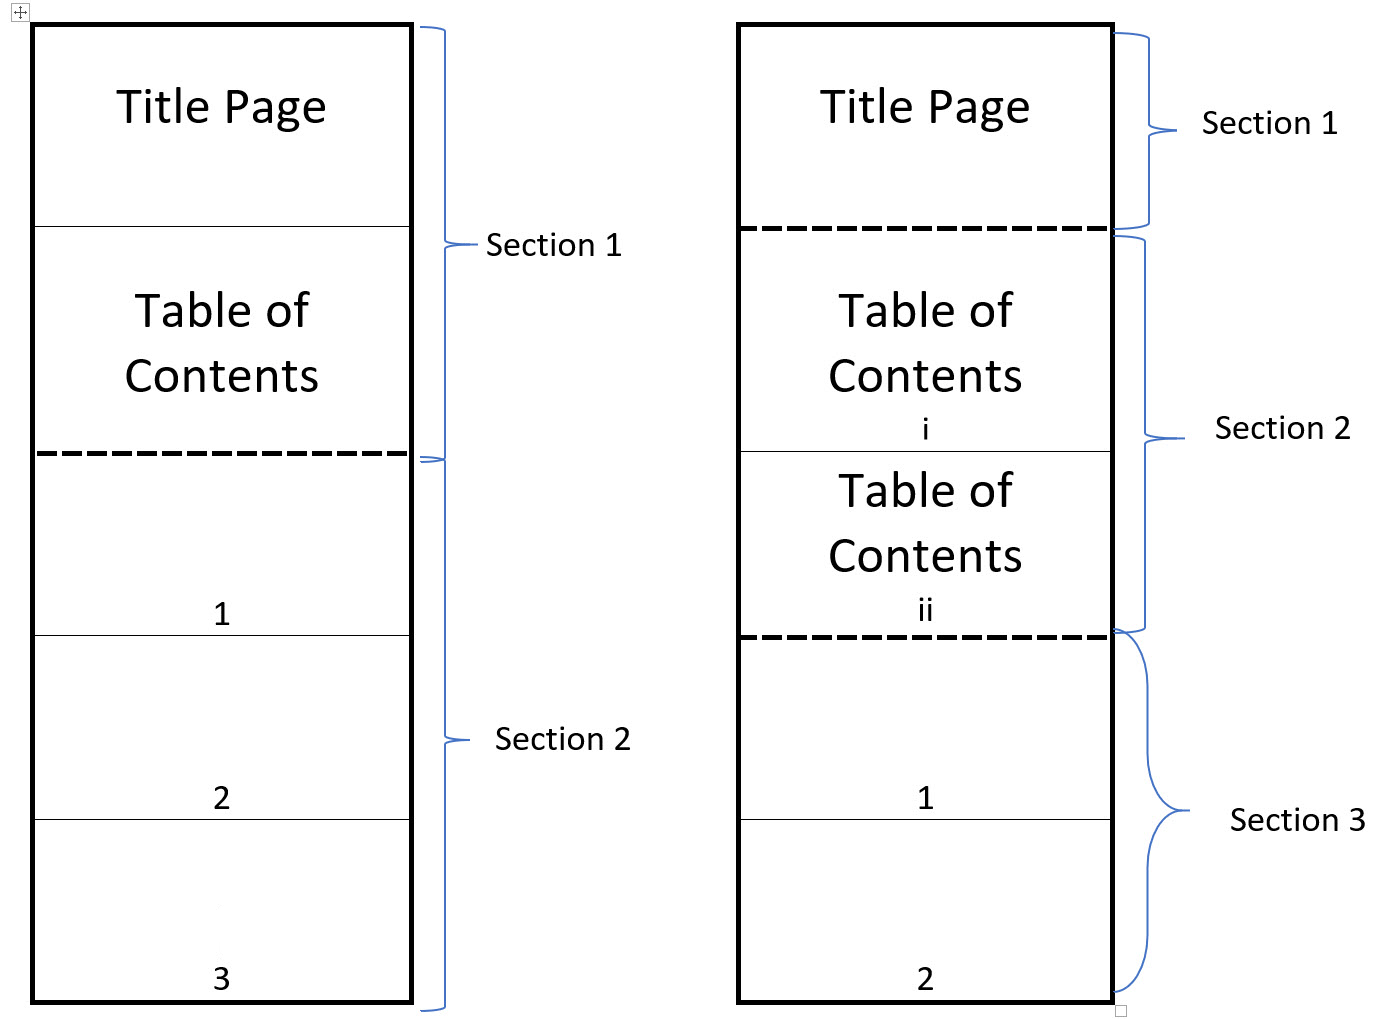 Figure 4: Different Page Number Formats in Different Sections
The link between the sections has been removed.
The page numbers have then been inserted.
Adding Different Footers in a Word Document - Example
Figure 5 shows a document where the:
- Title page has an empty footer,
- Table of Contents has Roman numeral page numbers, and
- Main text has Arabic numeral page numbers.
 Figure 5: Roman and Arabic page numbers
Figures 6 to 10 show how to set the page numbering in the footer as shown in Figure 5.
1. Insert a Section Break Between the Title and Table of Contents Pages
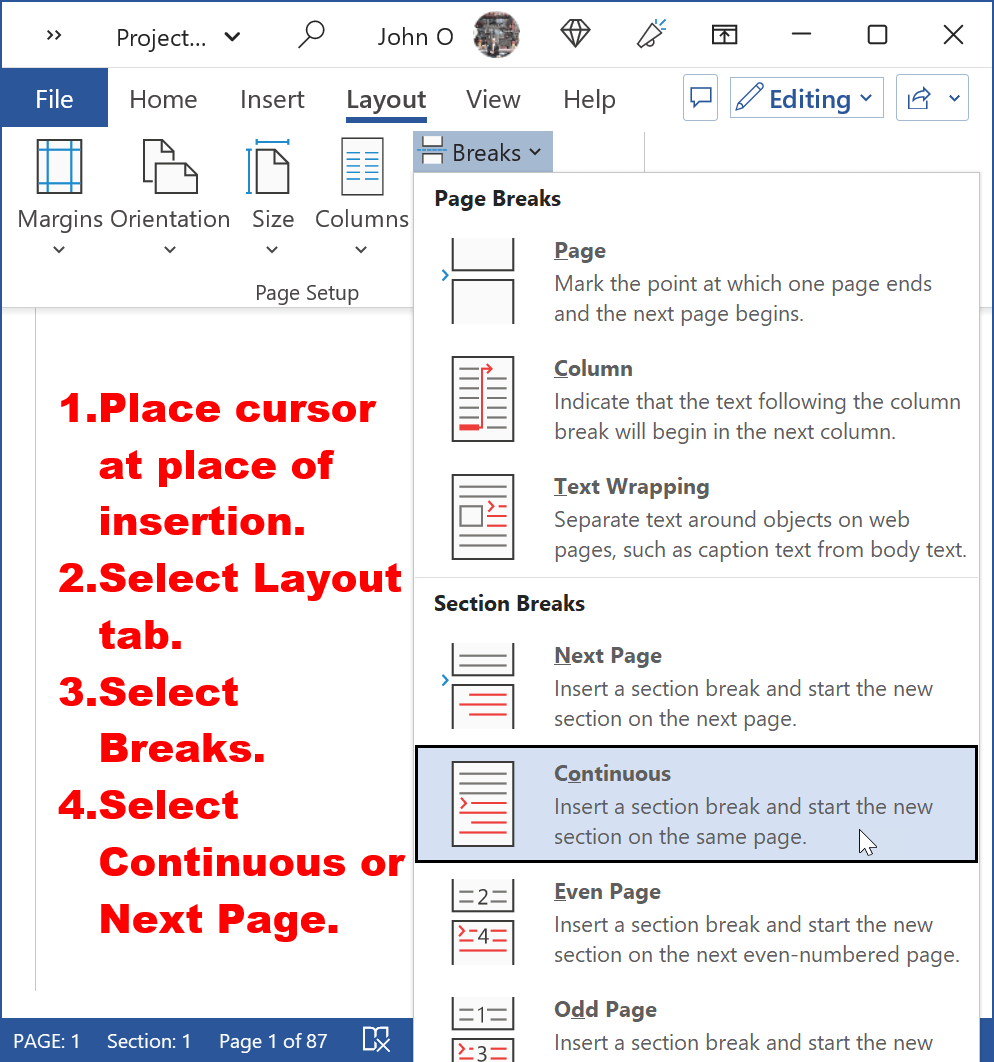 Figure 6: Section Break at End of Title Page
Written instructions (Figure 6) are:
- Place the cursor at the very end of the Title page (i.e., page 1).
- Select the Layout tab in the Ribbon.
- Select the Breaks command in the Page Setup group.
- Choose between Next Page and Continuous.
Select Next Page if there is only one page in the document, that is, the Title Page. A new page and section break will be inserted.
Select Continuous (place cursor at the end of the page break) if you already have more pages.
The Title Page will be in Section 1; The following page will be in Section 2.
How do you know what section you are in?
You will find the section number in the Status bar at the bottom of the screen, next to the Page number.
If the section number is not there, right mouse click on the Status bar. A menu will appear, Select Section.
2. Insert a Section Break Between the Table of Contents Pages and Main Text
Repeat the process from the previous step except create the section break at the end of the Table of Contents.
If you do not have a Table of Contents yet, leave a blank page (with the section break at the bottom) for the Table of Contents.
You should now have the following:
- Title page in Section 1
- Table of Contents page (or pages or a blank page) in Section 2
- The page (or pages) after the Table of Contents in Section 3
3. Remove Linkage Between the Title Page and Table of Contents Footers
Currently, each footer will have the same information, that is, if you enter something in one footer, it will appear in all the footers.
To change this, you need to break the linkage between the footers.
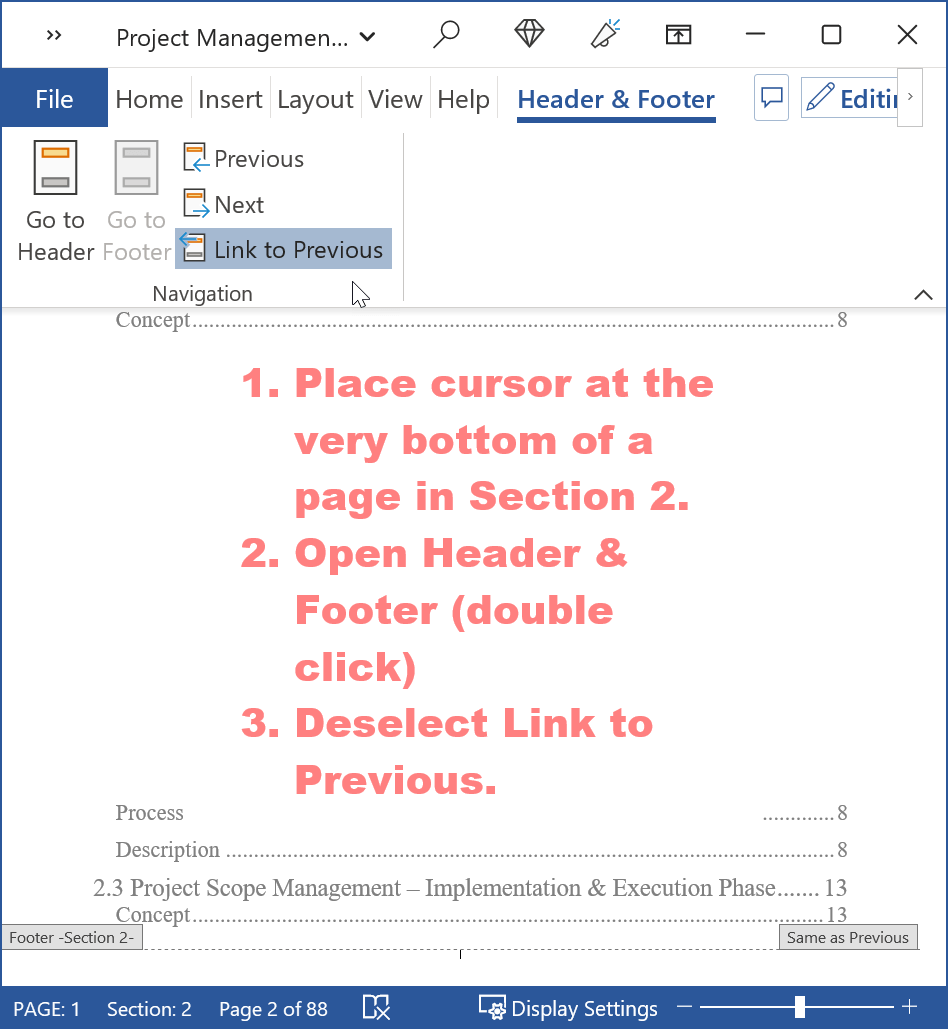 Figure 7: Linkage Removed Between the Footers of the Title page and Table of Contents Pages
Written instructions (Figure 7) are:
- Place the cursor at the bottom of any page in the Table of Contents (i.e., Section 2).
- Double click. The Header and Footer group will open.
- Deselect the Link to Previous command.
You can now enter unique information in Footer 1 and 2.
Note - this will only remove the linkage between the footers. Removing the linkage between the headers is a separate but similar process (double click at the top of the page).
4. Remove Linkage Between the Table of Contents and Main Text Footers
Repeat the process from the previous step except remove the Link to Previous from the footer in Section 3 to the footer in Section 2.
You should now have the following:
- Title page in Section 1
- Table of Contents page (or pages or a blank page) in Section 2 with a footer that is not linked to the footer in Section 1
- The page (or pages) after the Table of Contents in Section 3 with a footer that is not linked to the footer in Section 2
You can now format the footers in Section 1, 2 and 3 differently.
5. Add the Title Page Footer
Check the footer is empty (for this example).
You could add information if you wish such as copyright information.
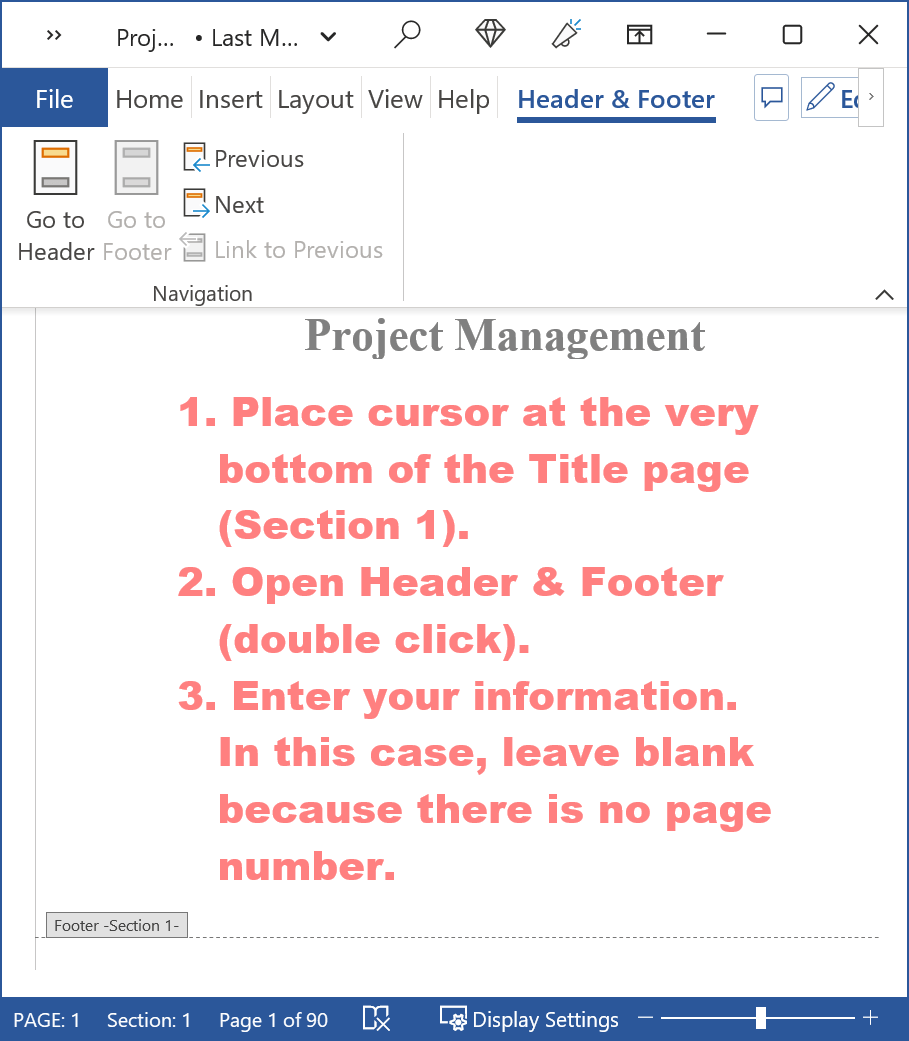 Figure 8: Title Page With Empty Footer
Written instructions (Figure 8) are:
- Place the cursor at the bottom of the Title page (i.e., Section 1).
- Double click to open the Header & Footer tab.
- Leave blank for an empty footer or insert any information you want.
Remember - what you do in the footer of section 1 will not affect the footer in section 2 because you have removed the Link to Previous.
6. Add the Table of Contents Footer
Repeat the process from the previous step except insert Roman numeral page numbers.
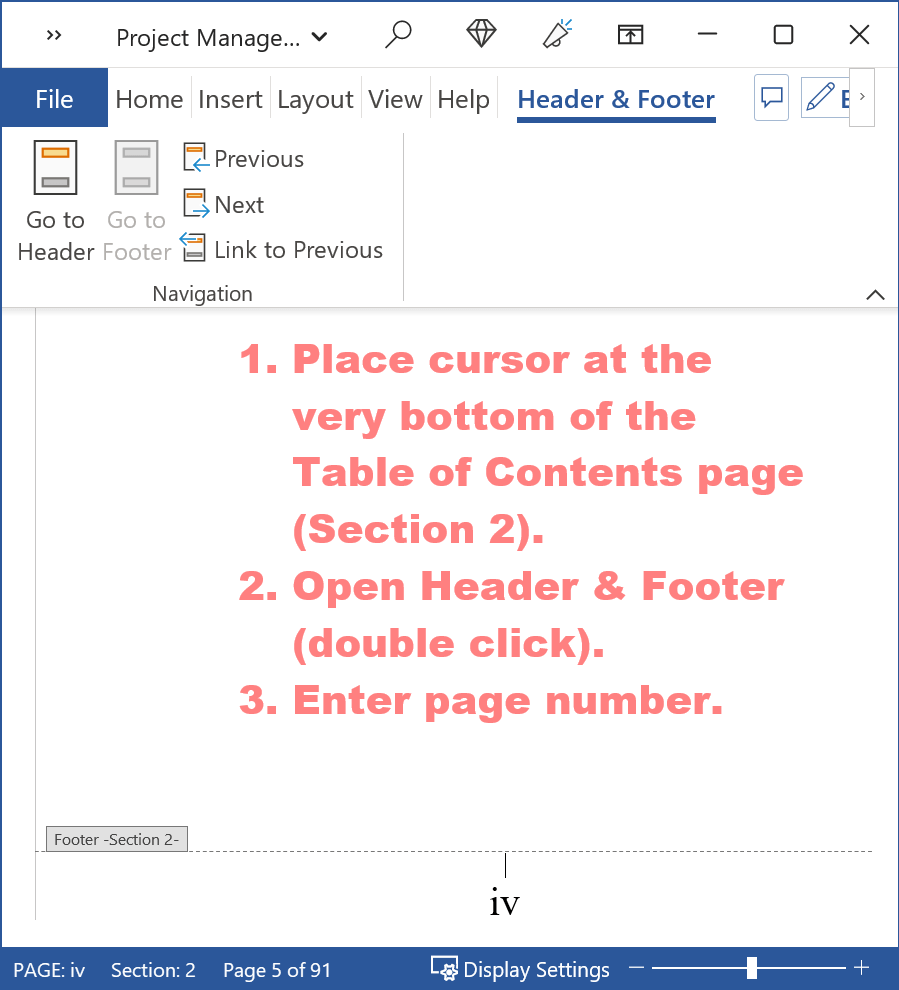 Figure 9: Add Roman Numeral Page Numbers to the Table of Contents
Written instructions (Figure 9) are:
- Place the cursor at the bottom of any page in the Table of Contents (i.e., Section 2).
- Double click to open the Header & Footer tab.
- Insert the Roman numeral page number, or any other information you want.
(If necessary, see how to insert Roman numeral page numbers)
Remember - what you do in the footer of section 2 will not affect the footer in section 1 because you have removed the Link to Previous.
N.B. You may also have some other preliminaries such as a List of Tables and/or List of Figures. The Roman numeral page numbers will continue on from the Table of Contents as long as the List of Tables and List of Figures remain in Section 2, or if they have their own section and the Link to Previous is not broken.
7. Add a Footer to the Main Text
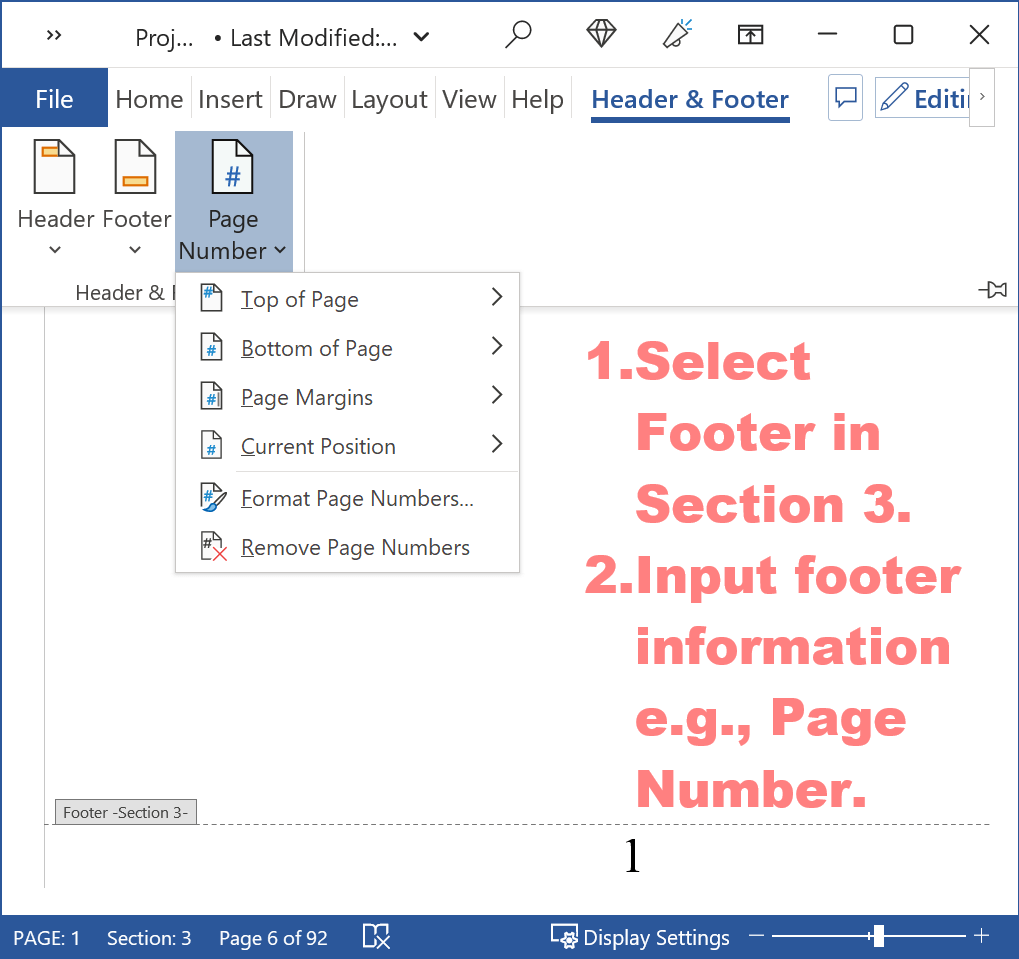 Figure 10: Add the Desired Footer in Microsoft Word to the Main Contents Pages
The next step in my example is to add a footer with page numbers in Arabic numeral format to the main content pages.
To add a footer in Microsoft Word:
- Select the footer in the next section after the preliminaries (Table of Contents, List of Figures etc.).
In my example, I only have a Table of Contents (Section 2) so it will be in Section 3. If you have more preliminaries, then it may be in a latter section. - Insert Arabic numeral page numbers, or any other information you want.
(If necessary, see how to insert Arabic numeral page numbers).
Remember - you have broken the link in this section to the previous section so adding a footer will not affect other sections.
Summary
Footers in your academic writing improves the professional look of your writing, particularly if you have footnotes and/or page numbers. You may have other information such as name, file location and copyright information.
Adding one single footer in your Word document (starting with page number 1) on the first page is quite easy.
Adding different footers in a Word document requires some extra steps.
These steps are simple to do and will make your academic and professional writing so much better.