Page Numbers in Word
Page numbers in Word documents are so easy to do.
They are essential in academic writing such as in essays, reports or theses.
Good academic writing practice and your university, college and school will expect it.
YET - I have seen academic documents that do not have page numbers.
I have received draft academic papers for editing with no page numbers.
The writer knows they should be there but when questioned, the reply is "I'll put it in later".
But it is very hard to proof read and edit a document with no simple referencing system, such as page numbers.
Many academics and students use Microsoft Word for academic writing.
Simple page numbers in Word documents with the first page starting at 1 are easy to do.
However academic writing documents usually have variations in page numbering styles such as:
- no page number on the Title Page
- Roman numerals (i, ii, iii...) in the Table Contents (or Contents) pages
- Arabic numerals (1, 2, 3...) in the main body of academic writing.
It may be even more complex than this, for example, with a Table of Figures or a Table of Authorities.
Do you want to know more about inserting page numbers in Word documents?
If you would like to know background information (what, why, when, where) about page numbers, then select the appropriate link (or just keep reading):
Select simple page numbering if you just want to know how to insert page numbers in Word documents.
Select complex page numbering if you want to know about different types of page numbers in the same Word document.
Select one of the following if you want to know how to:
- create sections in Word
- format page numbers in Word
- insert a section break after the Title page
- insert a section break after the Table of Contents
- remove the linkage between footers
- format the Title Page Number
- insert Roman page numbers in the Table of Contents
- insert Arabic page numbers in the main text
What Are Page Numbers in Word Documents?
Page numbers in Word are numbers that occur in the footer (or header) on some or all pages of your Word document.
Microsoft Word allows you to use Arabic numbers (0, 1, 2, 3......) and Roman numbers (i, ii, iii, iv......).
You can combine both types of page numbers in Word in one document.
Why Use Page Numbers?
The following are reasons for having page numbers:
- Page numbers provide a quick accurate reference point.
e.g. "on page 251 you will find..." - you can go there immediately
e.g. the Table of Contents tells you the Summary is on page 300 - you can go there immediately
e.g. a citation or reference will refer to page 51 of another published work - you can find that publication and go to that page immediately. - Reassembling a printed document
Have you ever had to put together a number of pages that have got out of order - maybe by spreading all over your desk or even dropping a document?
It is much easier to reassemble using page numbers! - Following standards
Academic institutions require you to follow an academic writing standard (e.g. MLA, APA, Chicago, Harvard) that requires you to number pages. - Helps to make your work look professional
The reader of your document (e.g. professor, business associate, teacher, client etc) will have a higher opinion of you.
This should help you succeed!
When to Use Page Numbers
All the time!
I recommend you set up your page numbering right from the start.
Page numbers in Word are automatically renumbered when you add, edit and delete your pages.
You should number your pages even for drafts. When your draft is being proofread or edited, page numbers enable the reviewer to quickly refer to the page that requires corrections.
Where to Insert Page Numbers
Page numbers are usually displayed at the top of the page in the header, or at the bottom of the page in the footer.
How to Automatically Insert Page Numbers in Word
Simple Page Numbering using MS Word
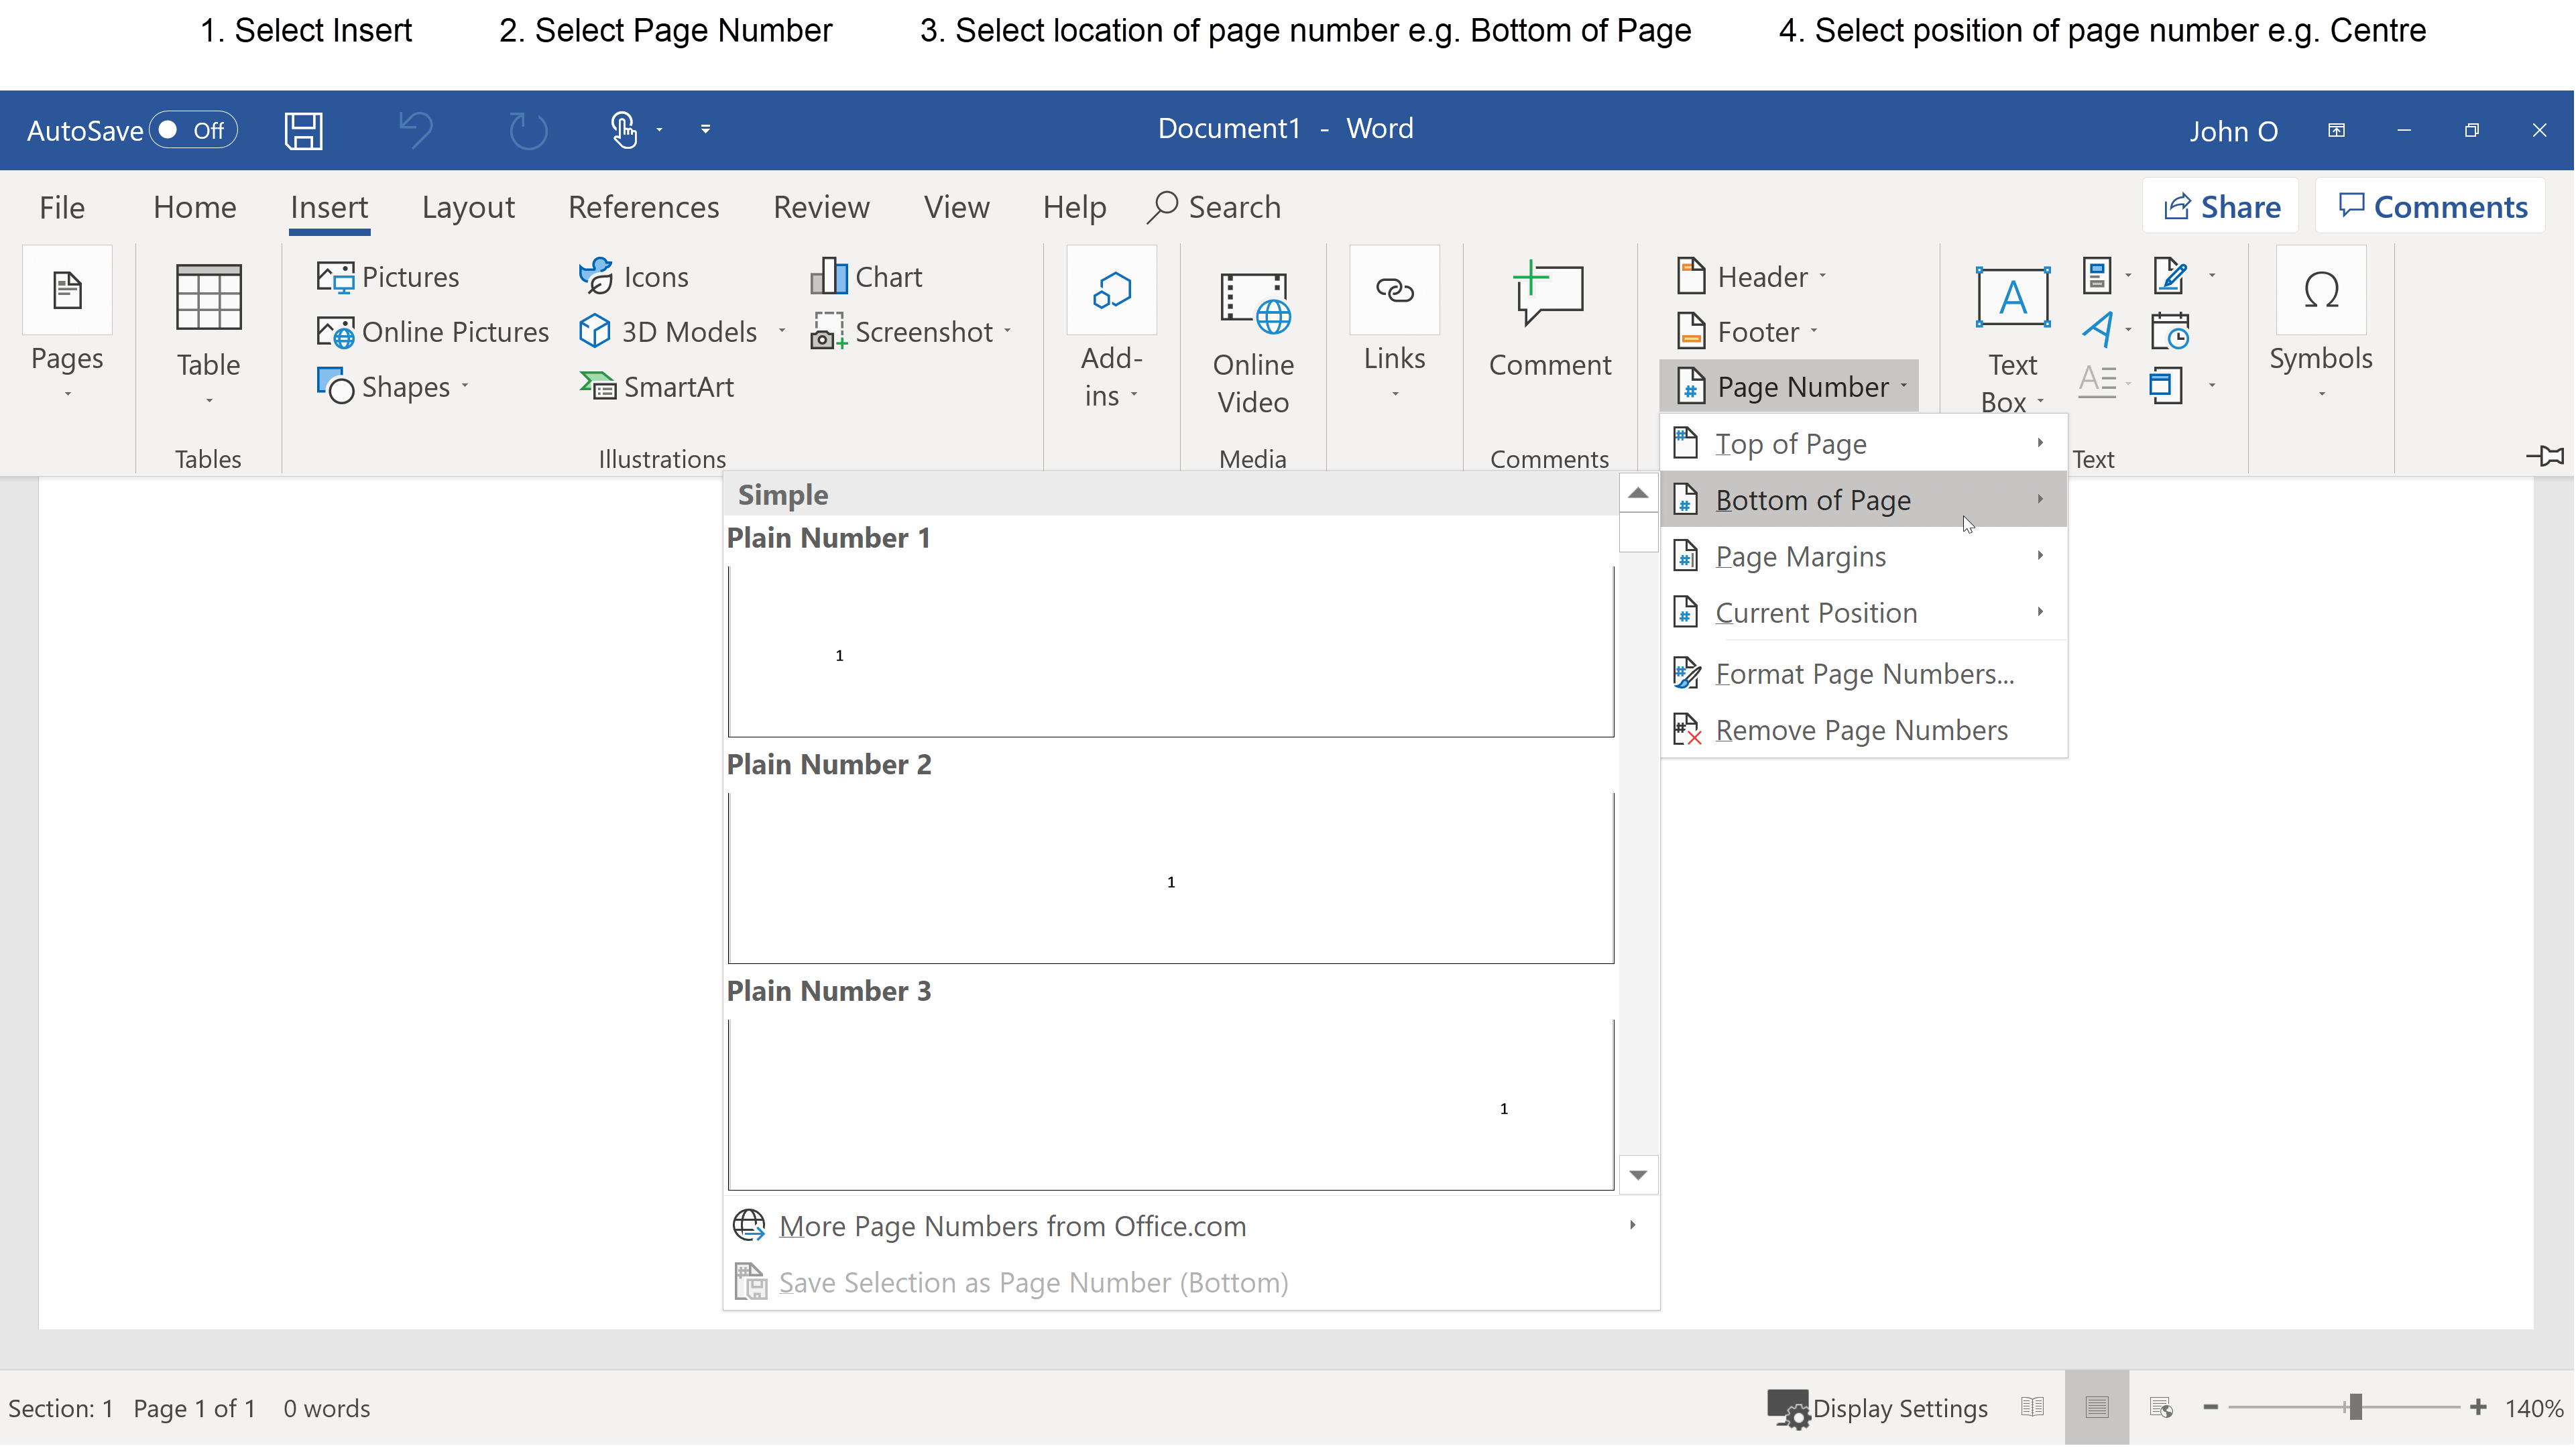 Figure 1: Adding page numbers in Word starting from the first page
Sometimes you may simply want consecutive page number from start to finish i.e. the first page is numbered 1.
This may be an essay or a short paper or another short document.
It does not have a Title page which usually does not have a page number.
It does not have a Table of Contents which usually has a different form of numbering.
To number each page in your document from 1 onward:
- Select the Insert Tab
- Select Page Number
- Select location (Top of Page, Bottom of Page)
- Select position of the Page Number (Left, Center, Right aligned).
That is all you have to do!
Whenever you add a new page, or delete a page, or add text or delete text or any other object such as a picture, Word will automatically renumber your pages.
You will not have to worry about page numbering again!
Alternate way of inserting a page number:
- Open the header of footer (double click in the top left hand or bottom right hand corner of the page)
- Select the design tab (immediately under the "Header & Footer Tools" tab
- Select Page Number in the Header & Footer group
- Continue as described above.
Your teacher, lecturer, professor or colleague will expect page numbering. If you do not, then you risk making a poor impression and being thought of as unprofessional and sloppy.
Make sure you put page numbers in!
More Complex Page Numbering Using Word
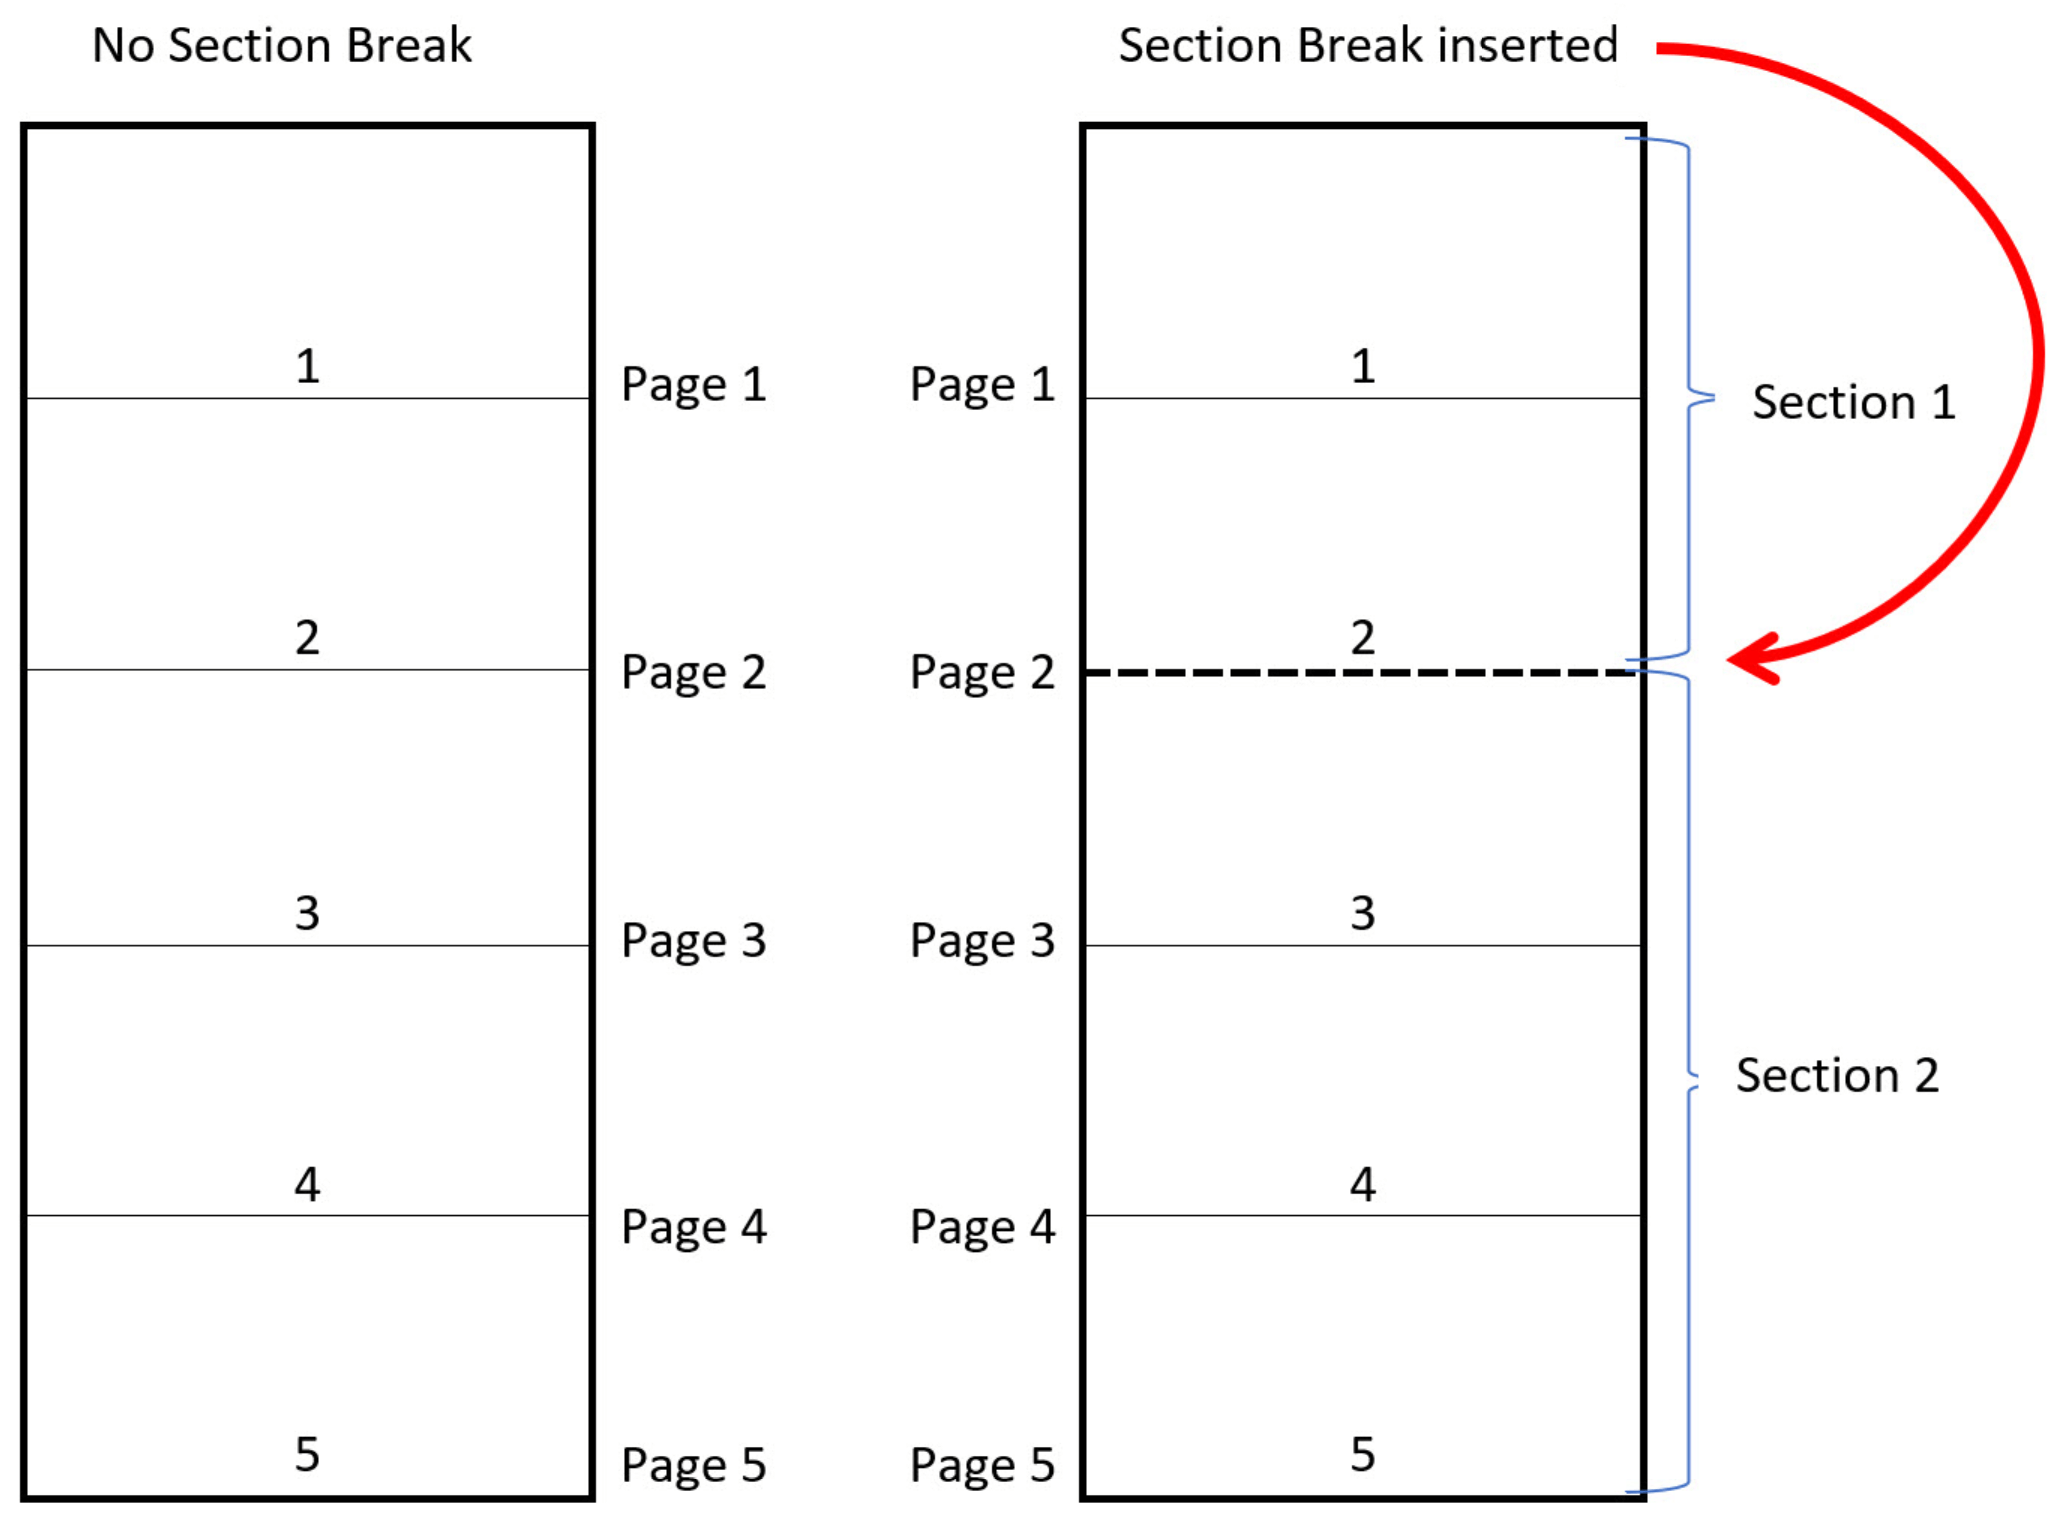 Figure 2: No section break (i.e. one section) v with section break (i.e. two sections)
The most common questions I get about creating page numbers in word are:
"how do I start page numbering on page 3, that is, the third physical page (because page 1 is the Title page and page 2 is the Table of Contents page"
or
"how do I use Roman numerals for the Table of Content pages and Arabic numbers for the main document pages"
or
some other variation where simple numbering from 1 onward from the first page is not wanted.
To know how to do this, you need to understand the concept of Sections in MS Word.
When you create a document, MS Word will automatically divide it into pages.
You can further divide the document into Sections. A Section consists of 1 or more pages.
You can have as many sections as you like.
You can format each section differently, including page numbers.
For example, suppose you have a 5 page document as represented in the diagram.
The document to the left has 5 pages with only one section (MS Word automatically allocates one section).
The document to the right has 5 pages but 2 sections because a section break has been inserted at the end of page 2.
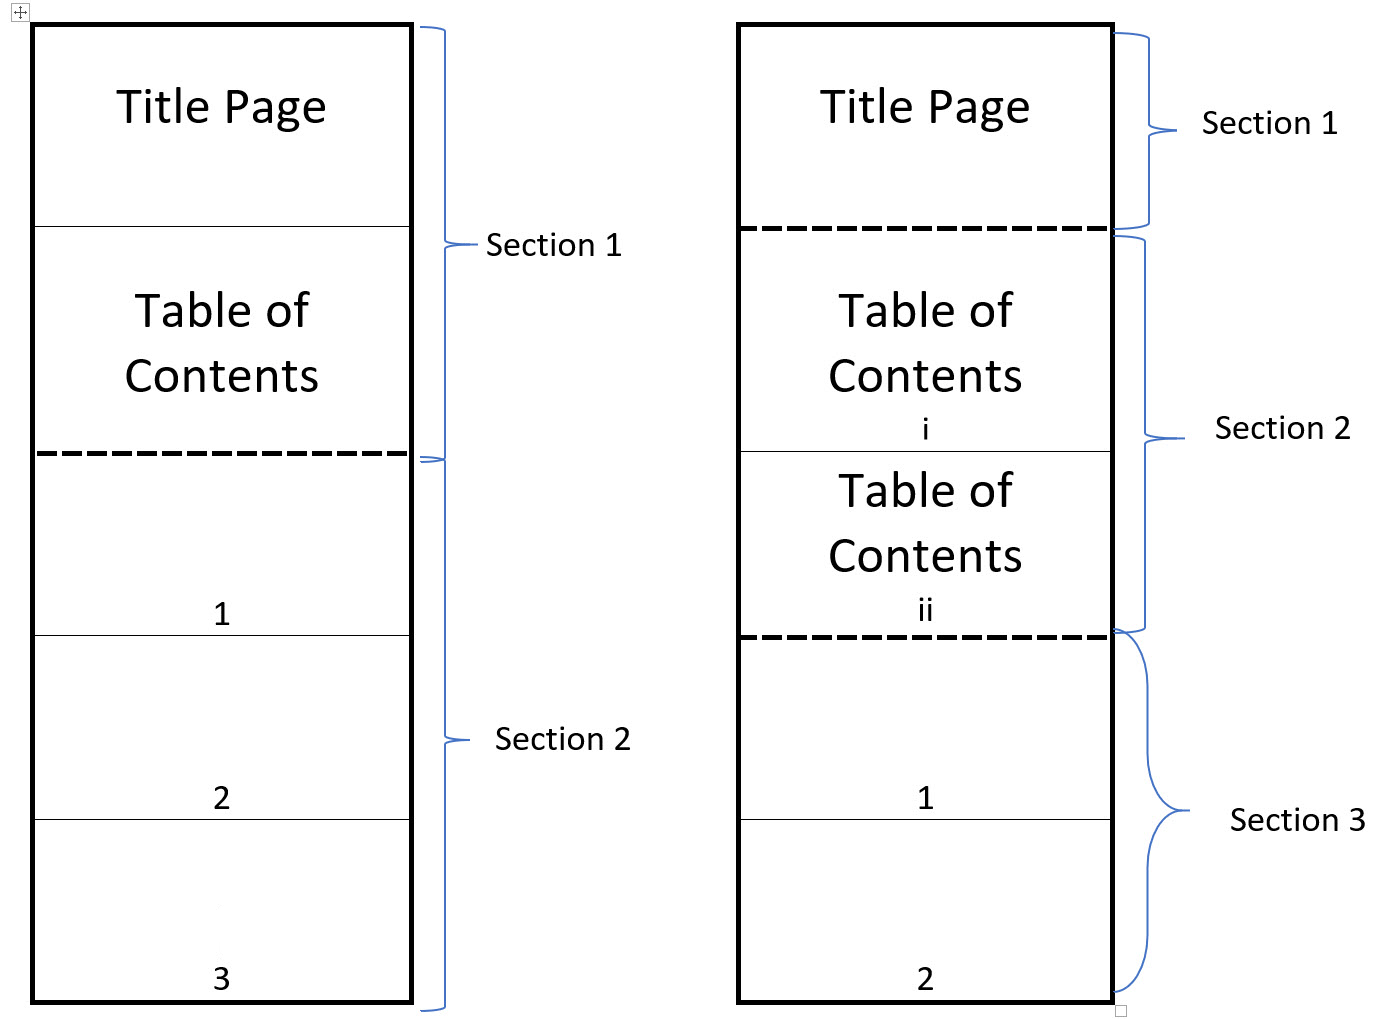 Figure 3: Different page number formats as a result of dividing document into sections
Now, you can format the sections differently, including page numbers.
The diagrams shows two simple scenarios.
The first document on the left has had a section break inserted after the second page.
The Title Page and the Table of Contents page do not have page numbers.
Page numbering starts at 1 on the third page.
The second document on the right has had two section breaks inserted - one after the first page (the Title page) and another one after the Table of Contents which is on the second and third pages.
The Title Page has no page number, the Table of Contents pages have page numbers i and ii (Roman numerals) and the rest of the document starts with page number 1 (Arabic numerals).
Dividing a document into sections allows you to format each section differently in other ways as well.
For example, changing the orientation of a page from portrait to landscape (and back again) is quite common.
This happens often when wanting to place a figure, graphic or table that fits better on a landscape page rather than a portrait page.
Another use is to have different headers and footers. For example, you may not want a header on the Title page and/or Table of Contents page but on the rest of the document. You can achieve this by creating sections.
Another example is having different headers for different chapters or sections of a document. You can format the headings differently in each section.
Other examples include different paper size (for example, you may want to include an A3 page in your appendix) and using columns on some pages but not others.
Your teacher, lecturer, professor or colleague will be impressed by your presentation skills. He or she may even not know how to do some of the things you do.
Understanding section breaks is invaluable!
How to Create Sections in Word
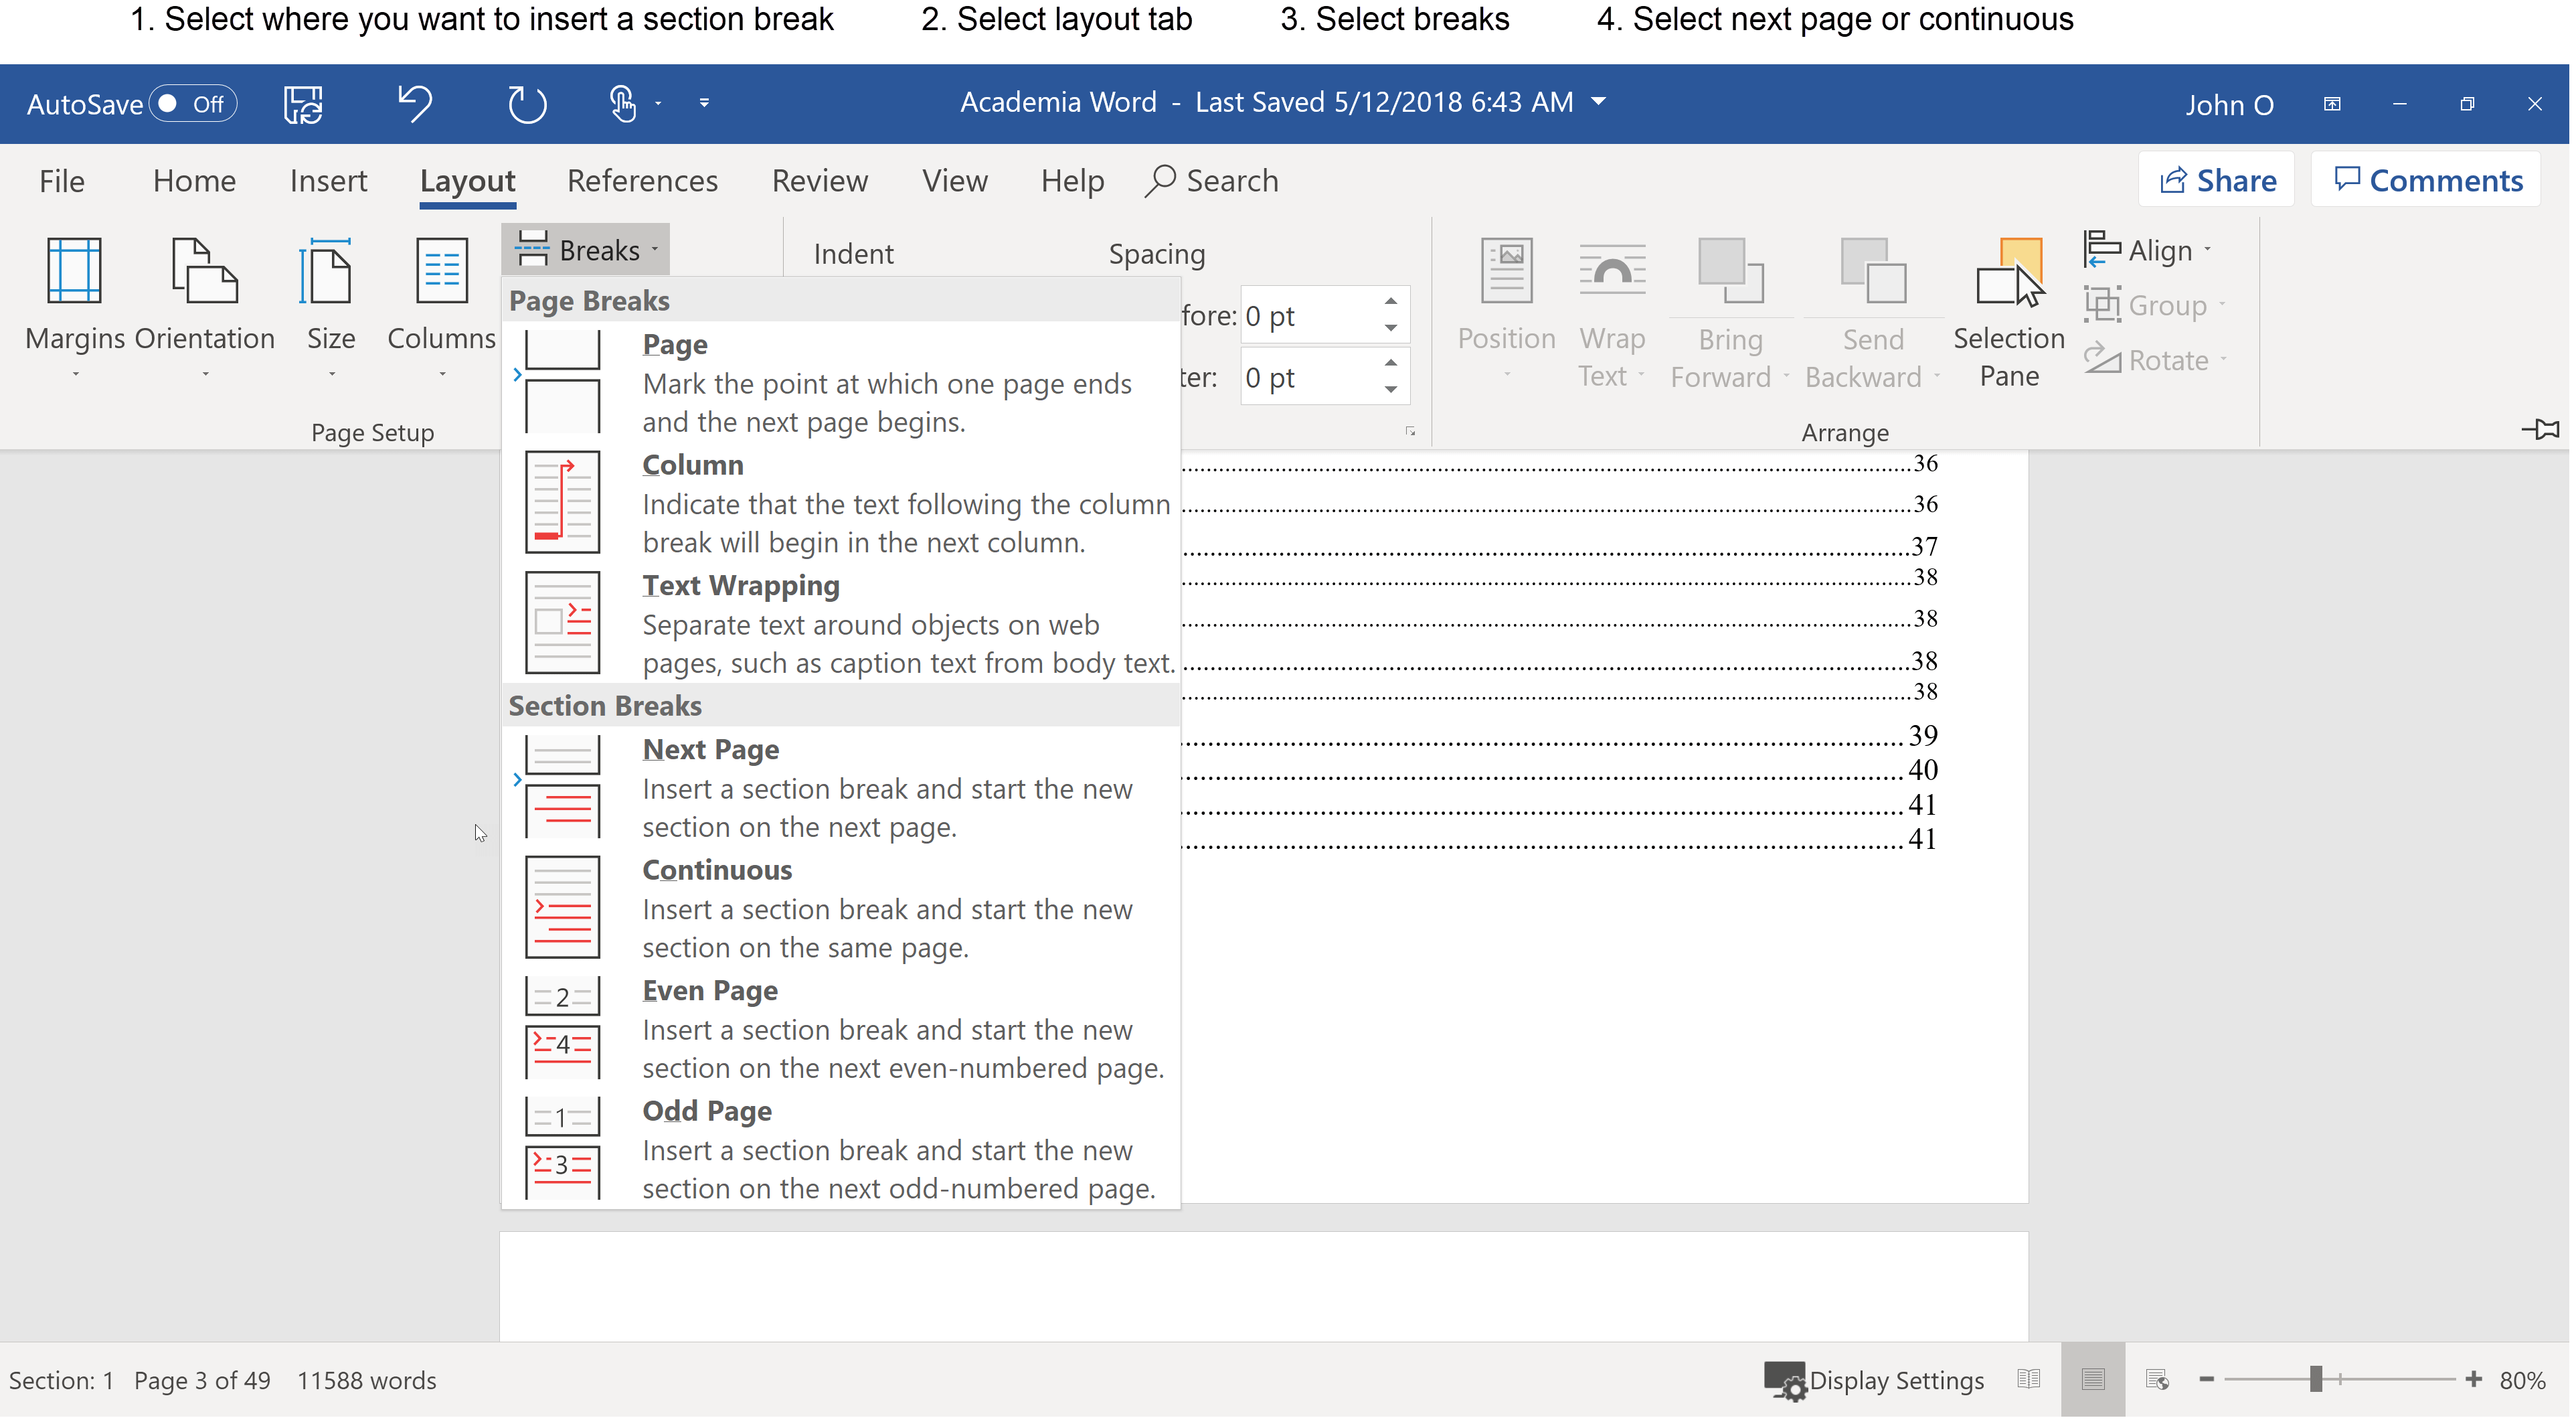 Figure 4. How to create a section break in a Word document
Decide where in your document you want to insert a section break.
For example, a section break should be inserted at the end of the Table of Contents if the next page is the main document.
To insert a section break:
- Select where you want to place the section break
- Select the layout tab
- Select breaks
- Select Next Page or Continuous
Select next page to put the section break on the next page.
Be careful you do not insert an extra page if you already have a page break there.
Select continuous to insert on the same page. This is good if you already have a forced page break there.
How to Format Page Numbers the Way You Want in Word
You use the footer of the page to format your page numbers.
Suppose you have a piece of academic writing (e.g. thesis, report, assignment) that has a title (or cover) page, a table of contents page, and then the main part of the writing.
The Title page is the first page of the word document.
The Table of Contents page is the second page (and more if necessary) of the word document. You may also have a List of Figures and/or List of Tables.
The main body of work are the pages after the Table of Contents (and List of Figures and List of Tables if present).
If you insert page numbers as before, you will get the following in this example:
 Figure 5: Page numbering starting at 1 from the Title Page
Note that the Title page, has Page number 1, the Table of Contents pages 2 and 3, and the main document has page number 4.
However, for most academic writing, you will need something like the following:
- the Title page with no page number
- the Table of Contents (or Contents) pages numbered using Roman numerals (i.e. i, ii, iii etc.)
- the main body pages numbered using Arabic numbers (i.e. 1, 2, 3 etc.), starting with number 1.
 Figure 6: Academic writing with no page number for the Title Page and then a combination of Arabic and Roman numerals for page numbers
You can do this by dividing your document into sections, and formatting the page numbers in Word differently in each section.
Detailed instructions on how to do this are given below.
1. Insert a Section Break Between the Title and Contents Pages
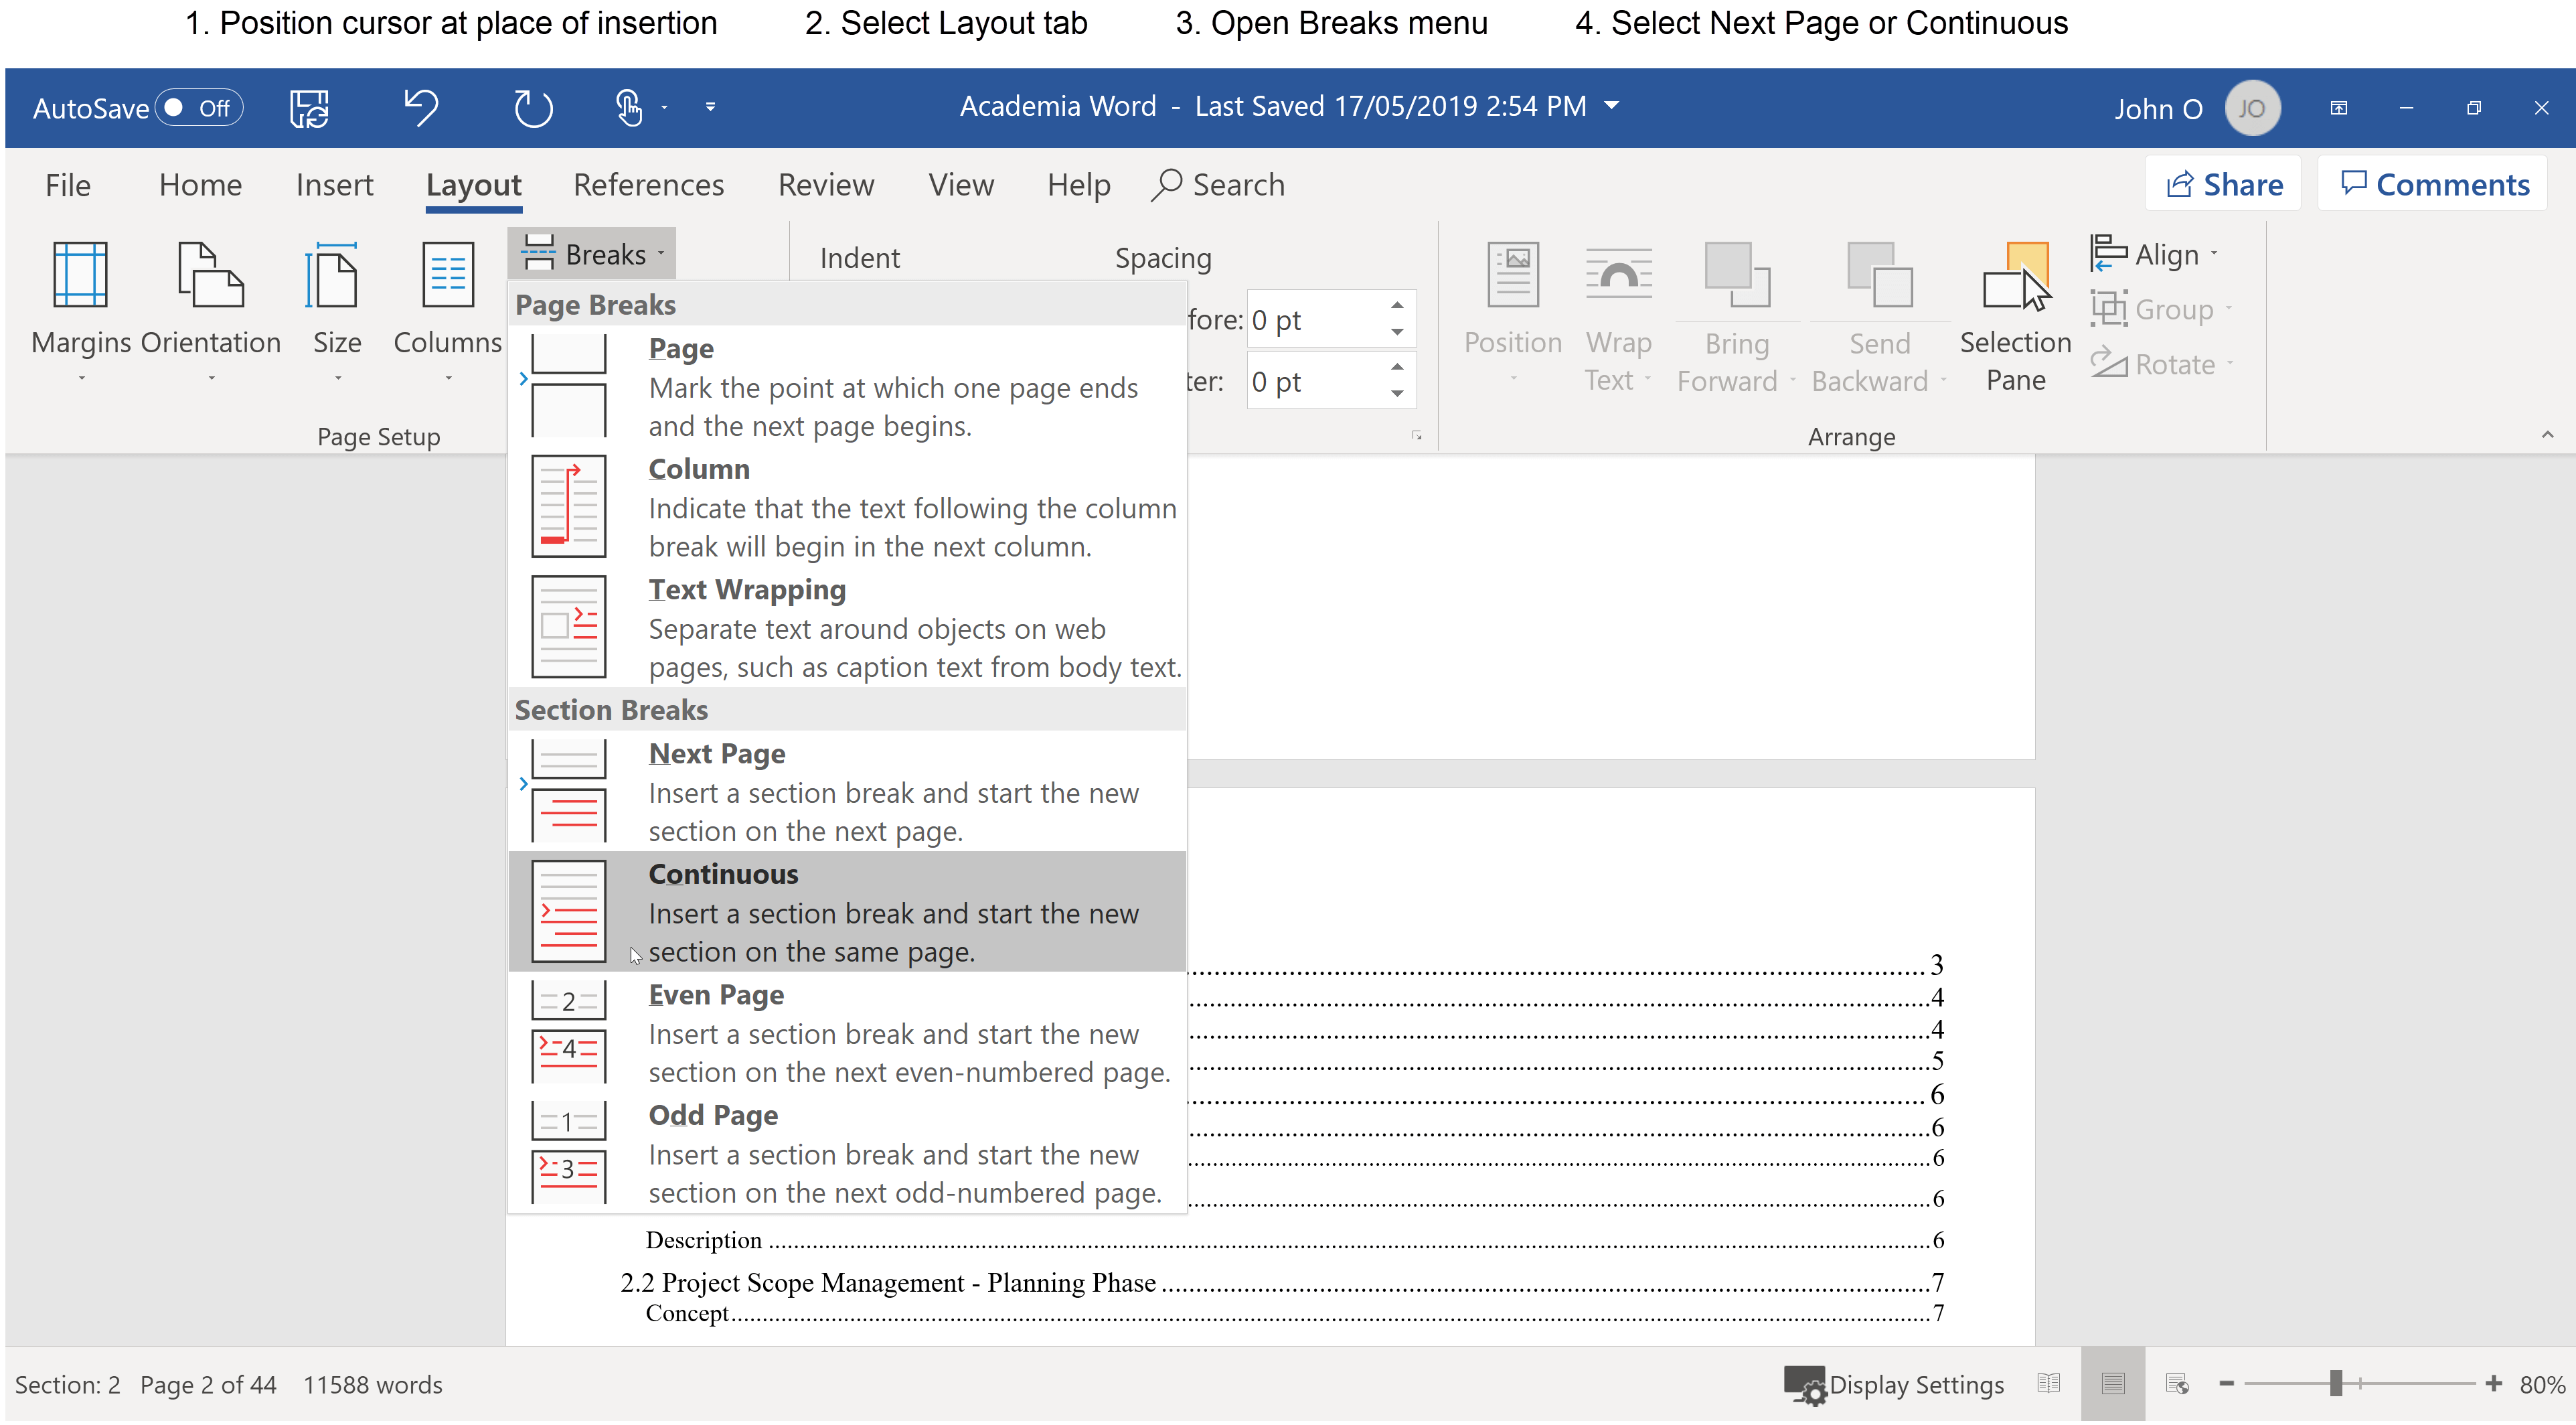 Figure 7: How to insert a section break between the Title Page and the Table of Contents pages
Assuming you have created the Title page and Table of Contents in the academic text (for example, thesis, report), create the first section break as follows:
- Position the cursor at the end of the Title Page or the beginning of the Table of Contents (Contents) page
- Select the Layout tab from the ribbon
- Open the Breaks menu
- Select Continuous under Section Breaks.
N.B. If there is no page break between the Title page and the Table of Contents (Contents) page, choose Next Page instead of Continuous. This will start the next section on a new page.
It is your decision whether to insert the section break before or after the Table of Contents is created.
I create my Title page and then insert a section break (new page). I then insert another section break (new page) so there is a title page (Section 1), blank page for the Table of Contents to be inserted (Section 2) and then the following pages are for the main document (Section 3).
If you have other preliminary pages, such as a List of Figures or List of Tables, follow the same procedure as for the Table of Contents - that is insert a section break (new page) for each.
Do not worry if you do not set up the sections at the start - you can always add them later!
2. Insert a Section Break Between the Table of Contents Pages and Main Text
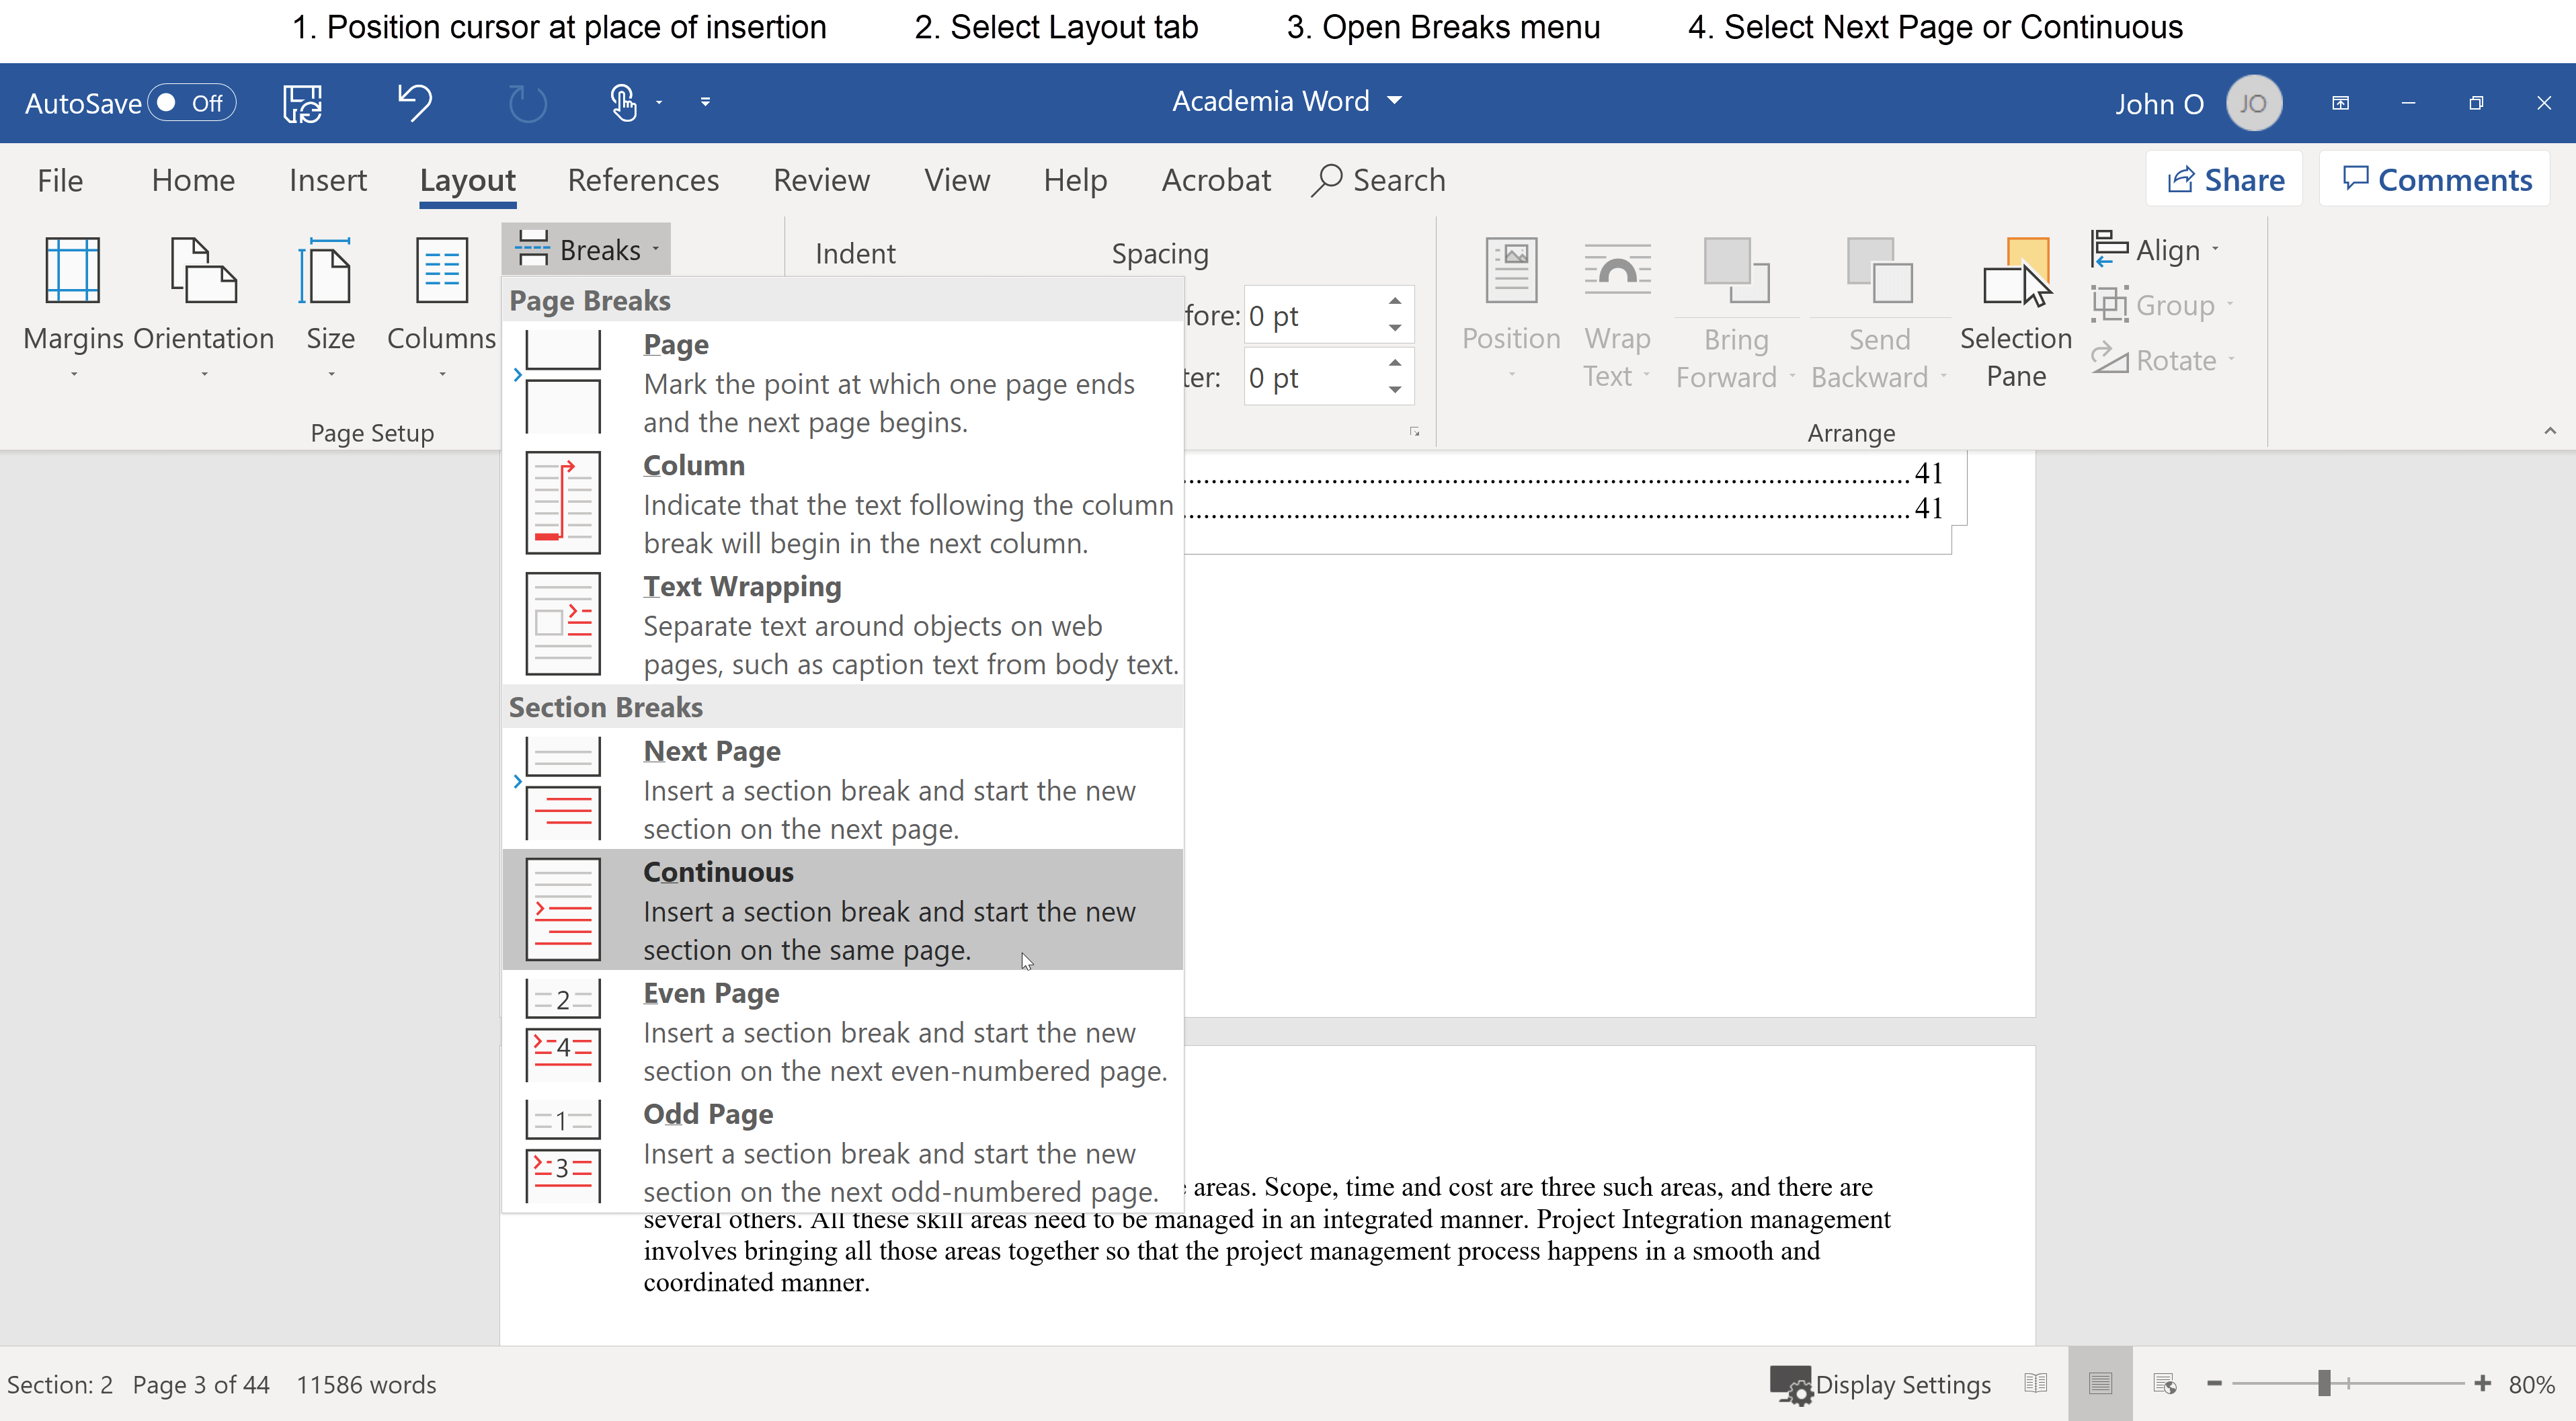 Figure 8: How to insert a section break between the the Table of Contents pages and the main text
You need to create one further section break to separate the preliminaries from the main text of academic writing.
Create the next section break as follows:
- Position the cursor at the end of the Table of Contents (or Contents) page or at the beginning of the next page of the main text.
N.B. If you have not yet generated the Table of Contents, create a blank page to place it in the future. - Select the Layout tab from the ribbon
- Open the Breaks menu
- Select Continuous under Section Breaks
N.B. If there is no page break between the Contents page the rest of the document, choose Next Page instead of Continuous. This will start the next section on a new page.
If you have other preliminaries such as a List of Figures or List of Tables, then insert the section break after the last one.
3. Remove Linkage Between Title Page and Contents Pages Footers
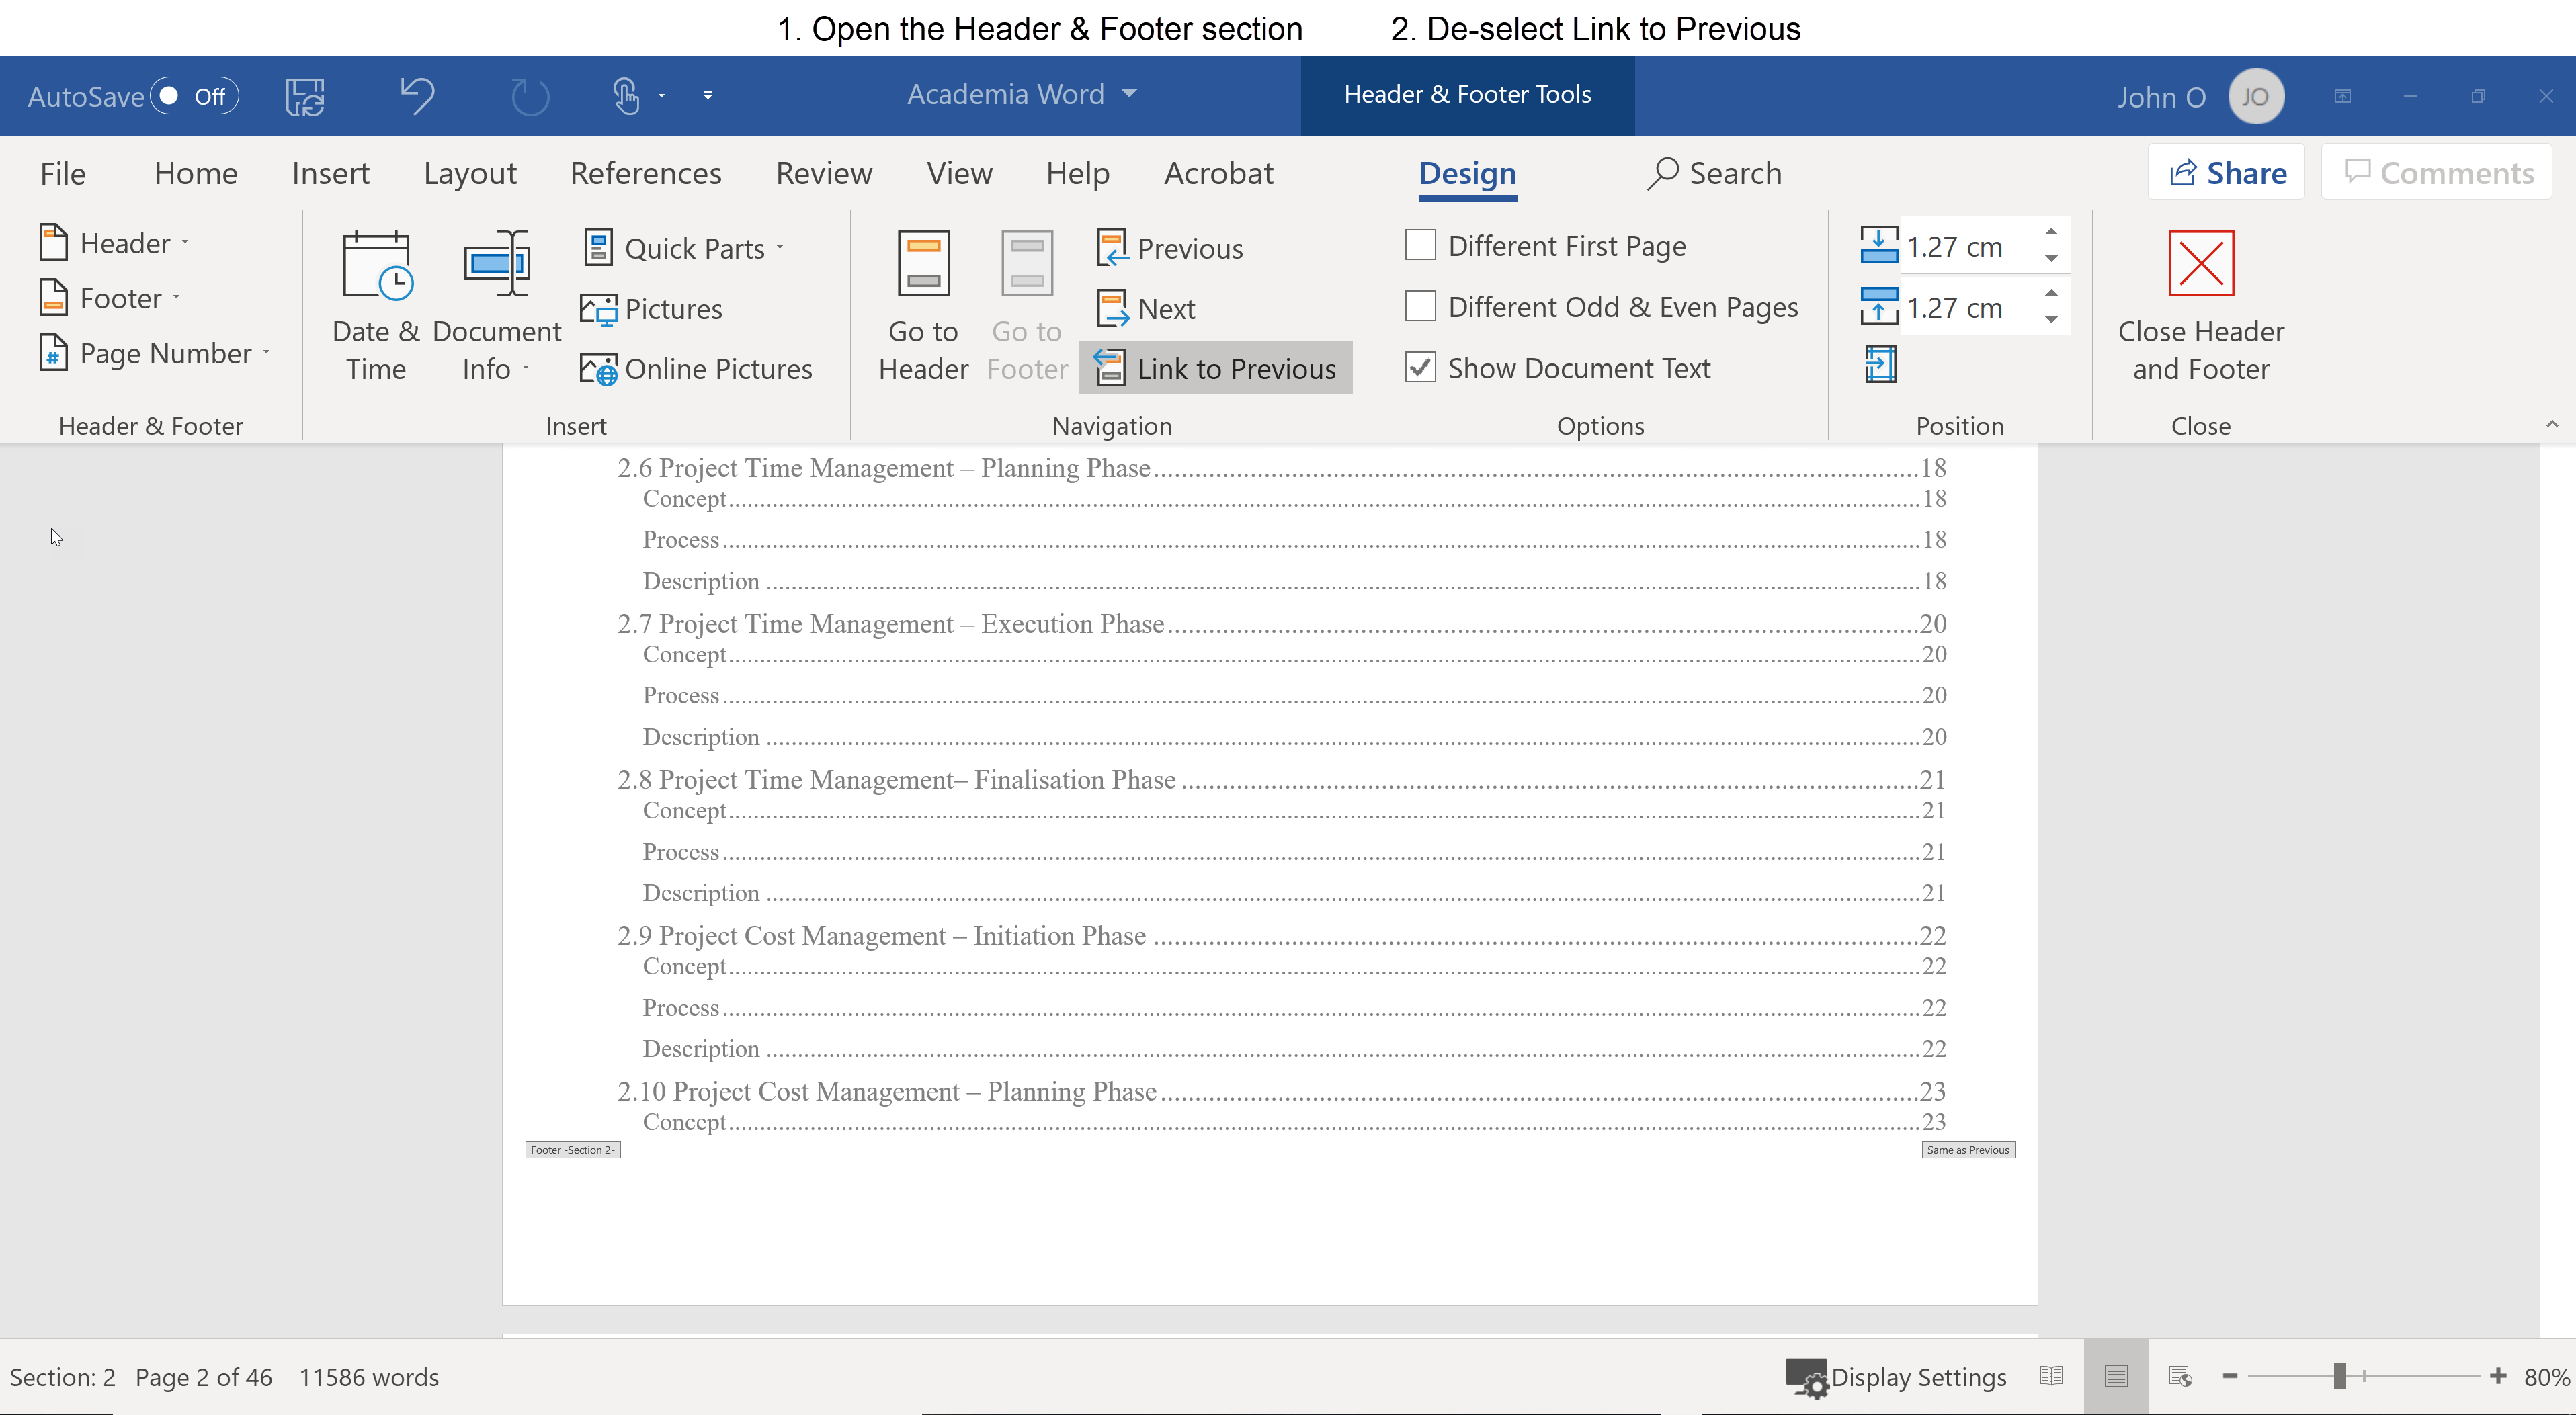 Figure 9: Remove linkage between Title page footer and the Table of Contents pages footer
So far you have created three sections:
- Section 1 for the Title page
- Section 2 for the Table of Contents (or just Contents pages)
- Section 3 for the main document
Currently, the header and footer in each section will use the information contained in the previous section (you can see that the Link to Previous in the screen capture is on).
So if you have 1 for the page number of the Title page, the Table of Contents page will start with page number 2, and so on.
If you have no page number, then subsequent pages will have no page number.
To stop the Section 2 footer from using the information from the Section 1 footer:
- Open the footer on any page in the Table of Contents (Section 2 in this example).
N.B. (double click in the blank space at the bottom of the page) - Select "Link to Previous" (Header & Footer Tools - Design - Link to Previous in Navigation Group). The Link to Previous button should not be grayed out now.
Note - this will only remove the linkage in the footer because I have selected the page number to be in the footer. If your page number is in the header, the process is the same. You work on the header instead of the footer.
4. Remove Linkage Between Contents Pages and Main Text Footers
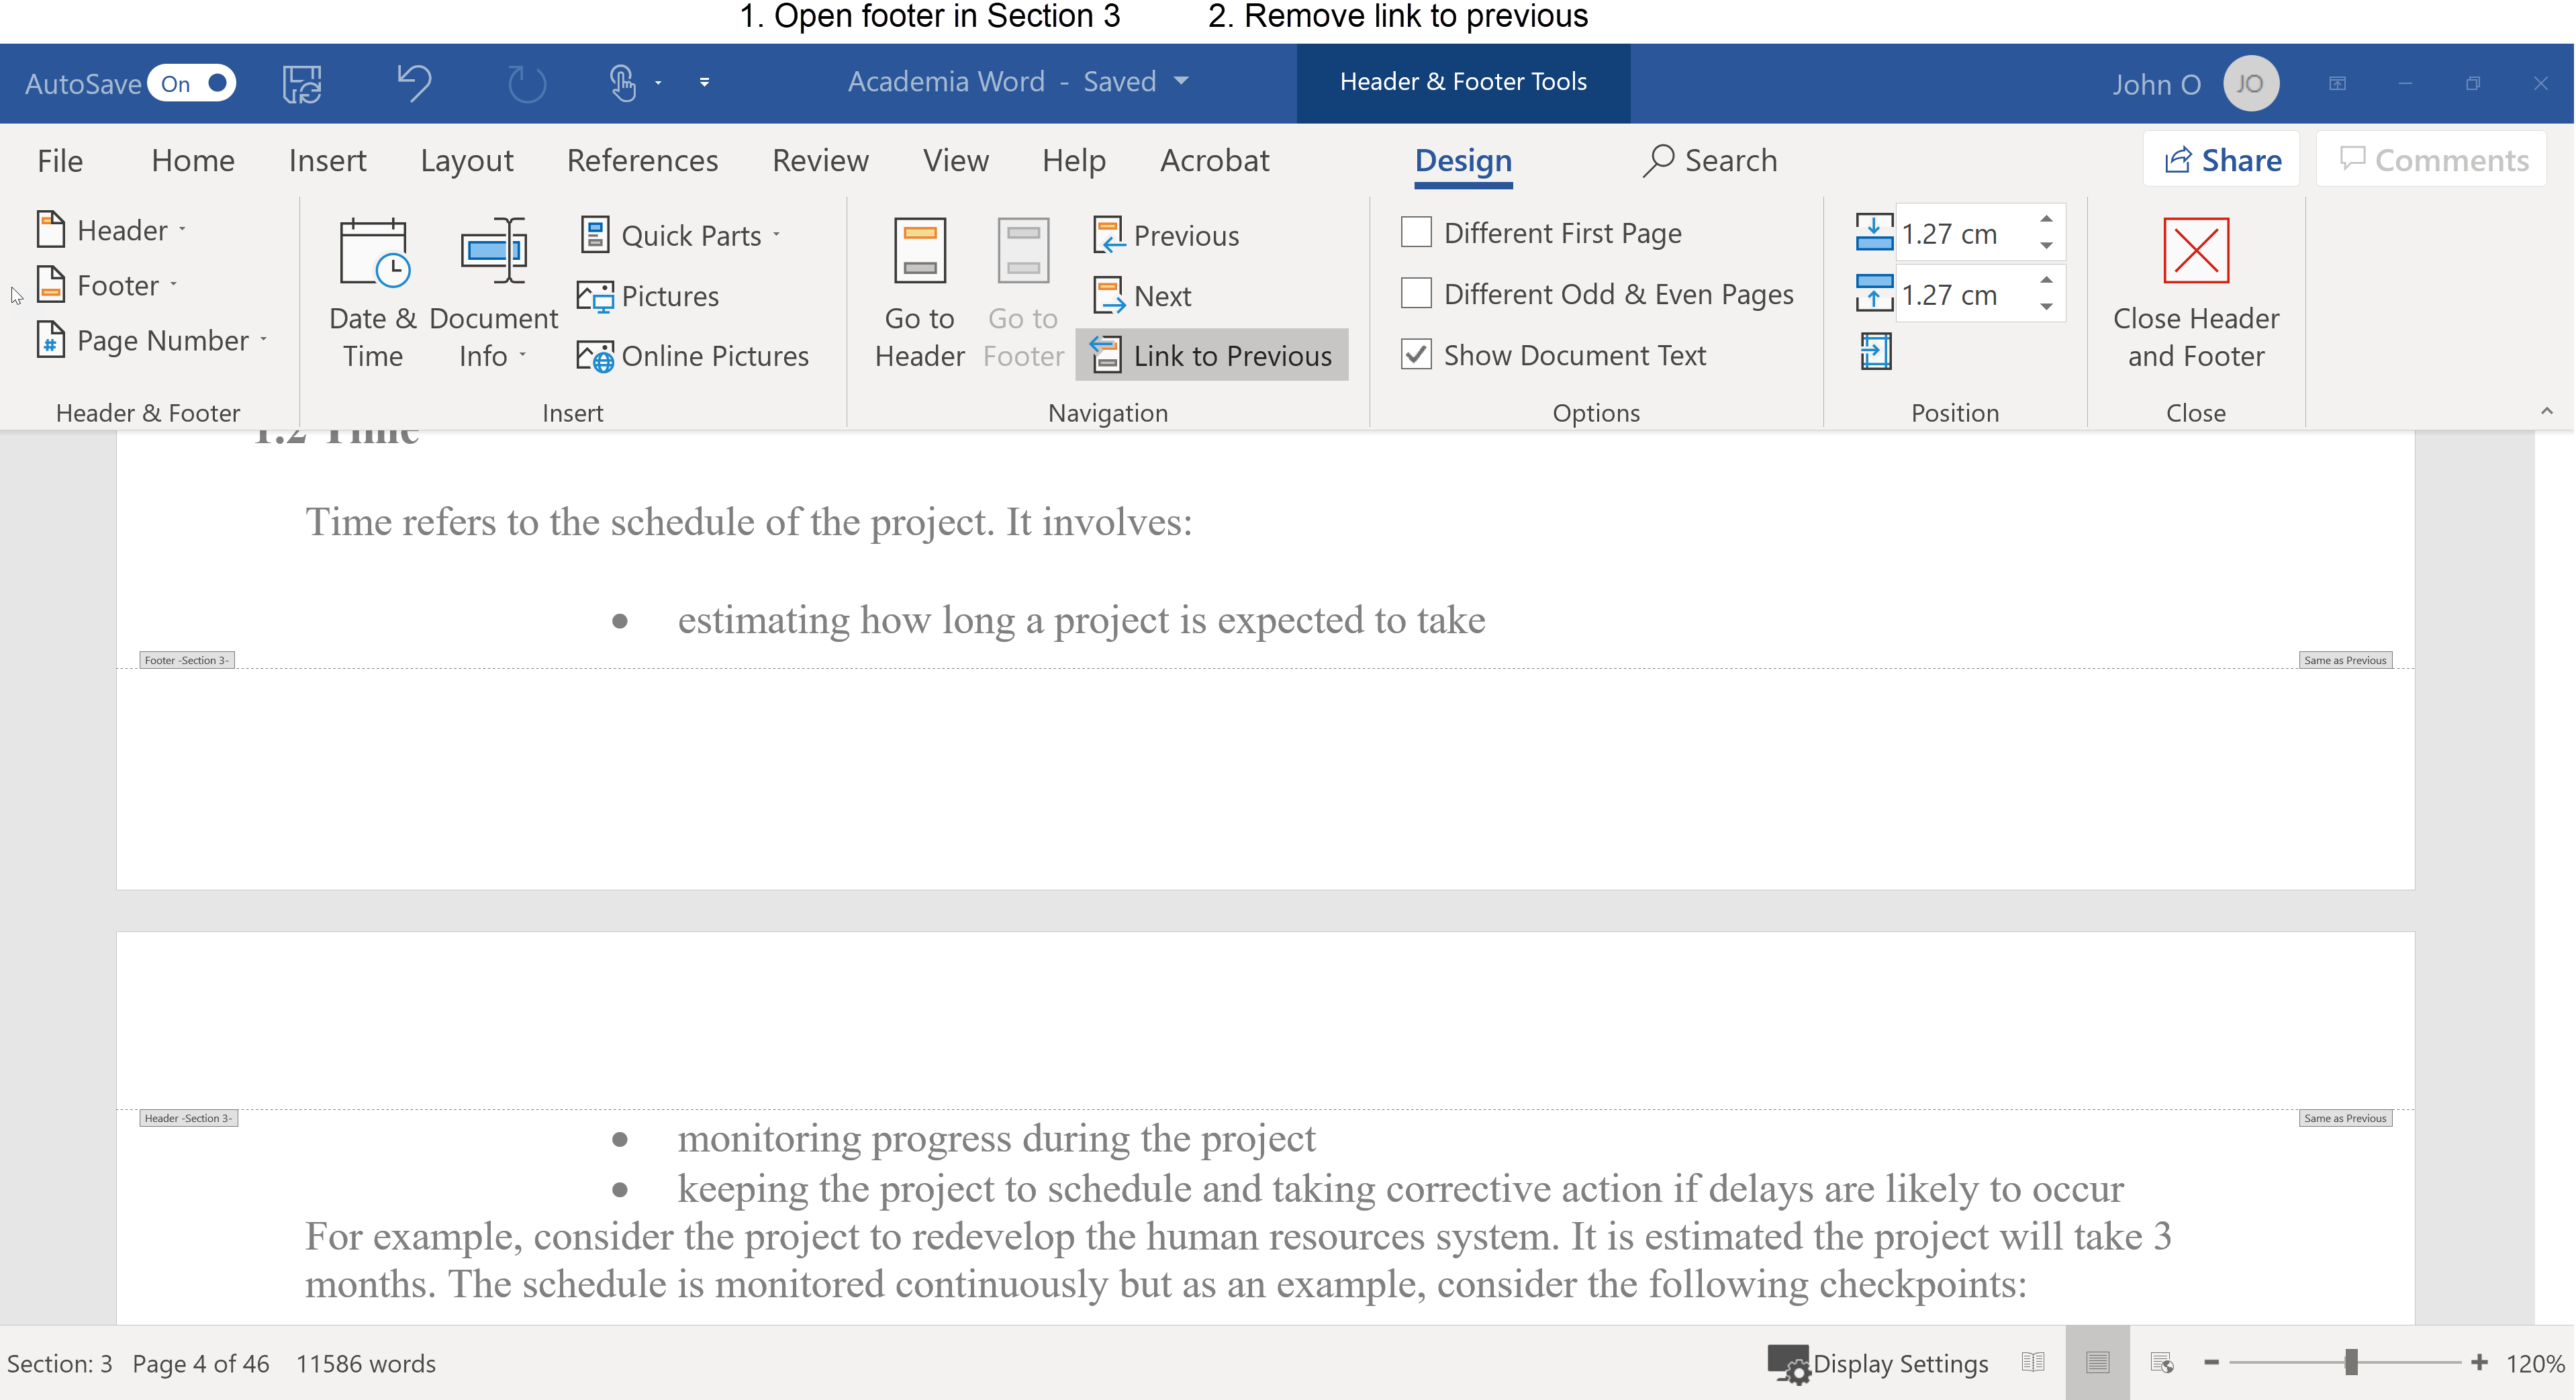 Figure 10. Remove linkage between the Table of Contents pages footer and the main document footer
So far you have created three sections and removed the Link to Previous in the footer of Section 2.
The footer in Section 2 will not use the Section 1 footer information.
Now, you need to repeat the process so that the Section 3 footer will not use the Section 2 footer information.
To stop the Section 3 footer from using the information from the Section 2 footer:
- Open the footer in any page of Section 3 of the main document following the Table of Contents.
N.B. (double click in the blank space at the bottom of the page) - Select "Link to Previous" (Header & Footer Tools - Design - Link to Previous in Navigation Group). The Link to Previous button should not be grayed out now.
You have now setup the footers in Section 1, 2 and 3 to format the page numbers in Word differently in each Section.
5. Format the Title Page Number
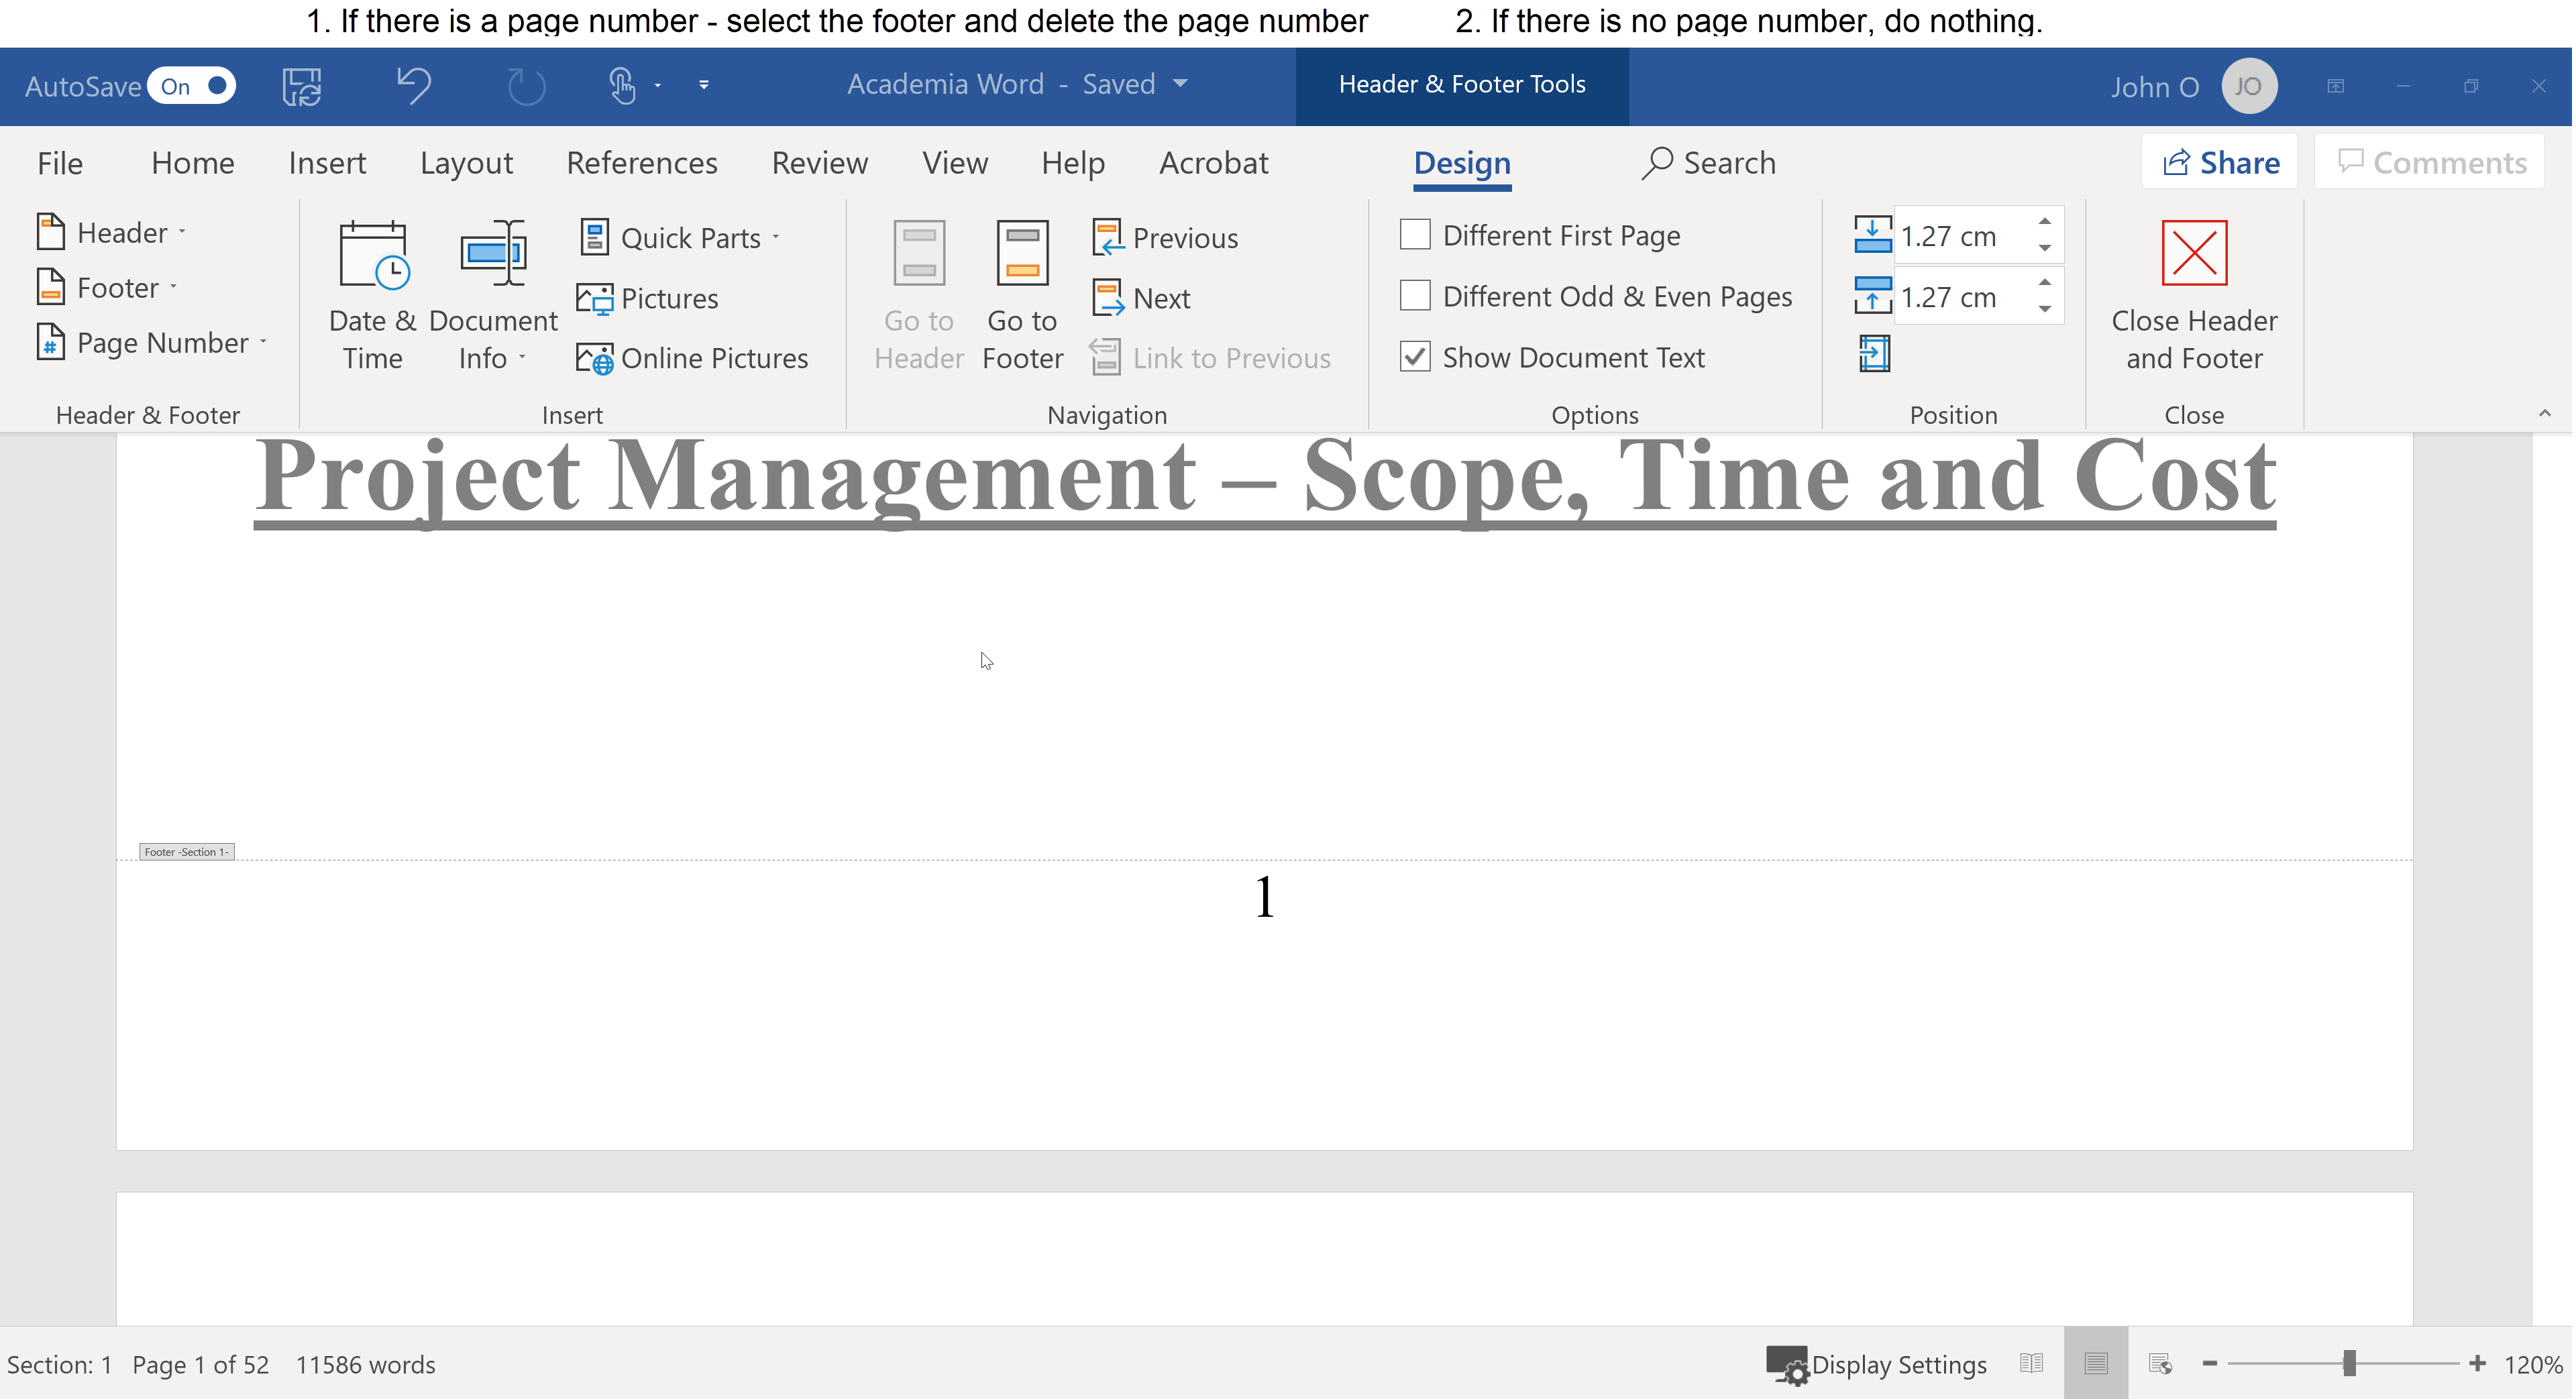 Figure 11. Deleting the page number from the Title Page
The Title page (or the cover page) usually does not have a page number unless specified by the academic standard you are bound by.
For example, the APA standard requires a page number on every page (including the Title page) in the header.
I will assume no page number is required for this Title page.
If there is a page number there already (maybe you inserted page numbers earlier) then:
- select the footer in Section 1 (double click at the bottom left hand corner of the Title Page)
- select the page number and delete it
Do nothing if there is no page number.
Remember - what you do in the footer of section 1 will not affect the footer in section 2 because you have removed the Link to Previous.
6. Insert Roman Numeral Page Numbers in the Table of Contents
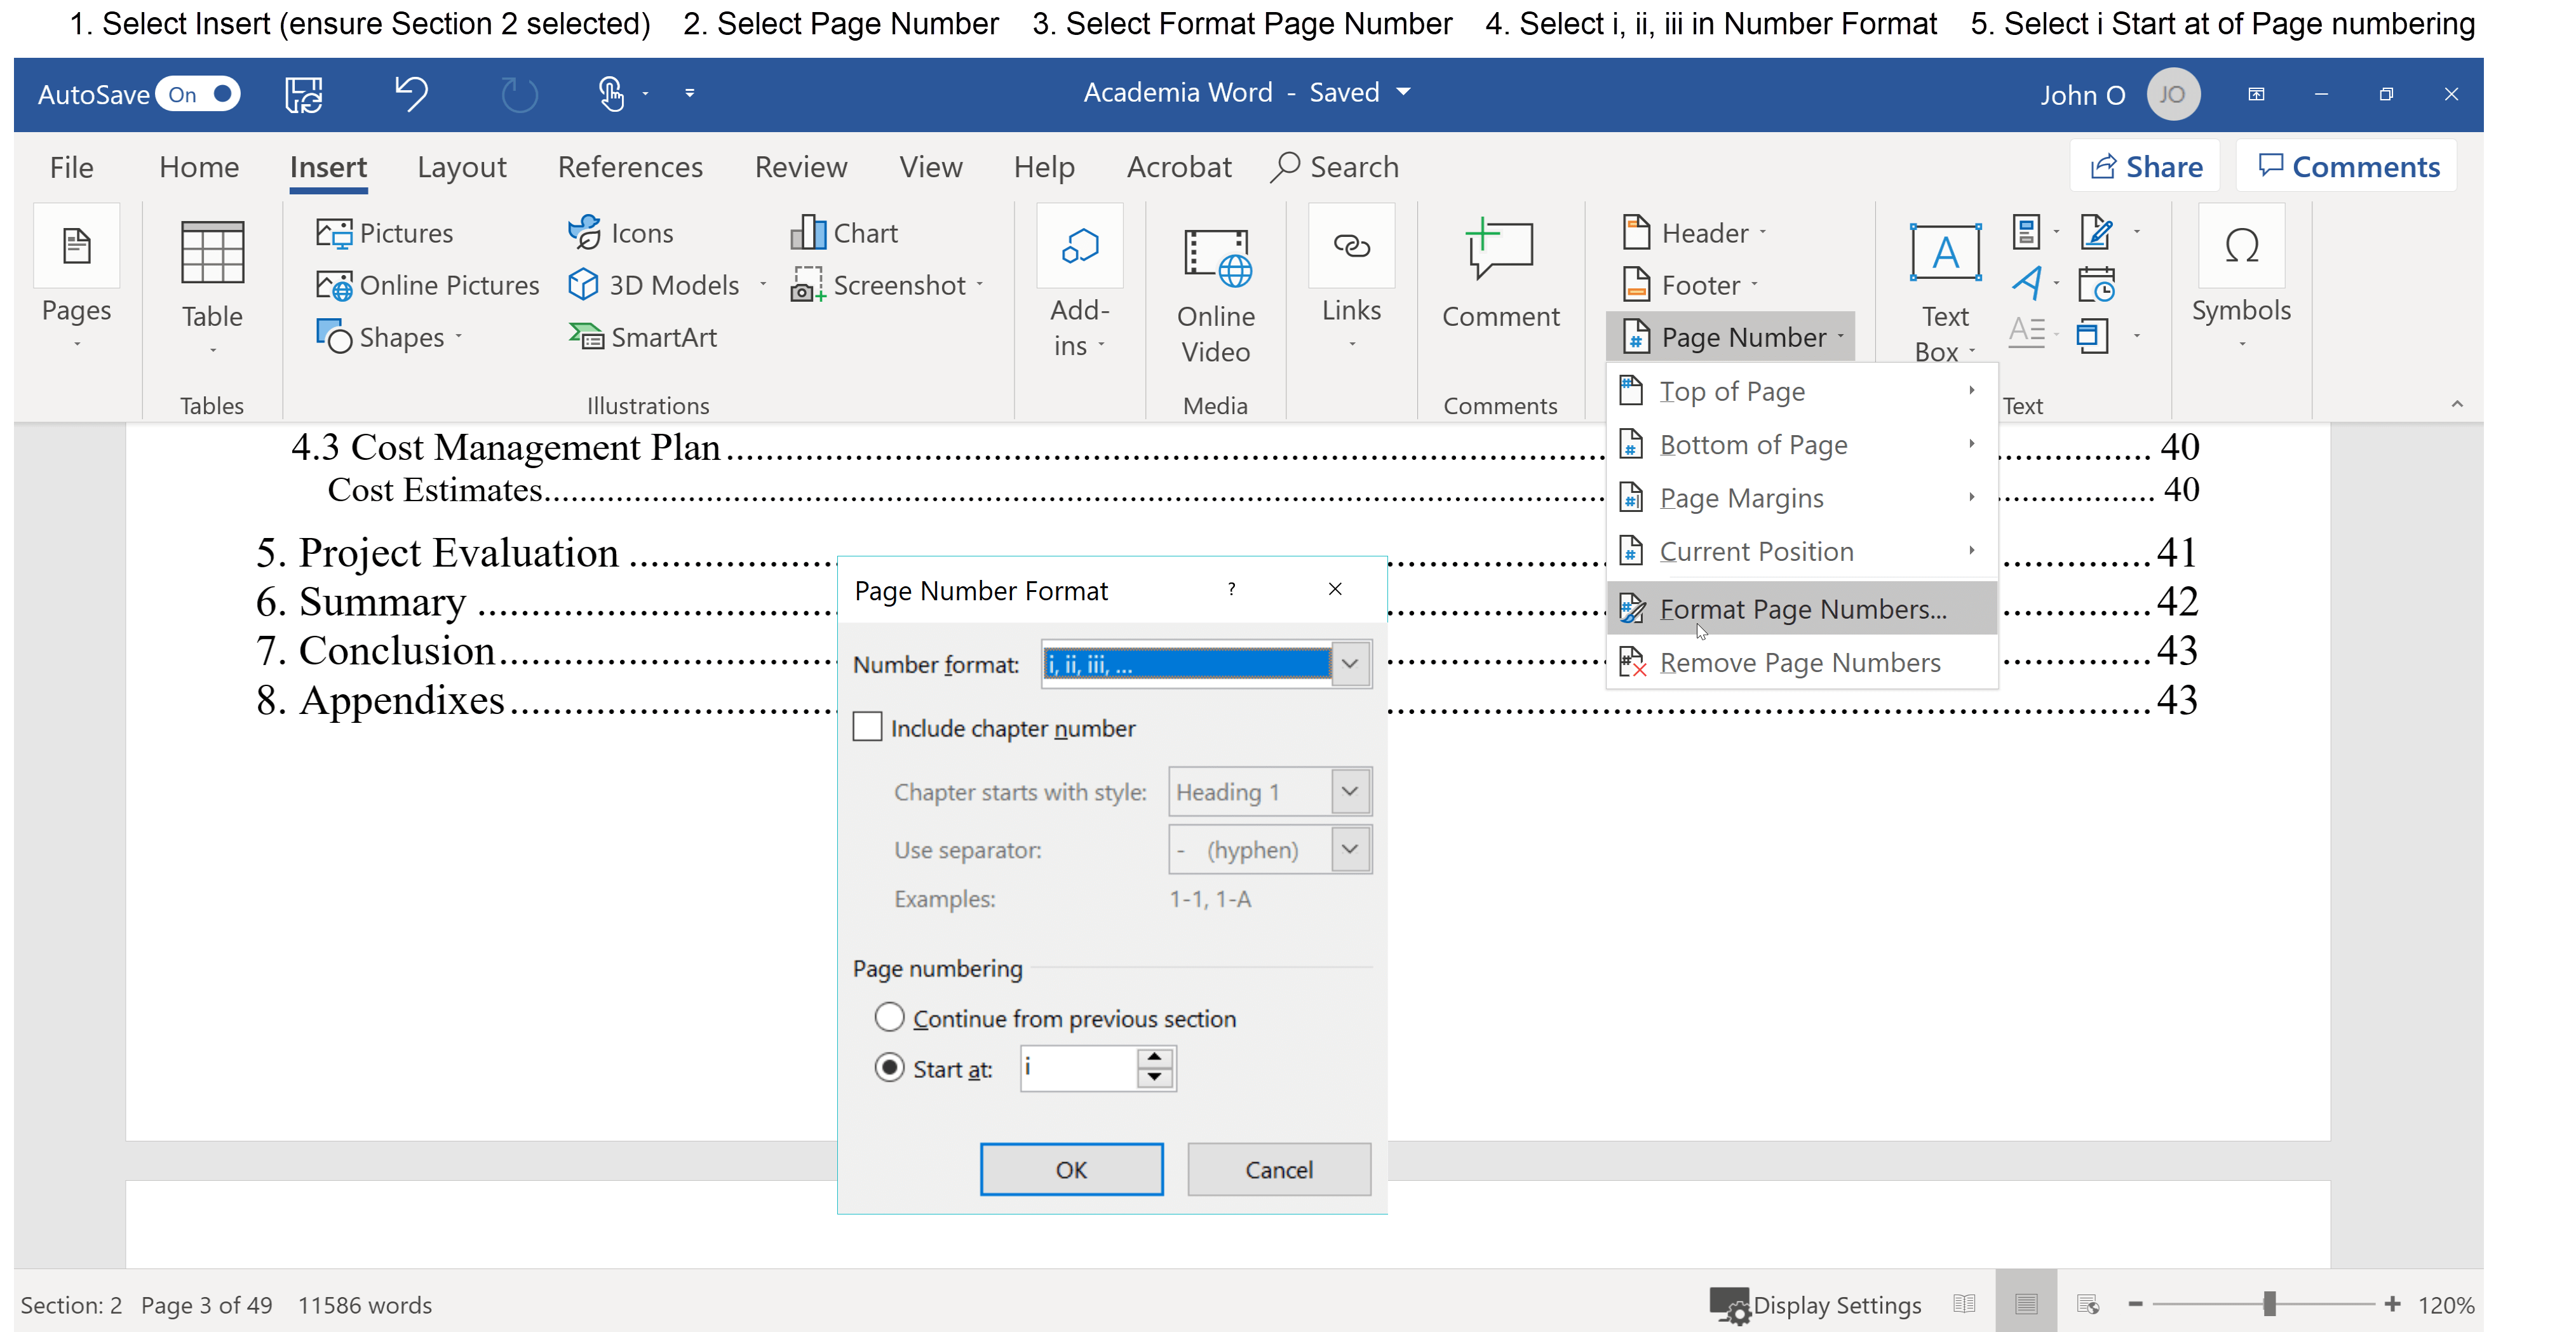 Figure 12: How to format the Table of Contents page numbers in Word in Roman Numeral (i, ii, iii...) format
The next step is to insert page numbers in Word in the Roman numeral format (i, ii, iii......) in the Table of Contents.
The first step is to format the page numbers in Roman numeral format as follows:
- Select Section 2 (click at the beginning or end of the Table of Contents)
- Select the Insert tab
- Select Page Number from the Header & Footer group
- Select Format Page Numbers from the Drop Down menu ( a new Window called Page Number Format will appear)
- Select i, ii, iii, ... from the Number Format
- Select "Start at" radio dial and enter i if not already there (the page numbering in Section 2 will start at i).
Note: Instead of selecting the Insert tab, you can open the footer in Section 2 (double click bottom left hand corner), then select Page Number in the Header & Footer area and follow the same procedure as above).
You have now set up the page number style to Roman numerals. Now you need to insert the page numbers in Word into your Table of Contents.
See How to Insert Page numbers in Word if you are unsure how to insert page numbers.
7. Insert Arabic Page Numbers in the Main Text
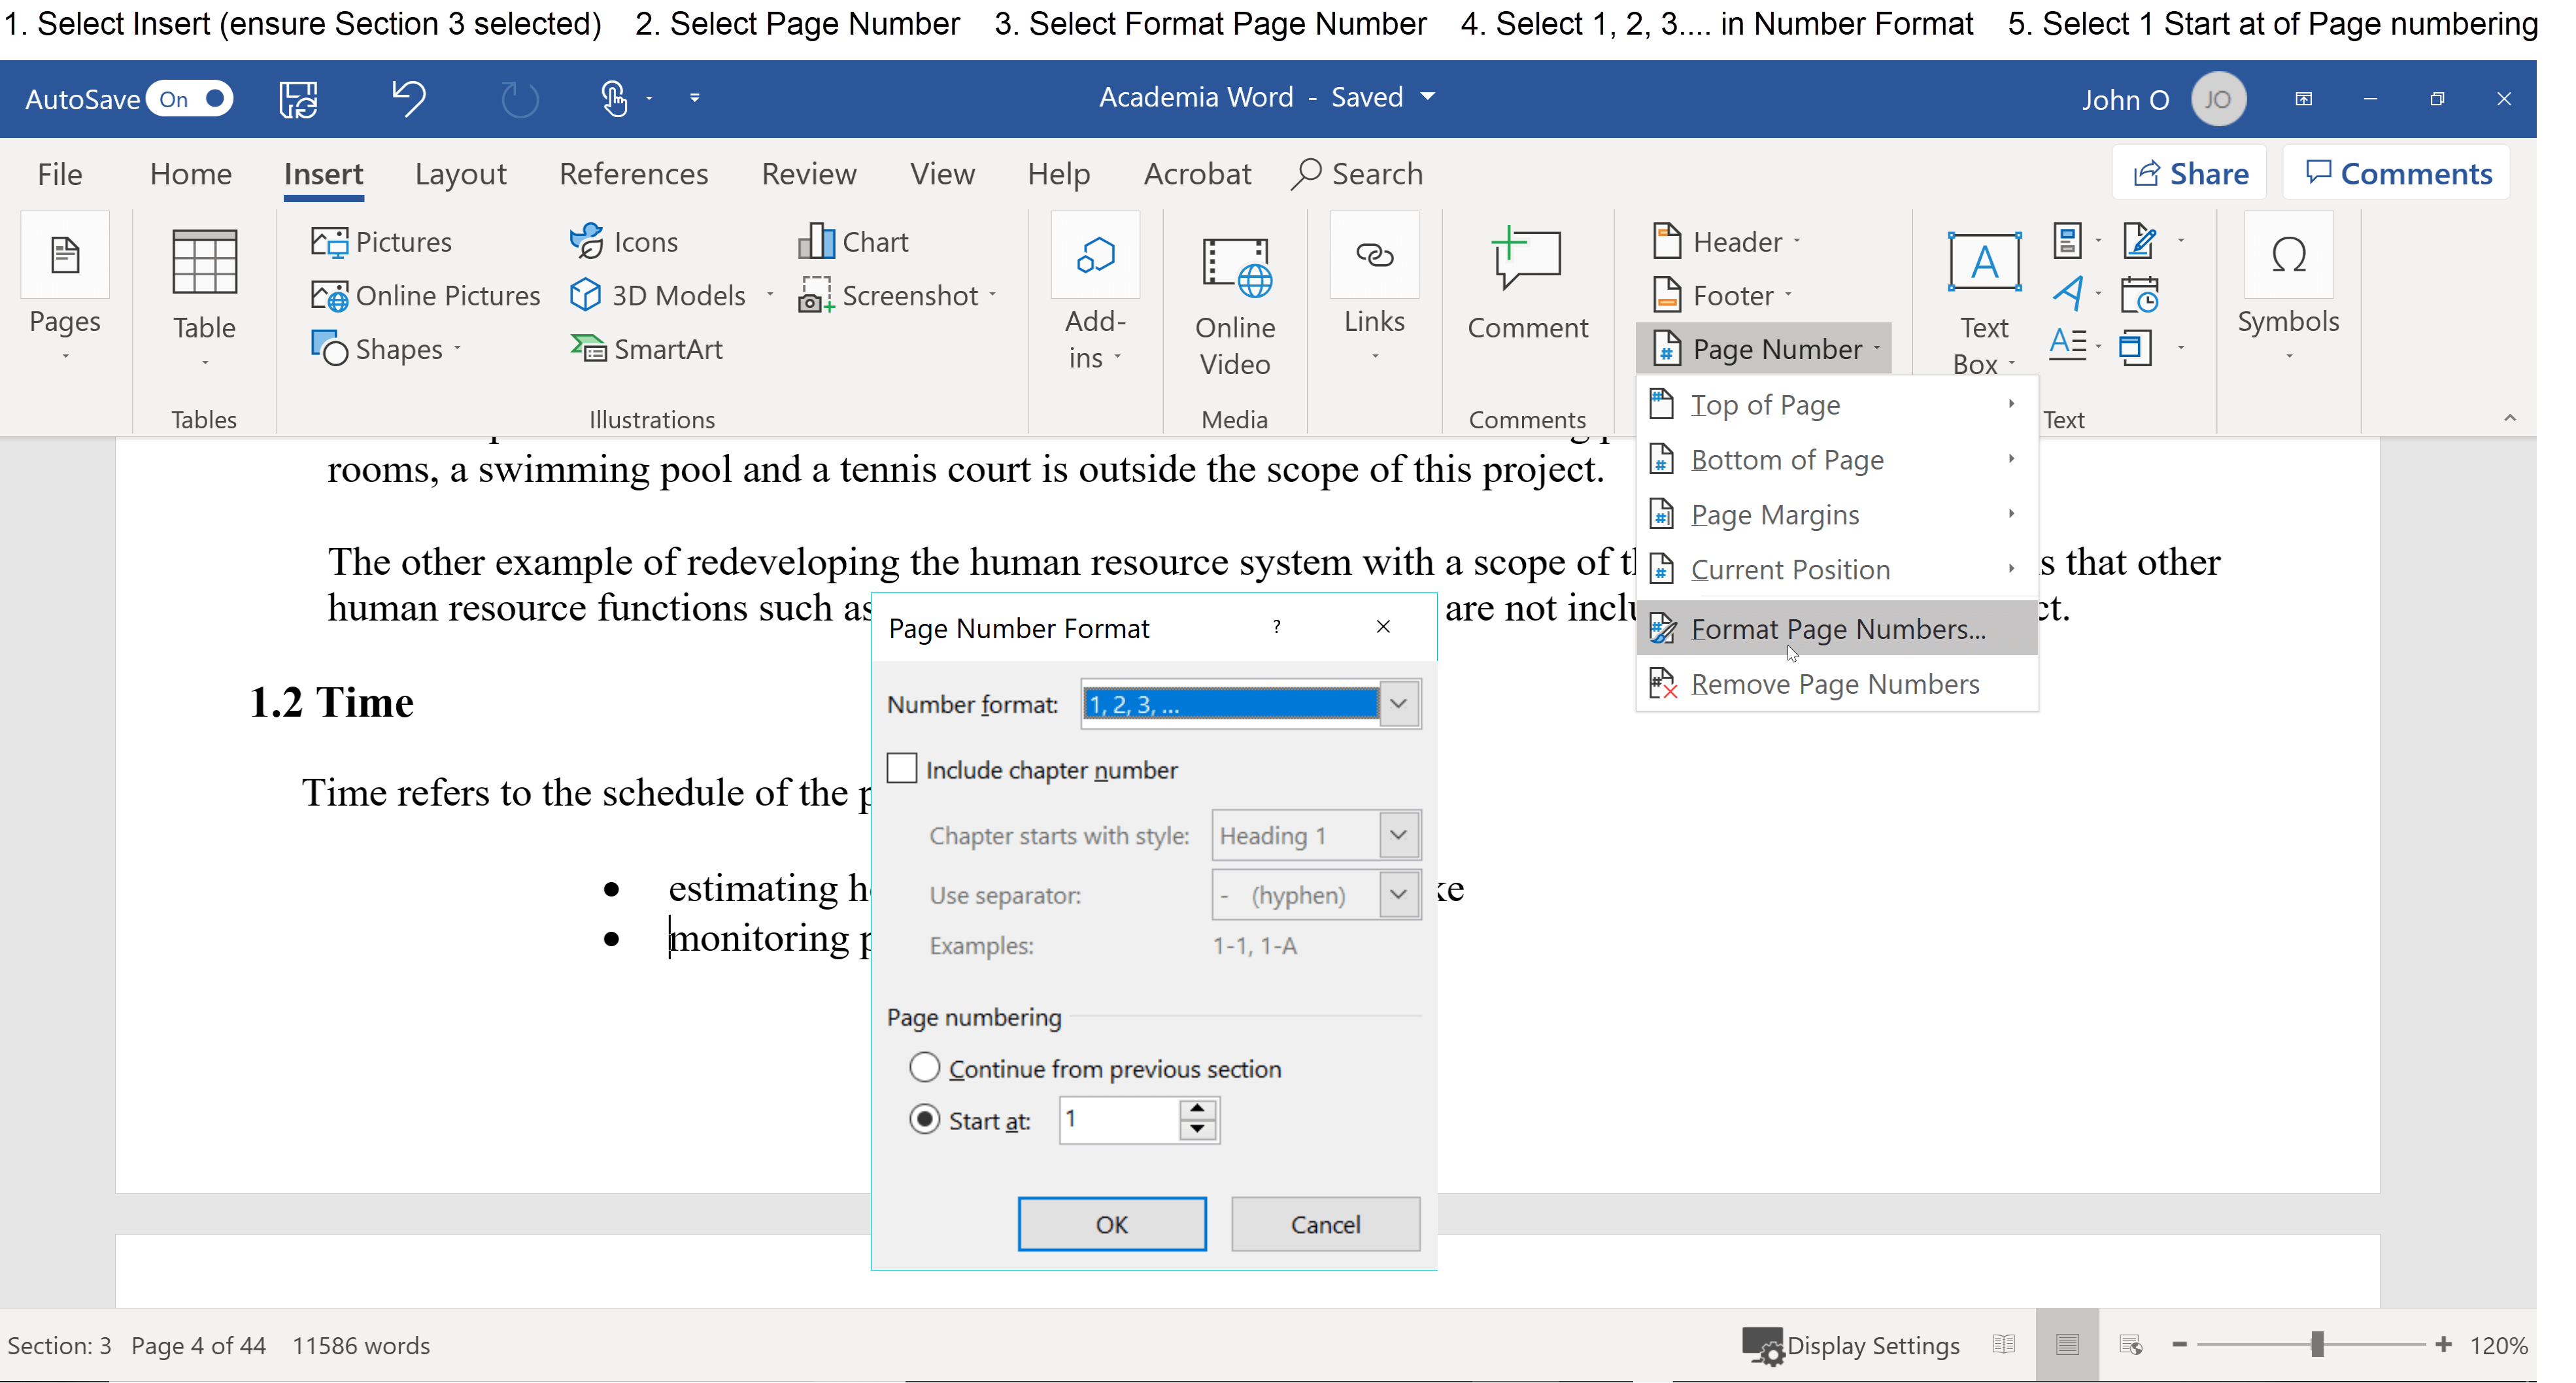 Figure 13: How to format the main text page numbers in Word in Arabic Numeral (1, 2, 3...) format
If there are no page numbers in the main text, or the page number is not in the format you want (that is, Arabic numbers starting with 1) then you need to insert the page numbers.
The first step is to format the page numbers in Word in Arabic number format as follows:
- Select Section 3 (click anywhere in the main text, for example, on the first page after the Table of Contents)
- Select the Insert tab
- Select Page Number from the Header & Footer group
- Select Format Page Numbers from the Drop Down menu ( a new Window called Page Number Format will appear)
- Select 1, 2, 3, ... from the Number Format
- Select "Start at" radio dial and enter 1 if not already there (the page numbering in Section 3 will start at 1).
Note: Instead of selecting the Insert tab, you can open the footer in Section 2 (double click bottom left hand corner), then select Page Number in the Header & Footer area and follow the same procedure as above).
You have now confirmed or set up the page number style to Arabic numbers. Now you need to insert the page numbers into Section 3 of your document.
See How to Insert Page numbers in Word if you are unsure how to insert page numbers.
Summary
Page numbers in academic writing are important and required for reasons stated previously.
Inserting simple page numbers in Word documents (starting with page number 1) on the first page is quite easy.
Inserting page numbers in Word documents which are formatted differently in different parts of the document (for example, i, ii, iii and 1, 2, 3) requires some extra steps.
These steps are simple to do, and you will have a valuable skill for your writing to follow.