- Home
- Headings
Headings in APA Format
Headings in APA format are as follows:
- Level 1 Headings
- centered
- bold
- written in title case
- Level 2 Headings
- left aligned
- bold
- title case
- Level 3 Headings
- left aligned
- bold
- italic
- title case
- Level 4 Headings
- indented (0.5 inches or 1.27 centimeters) in the first line of the paragraph
- bold
- ending with a period
- title case
- Level 5 Headings
- indented (0.5 inches or 1.27 centimeters) in the first line of the paragraph
- bold
- italic
- ending with a period
- title case
The Microsoft Word screenshots below show you how to create your headings in APA format.
You may not need five levels—two or three levels is often sufficient.
Level 1 is the main heading of a section (like a chapter in a book).
Level 2 is a subheading of Level 1, Level 3 a subheading of Level 2 and so on.
Scroll down, or go straight to:
Reminder - APA headings should be in Title Case - see Title Case Rules.
Written instructions are also provided if you need them.
Level 1 Headings in APA Format
Step 1
Please note: APA seventh edition allows various font types and sizes (opens in new window). Choose your font type and size.
However, you must then use that font type and size for all your APA headings and subheadings, and paragraphs.
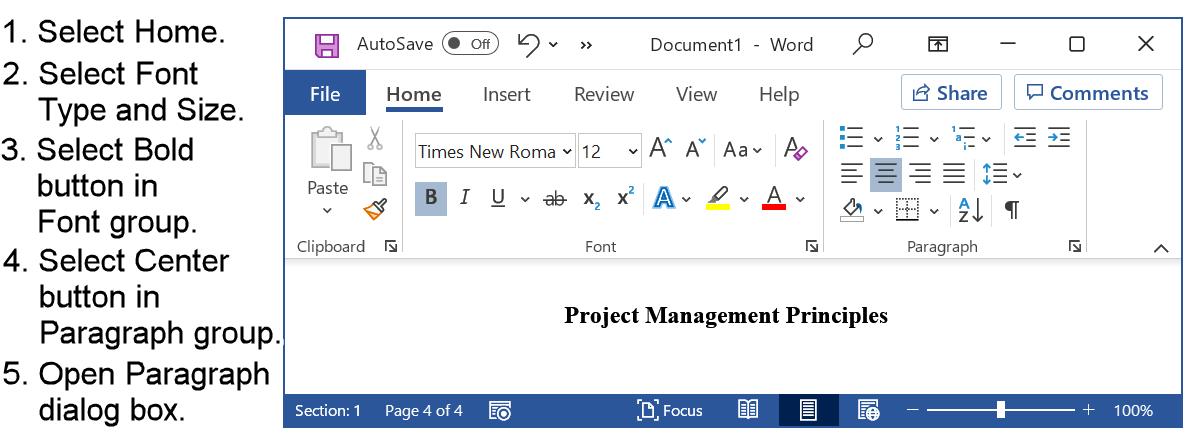 Figure 1: APA Level 1 Heading (Font properties and position)
Figure 1 instructions (if required) are as follows:
- Select the heading text (if necessary).
- Select the Home tab.
- Select the Font you wish to use, for example, Times New Roman.
- Set the Font Size, for example, 12.
- Set the Font style to Bold.
- Select the Centre button in the Paragraph group.
- Open the Paragraph dialog box (bottom right-hand arrow in the Paragraph group).
Step 2
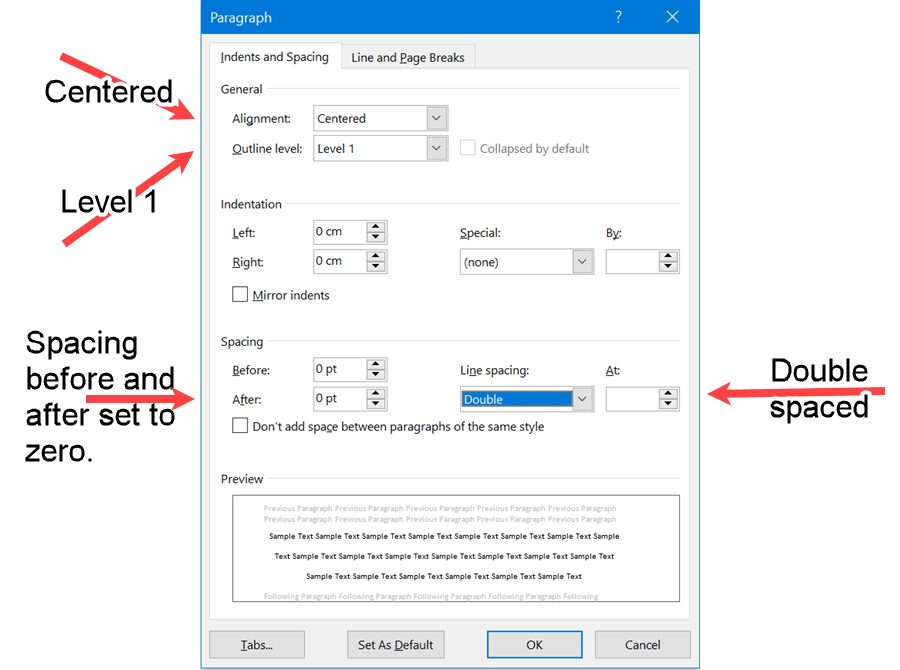 Figure 2: APA Level 1 Heading (Paragraph properties)
Figure 2 written instructions (if required) are as follows:
- Select the Indents and Spacing tab (if not already selected).
- Set Alignment to centered (if not already centered).
- Set Outline level to 1.
This indicates the level of the heading.
It will be required to show an outline of your work and is needed to make a Table of Contents if you have one. - Set Line spacing to Double.
- Set Before and After Spacing to zero (if not already set).
- Select the Line and Page Breaks tab.
Step 3
APA guidelines state "Do not add blank lines above or below headings, even if a heading falls at the end of a page" (see APA headings - opens in new window).
The APA Publication Manual states not to start a new page when a new heading occurs (see p. 39).
APA guidelines state "Do not insert hyphens (manual breaks) in words at the end of a line" (see APA paragraphs - opens in new window).
Strictly following APA guidelines means that the "Don't hyphenate" option is the only one to select. This will stop Microsoft Word from splitting a word at the end of a line, and the beginning of the next.
However, I do not like having a heading by itself at the bottom of a page. Therefore, I would select "Keep with next" to prevent this from happening.
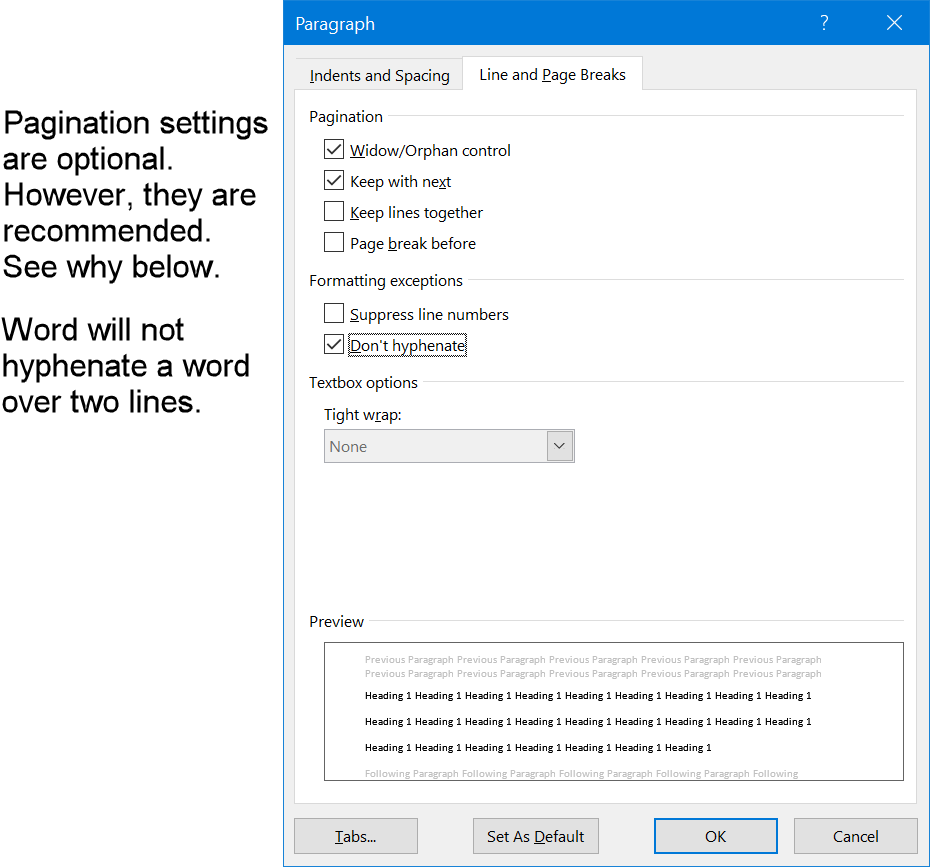 Figure 3: APA Level 1 Heading (Line and page break properties)
Figure 3 written instructions (if required) are as follows:
- Select Widow/Orphan control (if not already selected).
If your heading is two lines long, it will not be split across two pages. - Select Keep with next if you want the heading to always be together with at least the first line of next paragraph. That is, you will not have the heading on one page, and the paragraph on the next page.
Note: APA style says a heading can fall at the end of a page. - Select Don't hyphenate.
Microsoft Word will not hyphenate (i.e., split a word) if your Level 1 Heading goes onto the next line. - Click on OK.
Level 2 Headings in APA Format (Subheading for Level 1 Heading)
Step 1
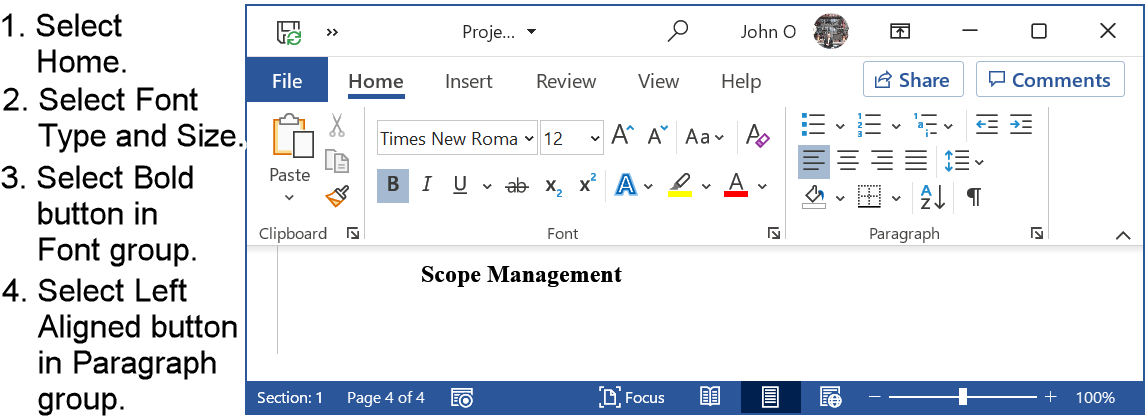 Figure 4: APA Level 2 Heading Font properties
Figure 4 instructions (if required) are as follows:
- Select the heading text (if necessary).
- Select the Home tab.
- Select the Font you are using, for example, Times New Roman.
- Set the Font Size, for example, 12.
- Set the Font style to Bold.
- Select the Left Align button in the Paragraph group.
- Open the Paragraph dialog box (bottom right-hand arrow in the Paragraph group).
Step 2
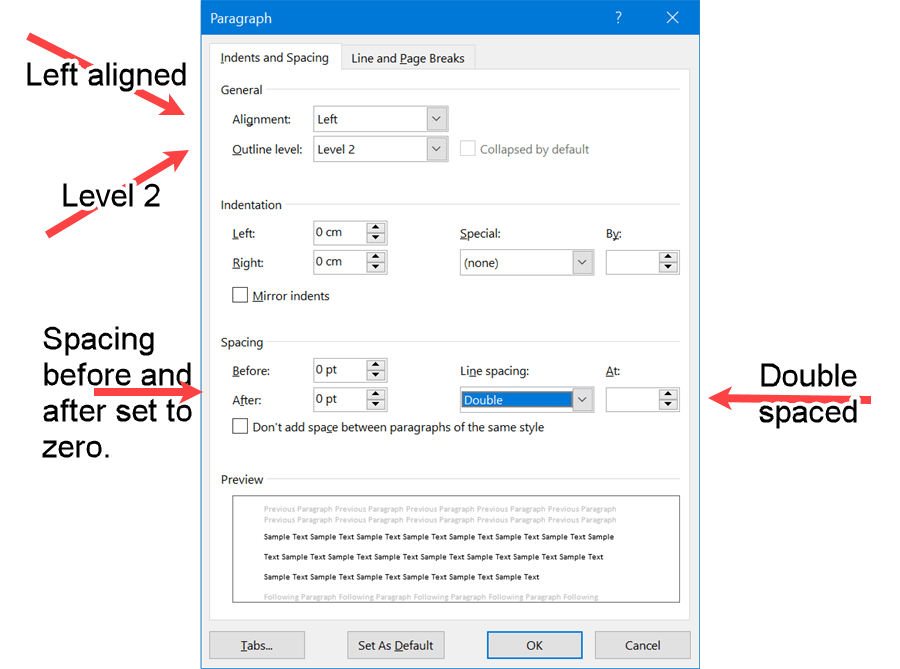 Figure 5: APA Level 2 Heading (Paragraph properties)
Figure 5 written instructions (if required) are as follows:
- Select the Indents and Spacing tab (if not already selected).
- Set Alignment to Left (if not already set).
- Set Outline level to 2.
This will be needed if you have a table of contents, and to use the Outline view in Microsoft Word. - Set Line spacing to Double.
- Set Before and After Spacing to zero (if not already set).
- Select the Line and Page Breaks tab.
Step 3
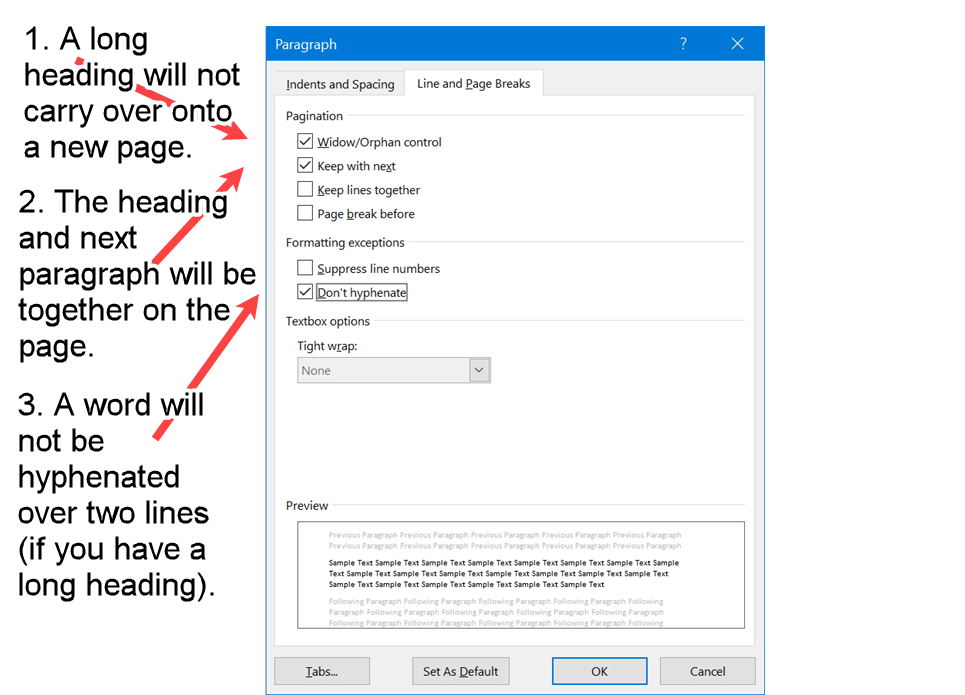 Figure 6: APA Level 2 Heading (Line and page break properties)
Figure 6 written instructions (if required) are as follows:
- Select Widow/Orphan control.
Your Level 2 Heading will not be split over two pages if your heading is longer than one line. - Select Keep with next.
Your Level 2 Heading and the next paragraph will be on the same page (i.e., the heading will not be on one page and the paragraph on another page).
Note: APA style says a heading can fall at the end of a page. - Select Don't hyphenate.
Microsoft Word will not hyphenate (i.e., split a word) if your Level 2 Heading goes onto the next line. - Click on OK.
Level 3 Headings in APA Format (Subheading for Level 2 Heading)
Step 1
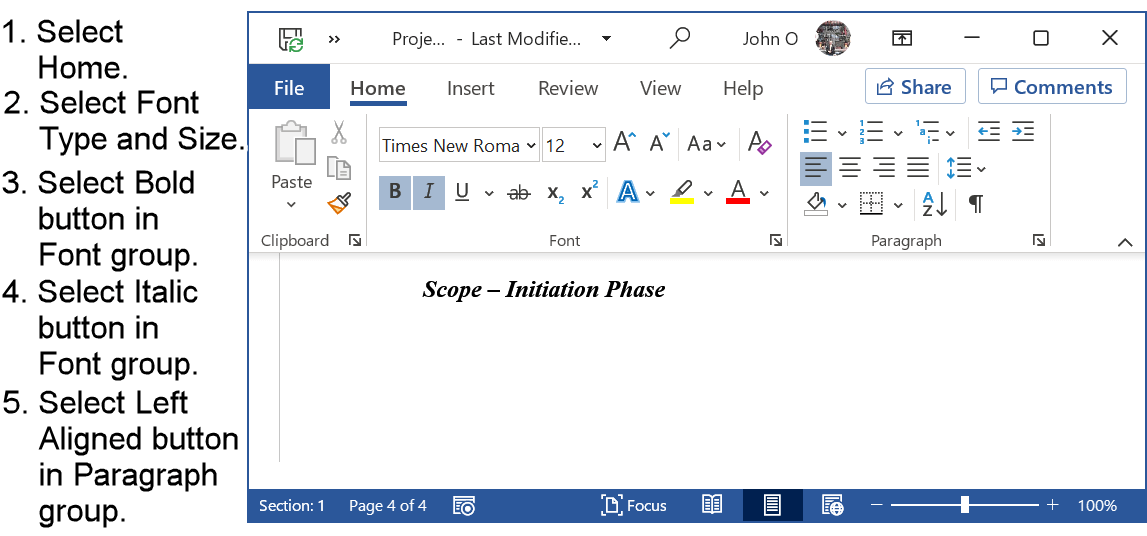 Figure 7: APA Level 3 Heading (Font properties)
Figure 7 instructions (if required) are as follows:
- Select the heading text (if necessary).
- Select the Home tab.
- Select the Font you are using, for example, Times New Roman.
- Set the Font style to Bold.
- Set the Font style to Italic.
- Select the font size you are using. for example, 12.
- Select the Left Align button in the Paragraph group.
- Open the Paragraph dialog box (bottom right-hand arrow in the Paragraph group).
Step 2
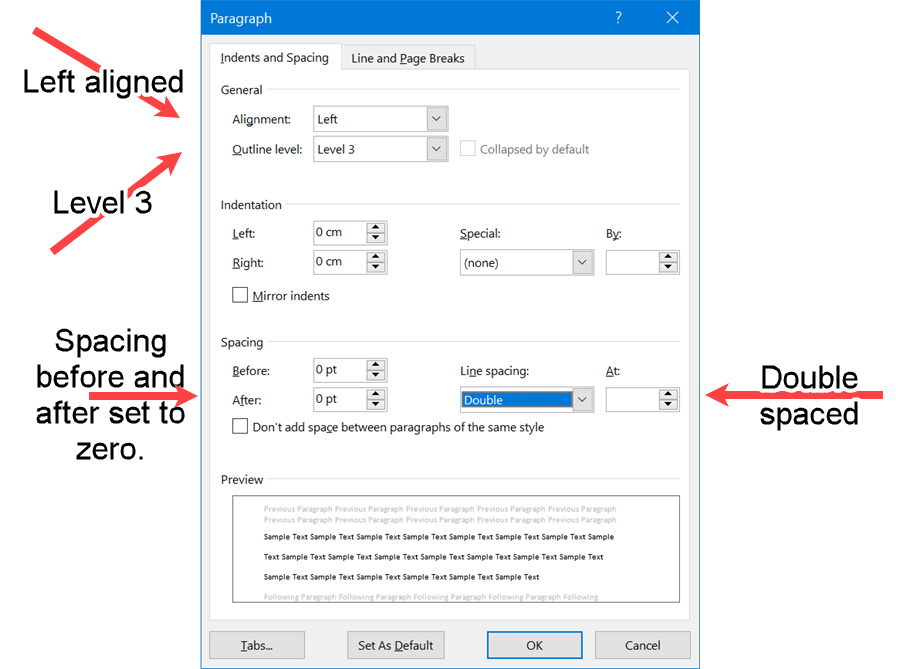 Figure 8: APA Level 3 Heading (Paragraph properties)
Figure 8 written instructions (if required) are as follows:
- Select the Indents and Spacing tab (if not already selected).
- Set Alignment to Left (if not already selected).
- Set Outline level to 3.
This indicates the level of the heading.
It will be required to show an outline of your work and is needed to make a Table of Contents if you have one. - Set Line spacing to Double.
- Set spacing before and after to zero (if not already set).
- Select the Line and Page Breaks tab.
Step 3
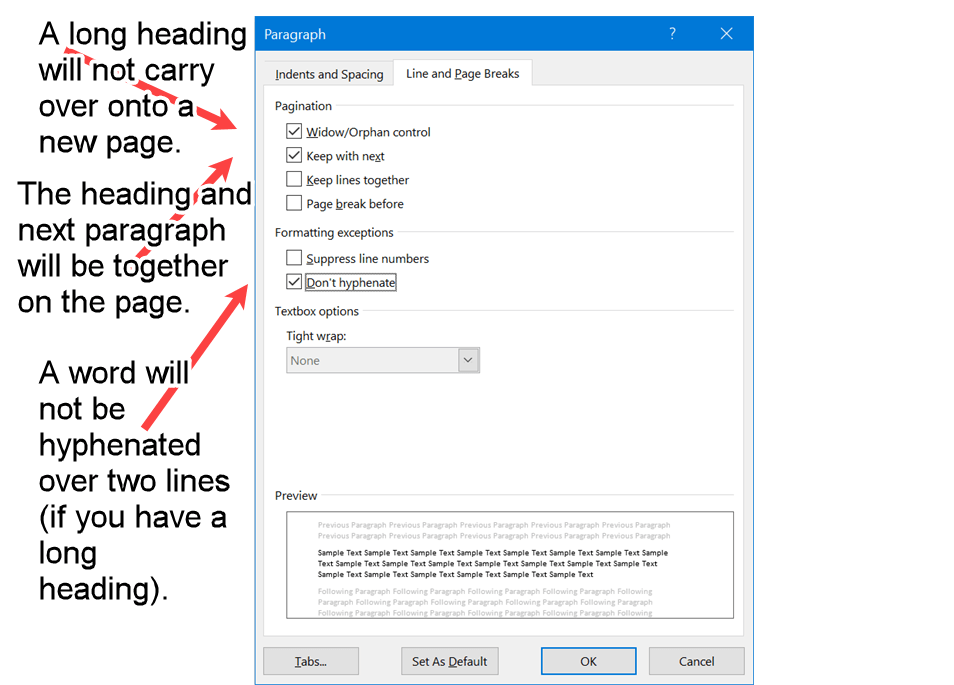 Figure 9: APA Level 3 Heading (Line and page break properties)
Figure 9 written instructions (if required) are as follows:
- Select Widow/Orphan control.
Your Level 3 Heading will not be split over two pages if your heading is longer than one line. - Select Keep with next.
Your Level 3 Heading and the next paragraph will be on the same page (i.e., the heading will not be on one page and the paragraph on another page).
Note: APA style says a heading can fall at the end of a page. - Select Don't hyphenate.
Microsoft Word will not hyphenate (i.e., split a word) if your Level 3 Heading goes onto the next line. - Click on OK.
Level 4 Headings in APA Format (Subheading for Level 3 Heading)
The APA Level 4 heading is not separate from the paragraph (unlike the Level 1, 2, and Level 3 headings).
The Level 4 heading is part of the first line of the paragraph which is indented.
You must choose the same font type and size that you are using for all your headings in APA format.
Step 1
- Type the text which will be the heading.
- Press Ctrl+Alt+Enter on your keyboard.
This creates a style separator, which means you can format the text up to it as an APA Level 4 heading. The text after the style separator is the text for the rest of the paragraph. - Select the text before the style separator and format as shown in the following screen shots.
Step 2
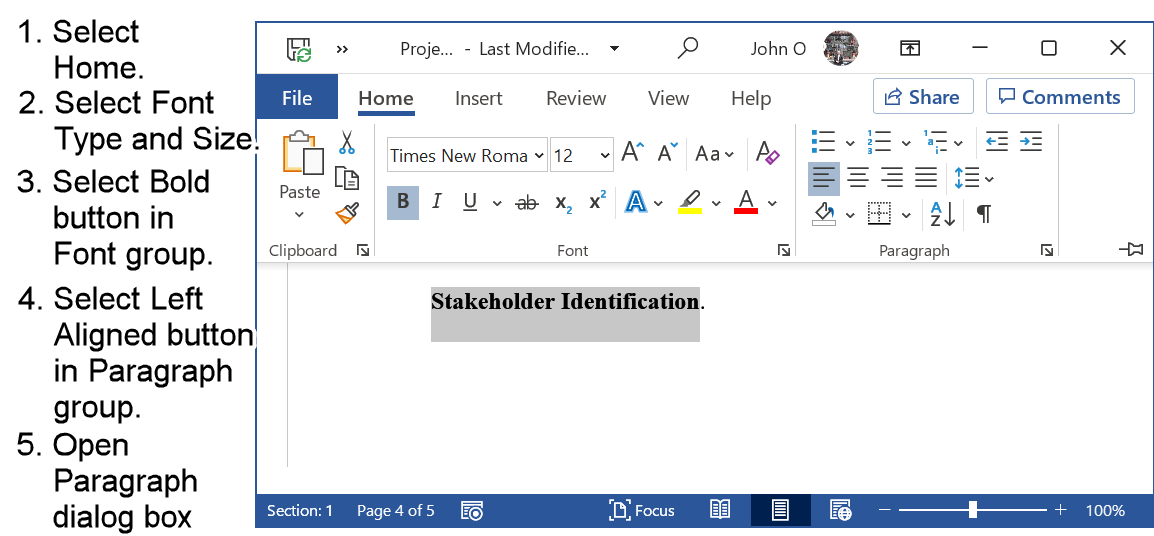 Figure 10: APA Level 4 Heading (Font properties)
Written instructions for Figure 10 (if required) are as follows:
- Select the heading text (if necessary).
- Select the Home tab.
- Select the Font you are using, for example, Times New Roman.
- Set the font size you are using, for example, 12.
- Set the Font style to Bold.
- Select the Left Align button in the Paragraph group.
- Open the Paragraph dialog box (bottom right-hand arrow in the Paragraph group).
Step 3
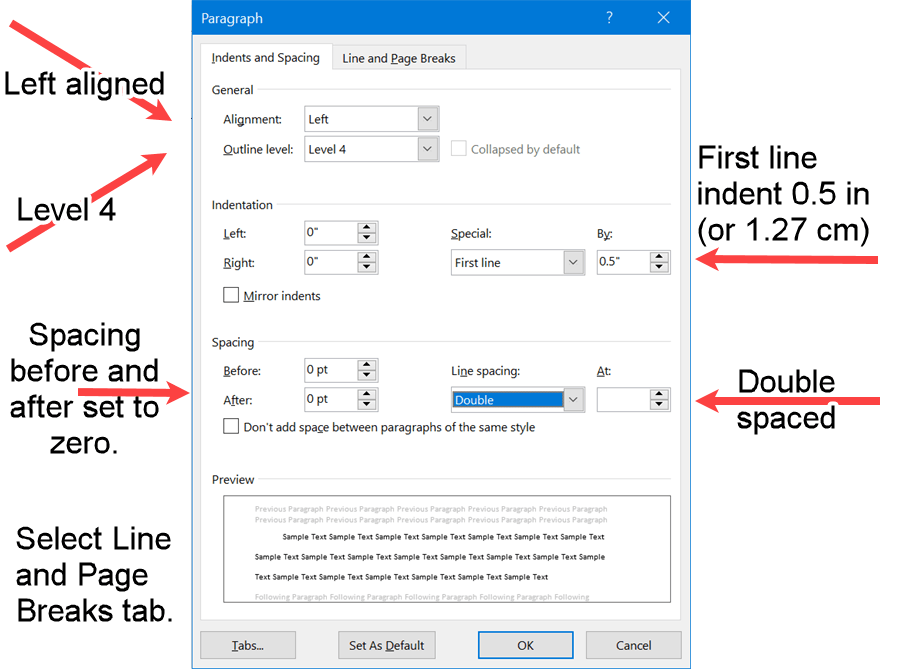 Figure 11: APA Level 4 Heading (Font properties)
Written instructions for Figure 11 (if required) are as follows:
- Select the Indents and Spacing tab (if not already selected).
- Set Alignment to Left (if not already selected).
- Set Outline level to 4.
- Set First line indent to 0.5 inches (1.27 centimeters)
- Set Line spacing to Double.
- Select the Line and Page Breaks tab.
Step 4
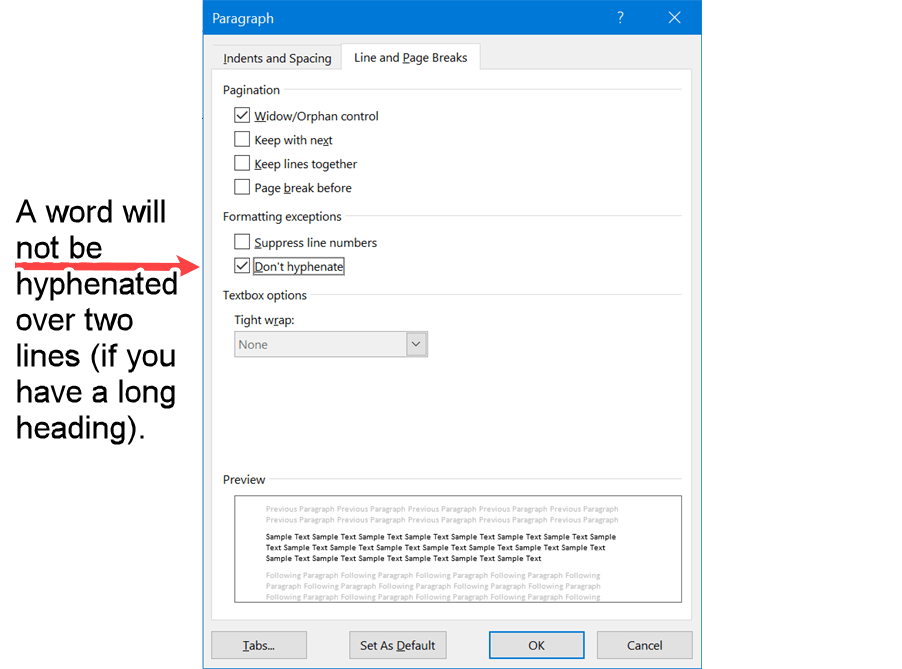 Figure 12: APA Level 4 Heading (Line and page break properties)
Figure 12 written instructions (if required) are as follows:
- Select Widow/Orphan control.
Your Level 4 Heading will not be split over two pages if your heading is longer than one line. - Select Don't hyphenate.
Microsoft Word will not hyphenate (i.e., split a word) if your Level 2 Heading goes onto the next line. - Click on OK.
Please note: You do not have to format the Level 4 heading this way.
You could:
- Type the paragraph (indenting the first line as required).
- Select the Level 4 heading text.
- Format in the APA style, that is, Bold.
However, you cannot have an Outline level of Level 4 for the heading; This means you cannot include the Level 4 heading in a Table of Contents or Outline view in Microsoft Word.
APA style does not require a Table of Contents.
However, your instructor may ask for a Table of Contents that contains the headings.
Level 5 Headings in APA Format (Subheading for Level 4 Heading)
To format the Level 5 heading:
- type the text which will be the Level 5 heading.
- press Ctrl+Alt+Enter on your keyboard.
This creates a style separator, which means you can format the text up to the style separator as an APA Level 5 heading. The text after the style separator is the text for the rest of the paragraph. - Select the text before the style separator and format as shown in the following screen shots.
You must choose the same font type and size that you are using for all your headings in APA format.
Step 1
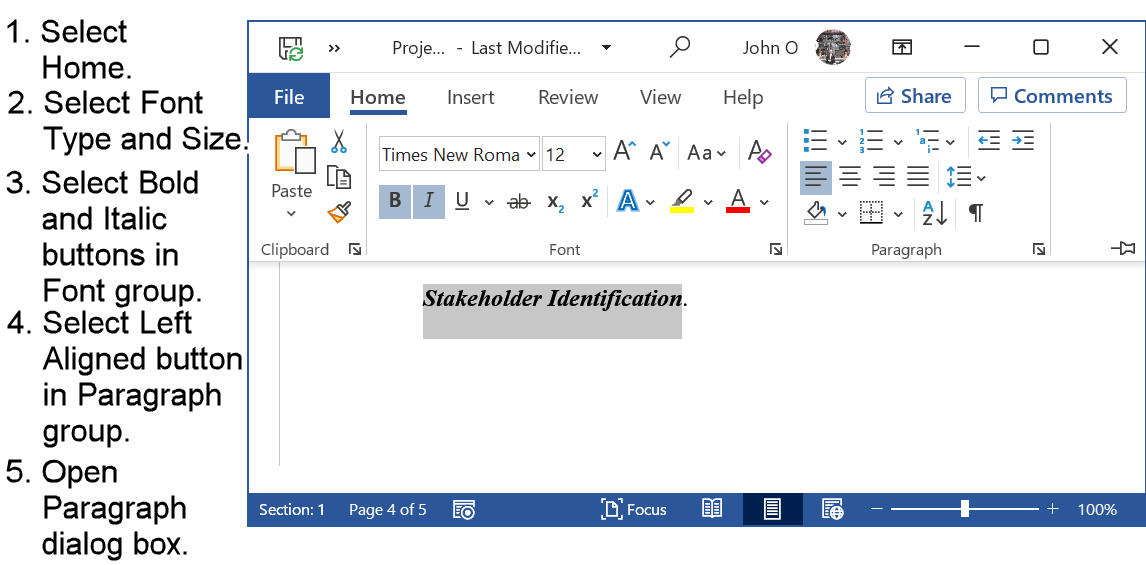 Figure 13: APA Level 5 Heading (Font properties)
Figure 13 written instructions (if required) are as follows:
- Select the heading text (if necessary).
- Select the Home tab.
- Select the Font you are using, for example, Times New Roman.
- Set the font size to 12.
- Set the Font style to Bold.
- Set the Font style to Italic.
- Select the Left Align button in the Paragraph group.
- Open the Paragraph dialog box (bottom right-hand arrow in the Paragraph group).
Please note: The font type and size must be the same for all your headings in APA format.
Therefore, use the same font type and size that you have for your Level 1, 2, 3, and Level 4 headings.
Step 2
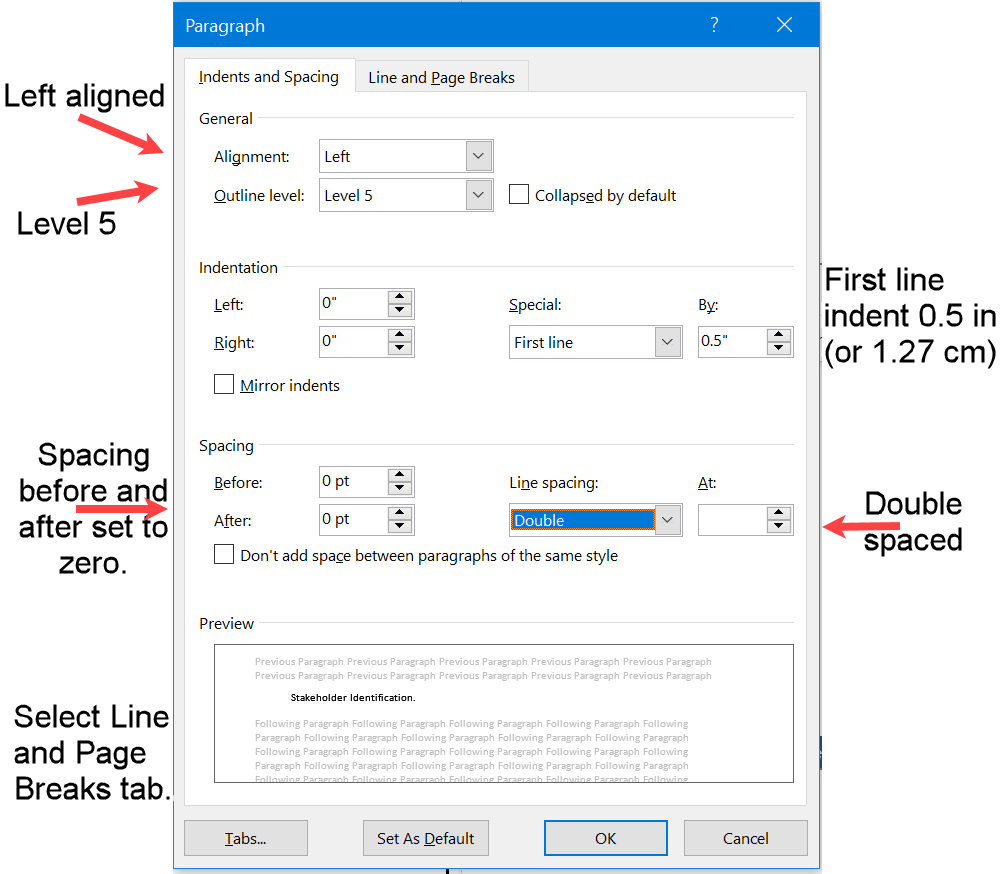 Figure 14: APA Level 5 Heading (Paragraph properties)
Figure 14 written instructions (if required) are as follows:
- Select the Indents and Spacing tab (if not already selected).
- Set Alignment to Left (if not already selected).
- Set Outline level to 5.
- Set First line indent to 0.5 inches (1.27 centimeters).
- Set Spacing Before and After to zero.
- Set Line spacing to Double.
- Select the Line and Page Breaks tab.
Step 3
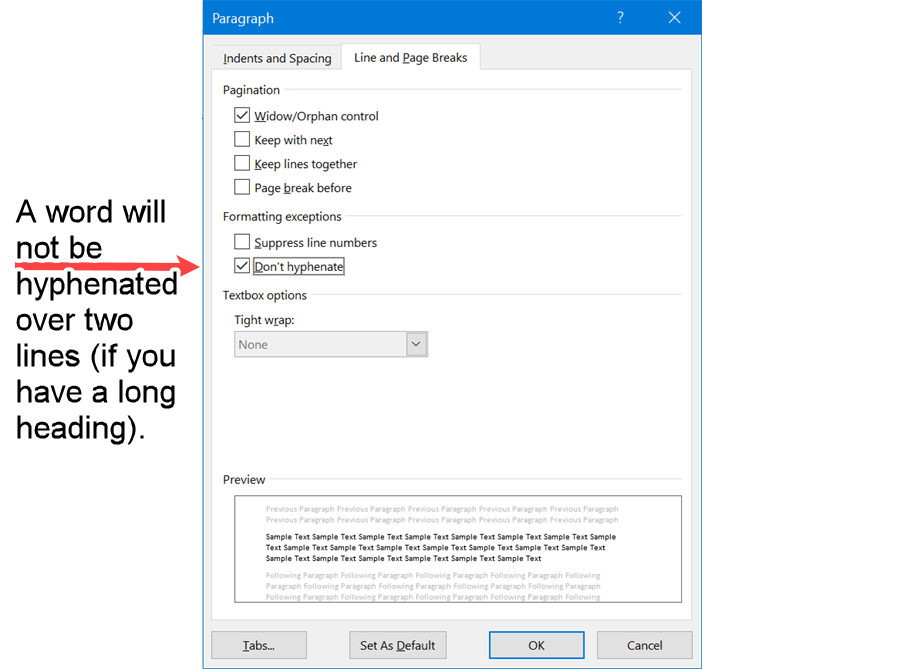 Figure 15: APA Level 5 Heading (Line and page break properties)
Figure 15 written instructions (if required) are as follows:
- Select Widow/Orphan control (if not already selected).
Your Level 5 Heading will not be split over two pages if your heading is longer than one line. - Select Don't hyphenate.
Microsoft Word will not hyphenate (i.e., split a word) if your Level 2 Heading goes onto the next line. - Click on OK.
N.B. You do not have to format your Level 5 heading this way - see previous note about headings in the Table of Contents.
How to Format Your Headings in APA Format Quickly Forever!
APA headings can be formatted in Microsoft Word three ways.
They are:
- the really long way (use the Font and Paragraph tools from the Home tab to format each heading as you write),
- the long way (use Format Painter in the Home tab to copy the format to each heading as you write), and
- the really smart way using Styles.
Set up your headings in APA format once in Microsoft Word and then:
- format all your headings APA style with one click,
and - format all the headings in your future APA style academic papers with one click.
All your headings will always be available in the correct APA format for your academic writing.
The benefits are immense!
They are:
- save a lot of time because you do not have to format each heading every time,
- make the format the same everywhere in the document (e.g., each heading is Times New Roman 12),
- get the format correct the first time and it will be correct forever,
and - make changes to the heading style once (e.g., change font size from 12 to 11) and all headings with that style will change automatically.
You will be more efficient, consistent, and accurate with your academic writing!
Find out how to set up your headings in APA format using Microsoft Word styles for the following:
Summary
You can format your headings in APA format by following the Microsoft Word screenshots above.
Levels one to three are usually enough. However, level four and five headings are provided should you need them.
If you have several headings, you can format one heading, and then apply that format to other headings by using the Format Painter brush.
To copy the format from one heading to another:
- Format the heading the first time in the APA format (as shown above).
- Select the heading text.
- Click (or touch) the Format Painter brush in the Clipboard group of the Home tab.
- Brush over (hold left mouse button down) the heading to which the APA heading format is to be applied.
N.B. Double click the Format Painter twice to keep the Format Painter brush active when the left mouse button is released. You can then format several headings. Deselect by clicking (touching) the Format Painter brush or pressing the Esc key on the keyboard.
However, the best way (especially if you have several headings and/or will be writing lots of APA format papers) is to create a style for each heading, and then apply each time the APA format is required.