- Home
- APA Paper Format
- Headings
- Level 3 Heading Style
How to Quickly Create Your Level 3 Heading in APA Format Using a Word Style
Do you want to create a level 3 heading in APA format quickly? And correctly? And consistently?
Create a Word style for a Level 3 Heading once and use it repeatedly. You will:
- save time (lots of time!)
- have the correct APA format every time
- be consistent every time.
The Word style stores the APA level 3 heading format.
Just select your heading text and click on the level 3 heading style when you want the heading in APA format.
You can even use the style in new documents. You do not have to create the style again!
Just think about the time you will save in future academic writing.
There will be:
- no more formatting every time you have an APA level 3 heading.
- no more looking up the APA format in the manual or guide.
Follow the screenshots below to set up your APA level 3 heading style in Word
(extra information is provided if you need it - however, you should be able to set up the style by following the screenshots).
Apply what you see, and you will set up your APA level 3 heading style.
If you are not ready to set up a style, go to APA Level 3 Heading to format your heading as a one-off.
If you already have a Level 3 Heading in APA format, go to Level 3 Heading APA style to create a style in Word (follow the screenshots).
If you do not have a Level 3 Heading in APA format, go to create your Level 3 Heading APA style in Word first, and then apply the style.
Remember - once you have your style, you can apply it again and again, even in new documents.
Create a Word Style Using an Existing Level 3 Heading in APA Format.
See Figures 1 to 4 to create the style from an existing Level 3 Heading in APA format.
Step 1 - Select an Existing Level 3 Heading in APA Format
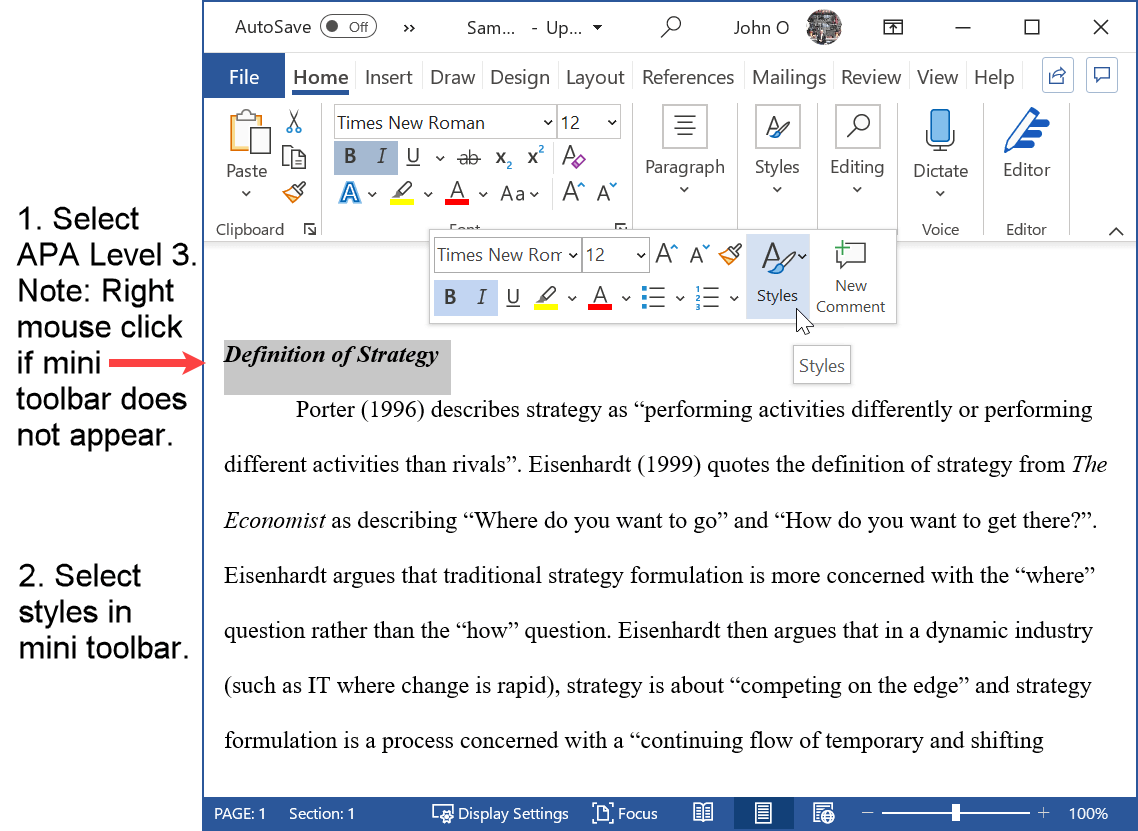 Figure 1: Select a Level 3 heading in APA format
Explanation for Figure 1 (if required) is as follows:
- Select (click and drag) a heading that has been formatted as an APA level 3 heading.
Please note: You must include the character after the paragraph. This is the paragraph mark that holds the properties of the paragraph, for example, double line spacing.
Please make sure the heading is formatted correctly as an APA level 3 heading as follows:
- left aligned against the margin
- bold
- italic
Your style will be based on this, so please make sure it is correct. - Select Styles in the mini toolbar that appears.
The styles pane will appear (see Figure 2).
Note: If the mini toolbar does not appear, right click the mouse - the mini toolbar will appear.
Step 2 - Open the New Style Dialog Box
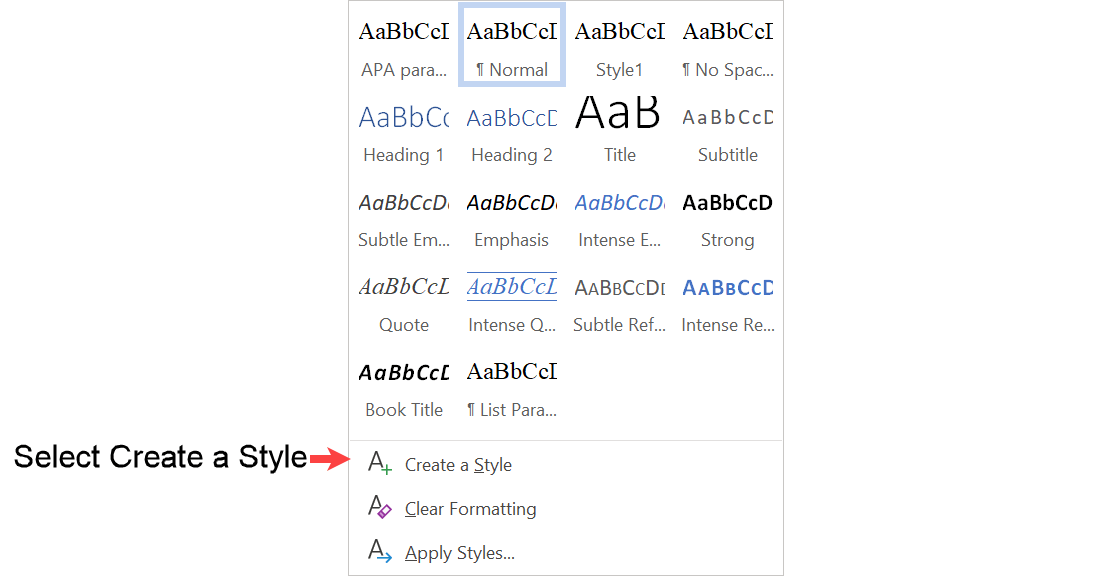 Figure 2: Select new style dialog box
Explanation for Figure 2 (if required) is as follows:
- Select Create a Style.
This will open the dialog box to create a new APA Level 3 Heading style in Word.
Step 3 - Create the Style for the Level 3 Heading in APA Format
 Figure 3: Create the style from a level 3 heading in APA format
Explanation for Figure 3 (if required) is as follows:
- Enter the style name of your choice.
Make the name short and meaningful (e.g. APA Level 3 Heading) so that you can recognize the style in the Styles gallery or the Styles panel. - Select Modify.
You will then be able to make your APA style available for future documents and add more information.
Note: I strongly recommend you make your style available for future documents. This means you can format APA level 3 headings in any future academic writing with one "click".
This is how you save time, and ensure your headings are formatted accurately and consistently.
Step 4 - Add Detail to the Style for the Level 3 Heading in APA Format
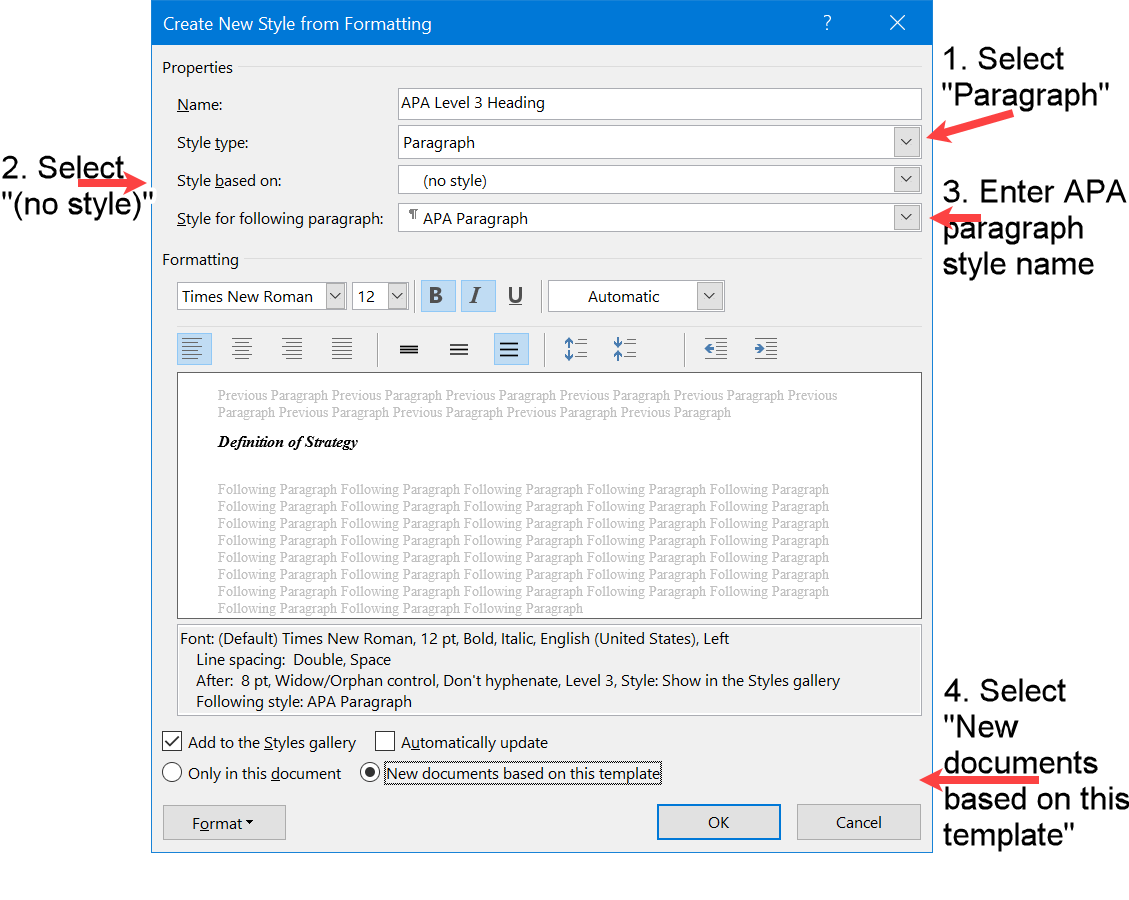 Figure 4: Modify the APA Level 3 Heading style
Explanation for Figure 4 (if required) is as follows:
- Select "Paragraph" for the Style type.
The Level 3 Heading is a unique paragraph. - Select "(no style)" for Style based on.
You are creating the style independently of any other. - Select the APA paragraph style you have created to follow.
This means that after completing the level 3 heading, the APA paragraph style will be applied to the paragraph straight after the heading.
If you have not yet created an APA paragraph style, select "Normal" and modify the Level 3 Heading APA style after you have created the APA paragraph style. - Select "New documents based on this template".
This means the Level 3 Heading Style will be available in any new documents you write.
Just one click and your level 3 heading will be in the APA format.
Keep reading if you want to find out how to create a style from scratch (i.e. not based on an existing format)
else go to how to use the style you have just created.
Create a Word Style for a Level 3 Heading in APA Format
(Not Using an Existing Format)
The Level 3 Heading in APA format should have the following settings:
- Font type and size that you have chosen - see APA recommendations (opens in new window)
You can only use one font type and size. It must be the same for all headings and text. - Aligned against the left margin
- Bold
- Italic.
The Level 3 Heading must be written in title case (see title case for details).
Step 1 - Open the Styles Menu
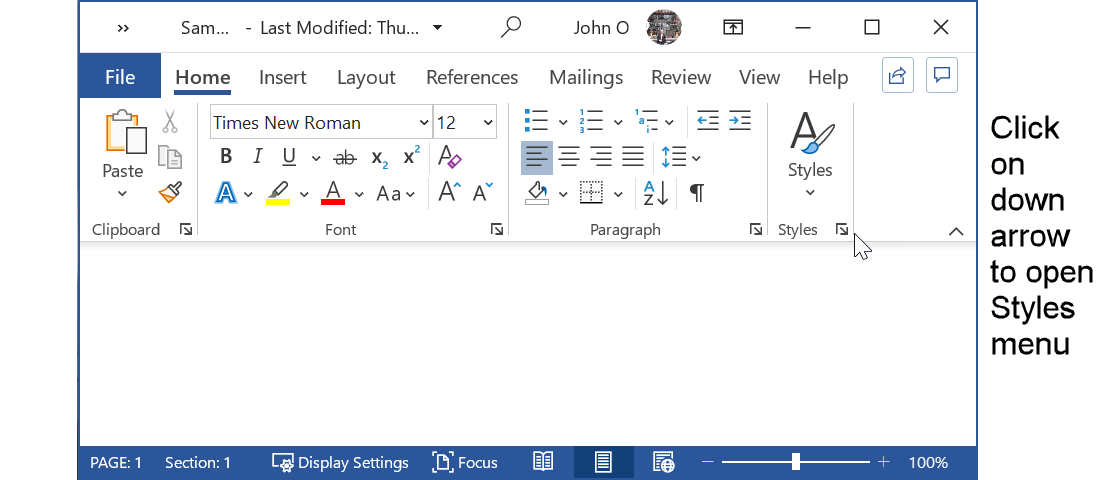 Figure 5: Open Styles menu
Explanation for Figure 5 (if required) is as follows:
- Select Home tab (if not already selected).
- Click on the bottom right-hand arrow of the Styles Group.
Your Styles group may look larger depending on your screen size.
Step 2 - Select New Style Window
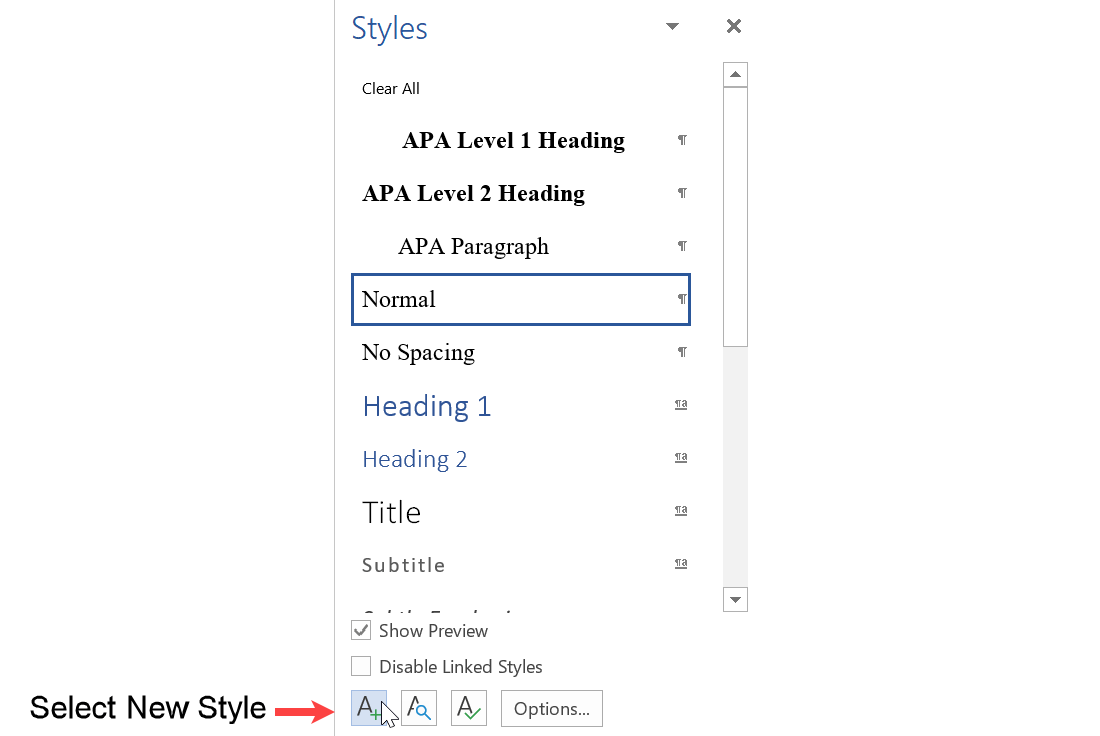 Figure 6: Select new style in Styles menu
Explanation for Figure 6 (if required) is as follows:
- Select the New Style button.
This will open the window to create the APA level 3 heading style in Word.
Step 3 - Define the Style for the Level 3 Heading in APA Format
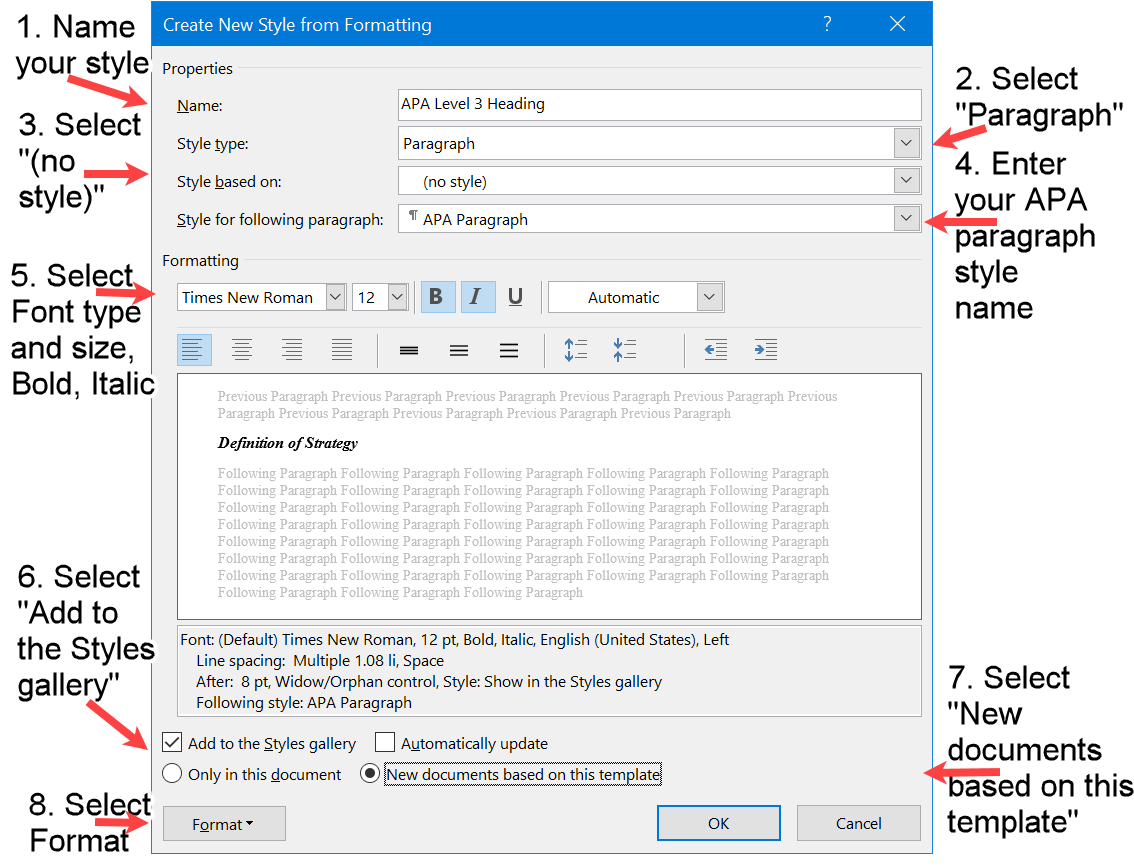 Figure 7: APA Level 3 Heading Style and Font Properties
Explanation for Figure 7 (if required) is as follows:
- Enter your style name.
You can make up any name but make it short and meaningful. Then you will easily recognize it in new documents. - Select "Paragraph" in the Style type.
Your level 3 heading is a Word paragraph. - Select "(no style)" for Style based on.
This means changes to any other style will not affect this APA level 3 heading style. - Enter your APA paragraph style name in the Style for following paragraph.
This means the APA paragraph style will follow automatically after the heading.
If you have not yet created the APA paragraph style, select the Normal style to follow. Then modify the APA level 3 heading style once you have created the APA paragraph style. - Select the Font type and size, bold and italics.
The font type and size should be the same for all headings (levels 1, 2 and 3) and paragraphs.
There is a range of allowable fonts and sizes (opens in new window). - Select "Add to the Styles gallery" if not already selected.
This will make the level 3 heading APA style available in the Styles gallery. - Select "New documents based on this template".
This means the level 3 heading APA style will be available in every new Word document you create.
Never again will you have to define the level 3 heading format - it will be there to use! - Select Format.
Step 4 - Select Paragraph to Format
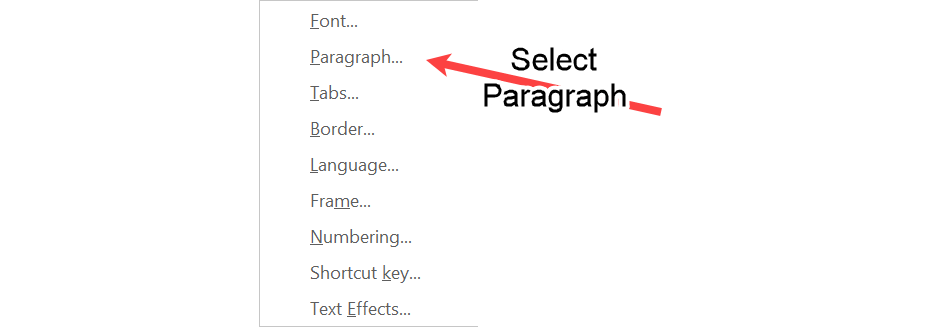 Figure 8: Format menu for the APA Level 3 Heading style
Step 5 - Set Outline Level and Spacing
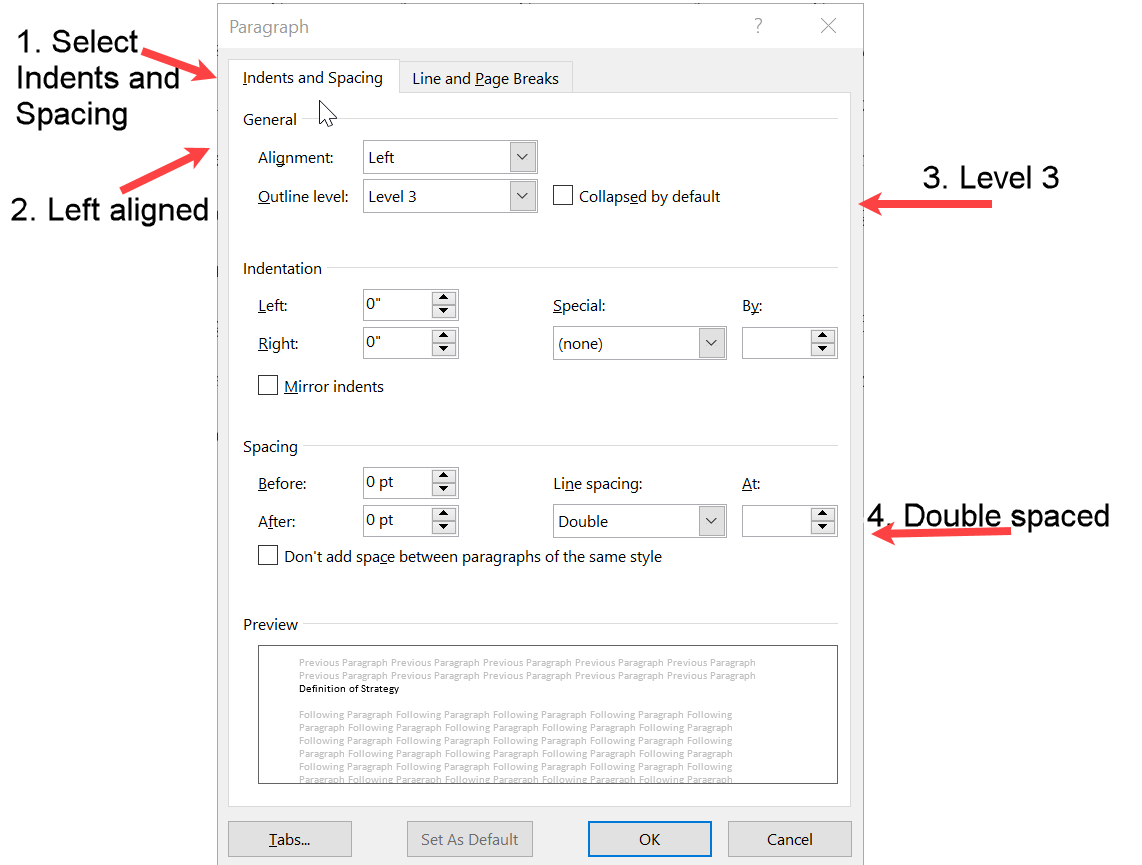 Figure 9: APA Level 3 Heading outline and spacing properties
Explanation for Figure 9 (if required) is as follows:
Note: Probably already set by default (see Figure 7).
Probably, your heading will not be longer than a line. But, you need a blank line before the following paragraph. Double line spacing is an APA requirement.
Step 6 - Page Breaks and Hyphenation
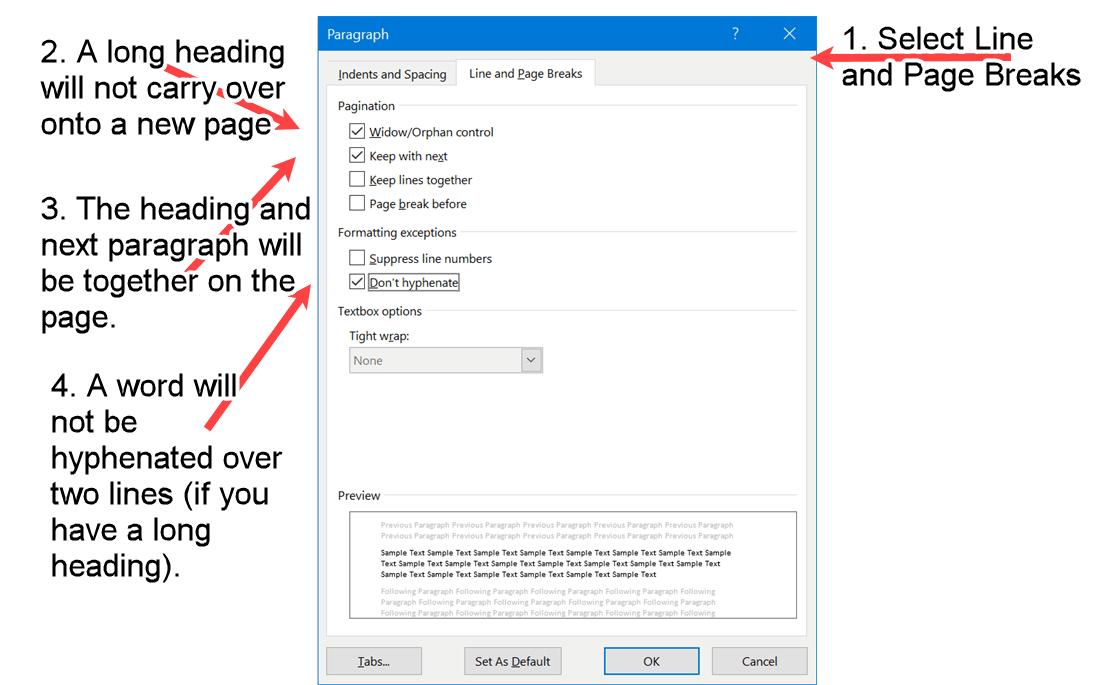 Figure 10: APA Level 3 Heading (Line and page break properties)
Explanation for Figure 10 (if required) is as follows:
- Widow/Orphan control and Keep with next will ensure a heading or a single line will not be by itself at the bottom or top of a page.
This is not an APA requirement but makes your document look more professional. - Don't hyphenate is an APA requirement.
- Close each open Window (select OK).
Your newly created APA level 3 heading style will be added to the Styles gallery.
How to Use the APA Level 3 Heading Style
You can apply the style by:
- selecting from the Styles gallery
or - selecting from the Styles panel.
Styles Gallery
Step 1 - Select Text for the Level 3 Heading in APA Format
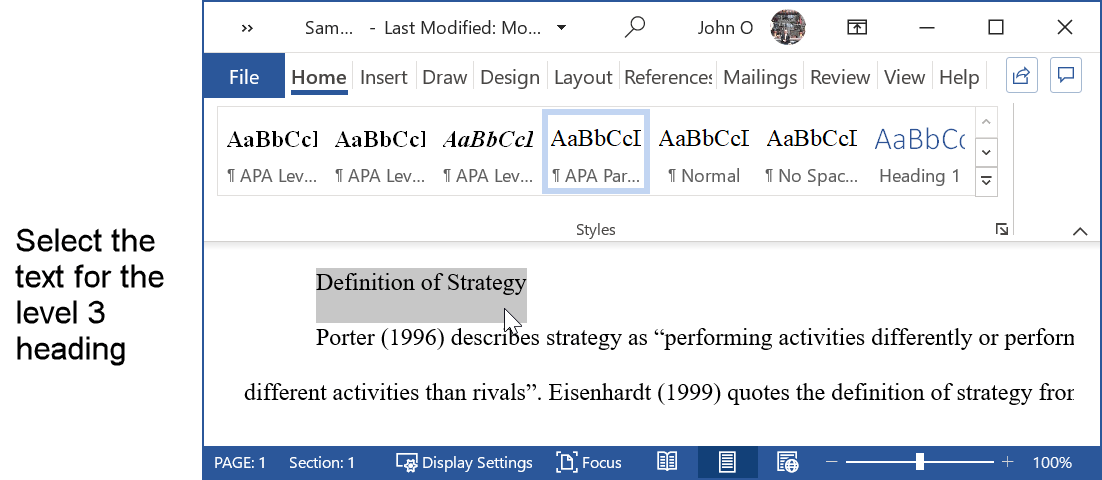 Figure 11: Select text for APA level 3 heading
Explanation for Figure 11 (if required) is as follows:
- Select the Home tab (if not selected).
This will ensure the Styles gallery (i.e. the Styles group) is displayed. - Select the text for the APA level 3 heading.
Note: If you defined the Style type as "Paragraph" (see Figure 7), you only have to place the cursor in the text, not select the text. However, it does not matter if the text is selected.
If you defined the Style type as "linked" (the Word default), then you need to select the text.
Step 2 - Apply the Style to Create the Level 3 Heading in APA Format.
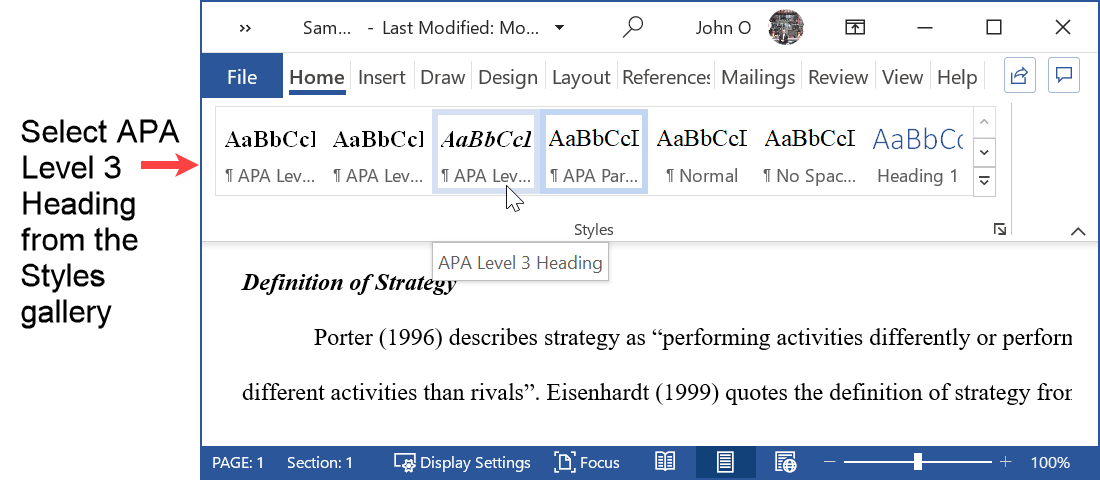 Figure 12: Apply the APA level 3 style from the Word styles gallery
Explanation for Figure 12 (if required) is as follows:
- Select the APA Level 3 Heading style in the gallery.
If you cannot see the style (because you did not select to place the style in the gallery - see Figure 7), follow the next method.
Styles Panel
Step 1 - Select Text for the Level 3 Heading in APA Format
 Figure 13: Select text for APA level 3 heading
Explanation for Figure 13 (if required) is as follows:
- Select the Home tab (if not selected) to show the Styles gallery.
- Highlight the text for the APA level 3 heading.
Note: An alternative is to place the cursor in the text if you selected "Paragraph" for the Style type (see Figure 7).
Step 2 - Open the Styles Panel
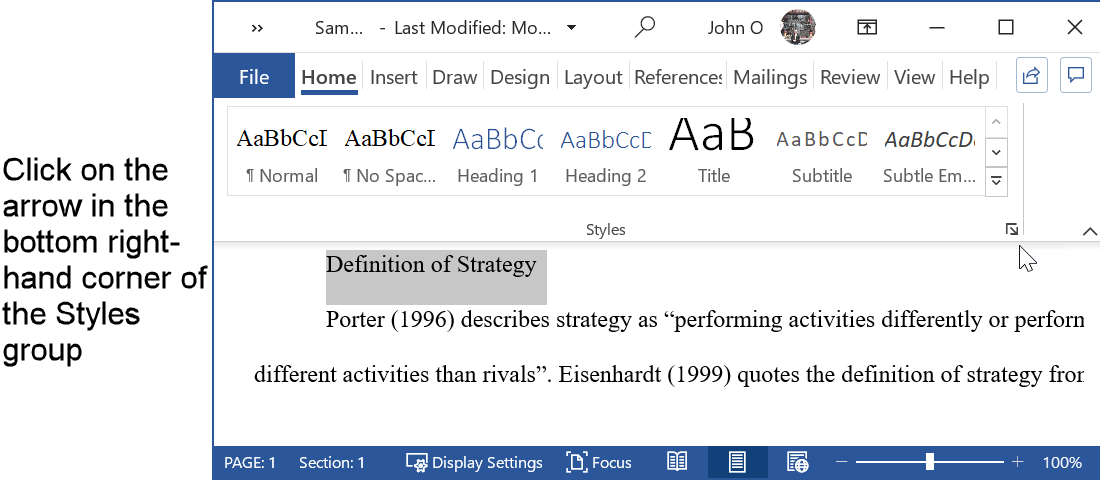 Figure 14: Open the styles menu
Explanation for Figure 14 (if required) is as follows:
- Click on the arrow at the bottom right-hand corner of the Styles group.
This will open the styles panel.
The Styles group is found under the Home tab in the ribbon.
Step 3 - Select the APA Level 3 Heading Style
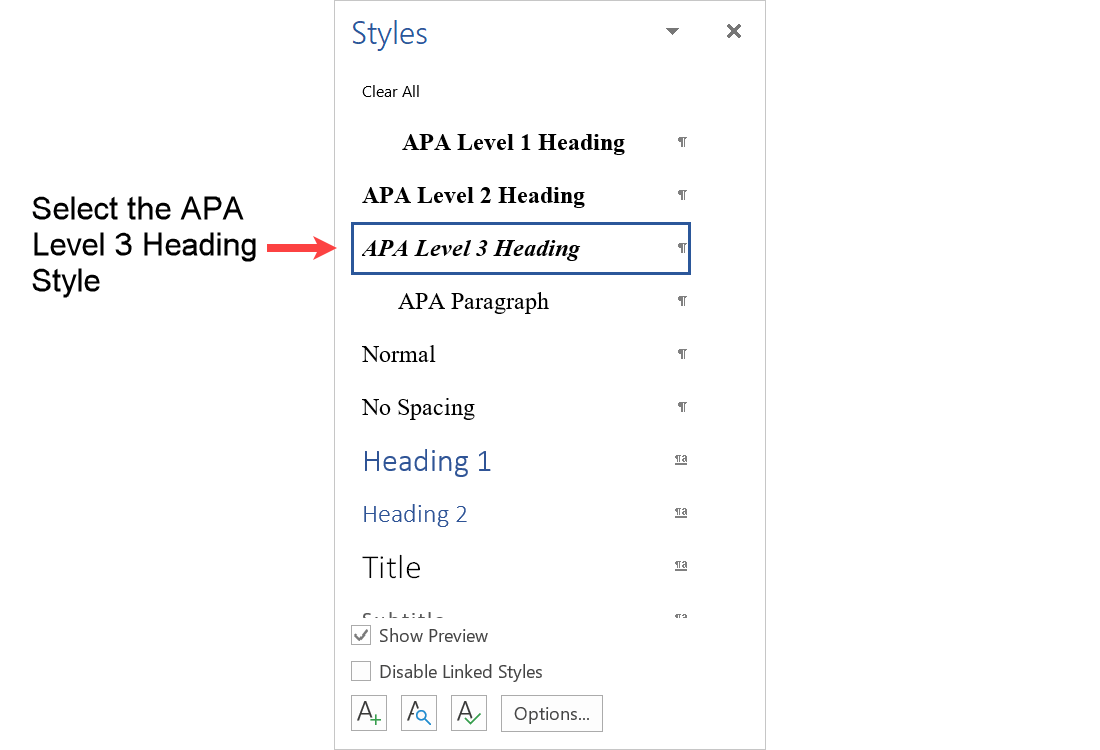 Figure 15: Select the APA Level 3 Heading style from the Styles menu
Your heading will appear in the level 3 heading APA format.
Summary
You will save lots of time if you use a Word style to format a level 3 heading in APA format if you have several level 3 headings in your document.
You will especially save lots of time if you will be writing of academic documents in APA format in the future.
You will not need to:
- look up APA documentation for the Level 3 heading format. You already have it in the style.
- format in Word the level 3 heading format. The style will do it for you.
Create the level 3 heading APA style - it is a great time saver!