- Home
- Table in APA Format
Create a Table in APA Format
A table in APA format contains the following elements:
- table number
- title
- body of the table
- notes, if required
The following sections explain how to format each element.
APA Format for a Table
Table Number
Format the table number as follows:
- Use the same font type and size as the rest of your document.
- Align the table number flush left against the left margin.
- Write the table number in bold, for example, Table 1.
- Do not place a period after the table number.
- Number tables consecutively in the order in which they are first mentioned in the main text.
- Double-space the table number.
Table Title
Format the table title as follows:
- Use the same font type and size as the rest of your document.
- Align the title flush left against the left margin.
- Italicize the title.
- Write the title in title case, for example, The Population of Major European Cities
- Do not place a period after the title.
- Double-space the title.
Table
Format the table as follows:
- Align the table flush left against the left margin.
-
Use single, one-and-a-half, or double line spacing.
Follow any instructions given by your instructor. Otherwise, choose the spacing that makes the table easiest to read. -
Include a heading for every column.
This includes the stub column—the left-hand column—and any spanner headings that cover two or more columns.
Format the column headings as follows:
- Use the same font type and size as the rest of your document.
- Center the headings above their columns.
- Write the headings in sentence case, for example, Employment history.
Table Entries
Format the entries in the table as follows:
-
Left align entries in the stub column.
You may center them if they are short and this improves readability. - Indent subitems in the stub column.
- Center numerical entries unless another alignment makes the information easier to compare.
- You do not normally need to align numbers by their decimal points. However, decimal alignment may be used when it improves readability.
- Center short text entries where appropriate.
- Write text entries in sentence case.
- Use a hanging indent of 0.15 inches (0.38 centimetres) or one em space for entries that extend over more than one line.
Table Borders and Lines
APA-formatted tables normally use only the borders and lines needed to make the information clear.
Use the following lines:
- a border at the top of the table
- a border at the bottom of the table
- a line beneath the column headings
- a line above a spanner heading, when required
Do not use vertical borders or borders around every cell unless they are necessary for clarity.
Notes, If Required
A table note provides information that readers need to understand the table.
Format the note as follows:
- Use the same font type and size as the rest of your document.
- Align the note flush left against the left margin.
- Begin with the italicized word Note. followed by the explanatory text.
- Double-space the note.
A note is not required when the information in the table is clear without further explanation.
Figure 1 shows an example of a table in APA format.
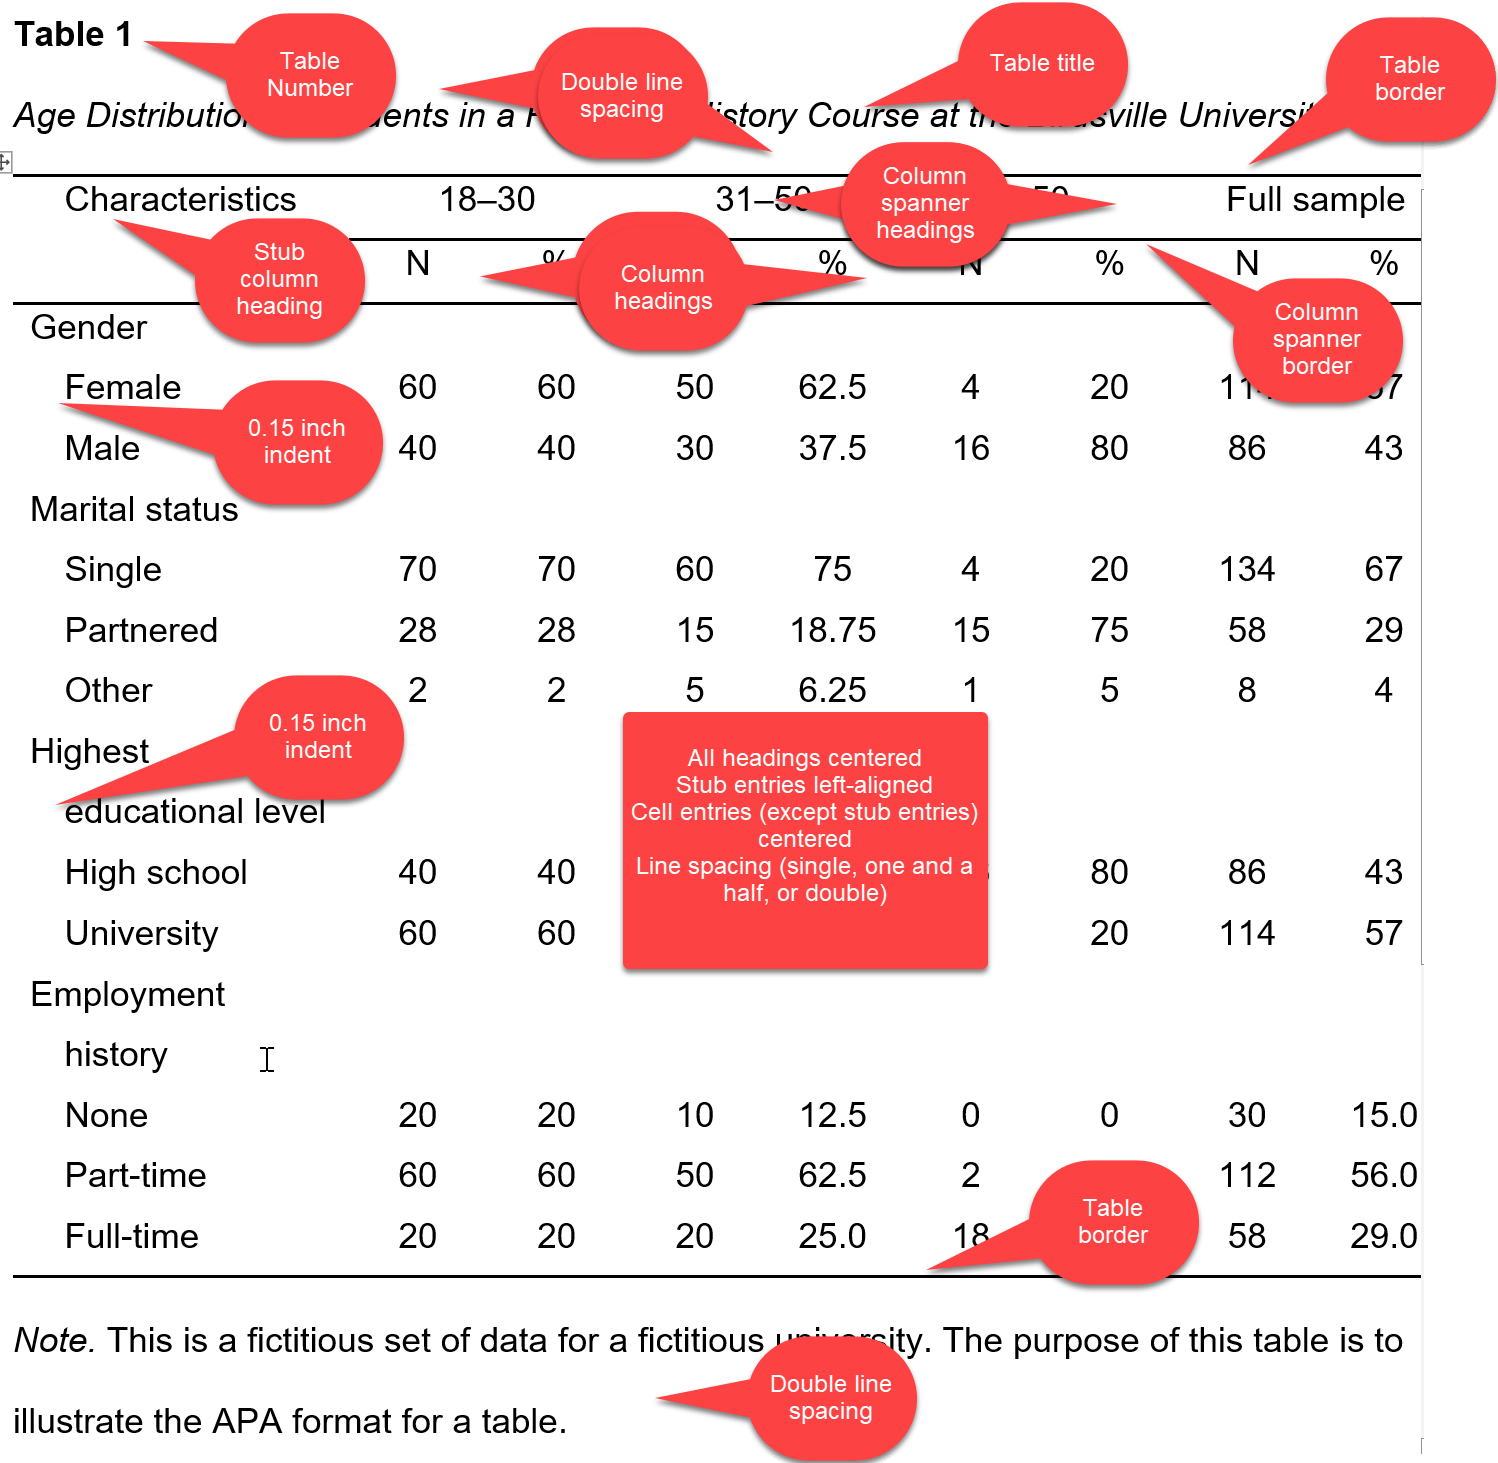 Figure 1: Table in APA Format
The following sections show you how to build a table in APA format using Microsoft Word. They cover:
Formatting a Table in APA Format Using Microsoft Word
Table Number
As is often the case in Microsoft Word, there is more than one way to format an element.
Figure 2 shows how to format a table number using Microsoft Word.
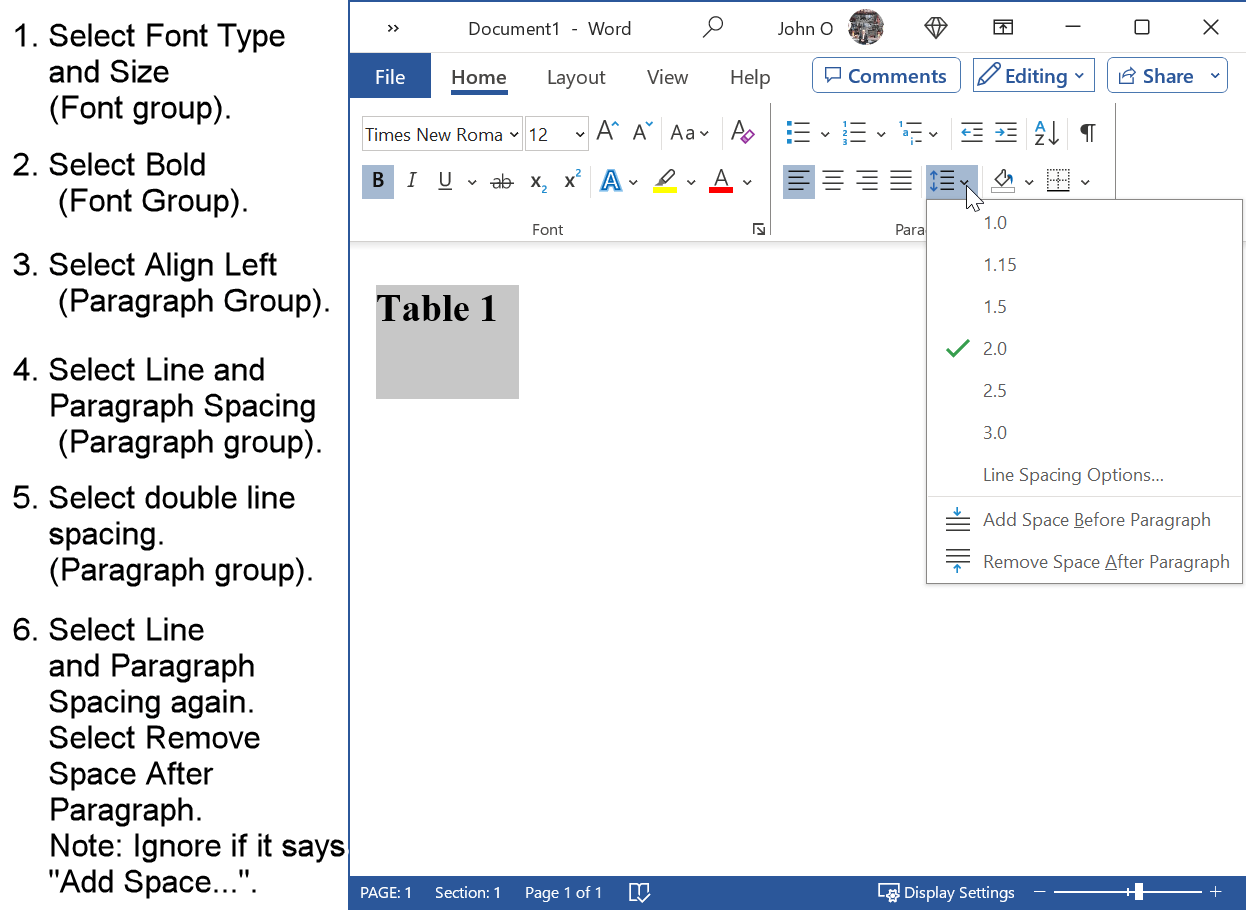 Figure 2: Formatting a Table Number in APA Style
Format the table number as follows:
- Enter the table number, for example, Table 1.
- Select the table number.
- Apply the same font type and size used in the rest of your document, for example, 12-point Times New Roman.
- Select Bold in the Font group.
- Select Align Left in the Paragraph group.
- Select the Line and Paragraph Spacing icon.
- Select 2.0 to apply double line spacing.
- Open the Line and Paragraph Spacing menu again.
-
Remove any additional spacing before or after the paragraph, if present.
This prevents Microsoft Word from adding extra space in addition to the required double spacing.
Table Title
Figure 3 shows how to format a table title using Microsoft Word.
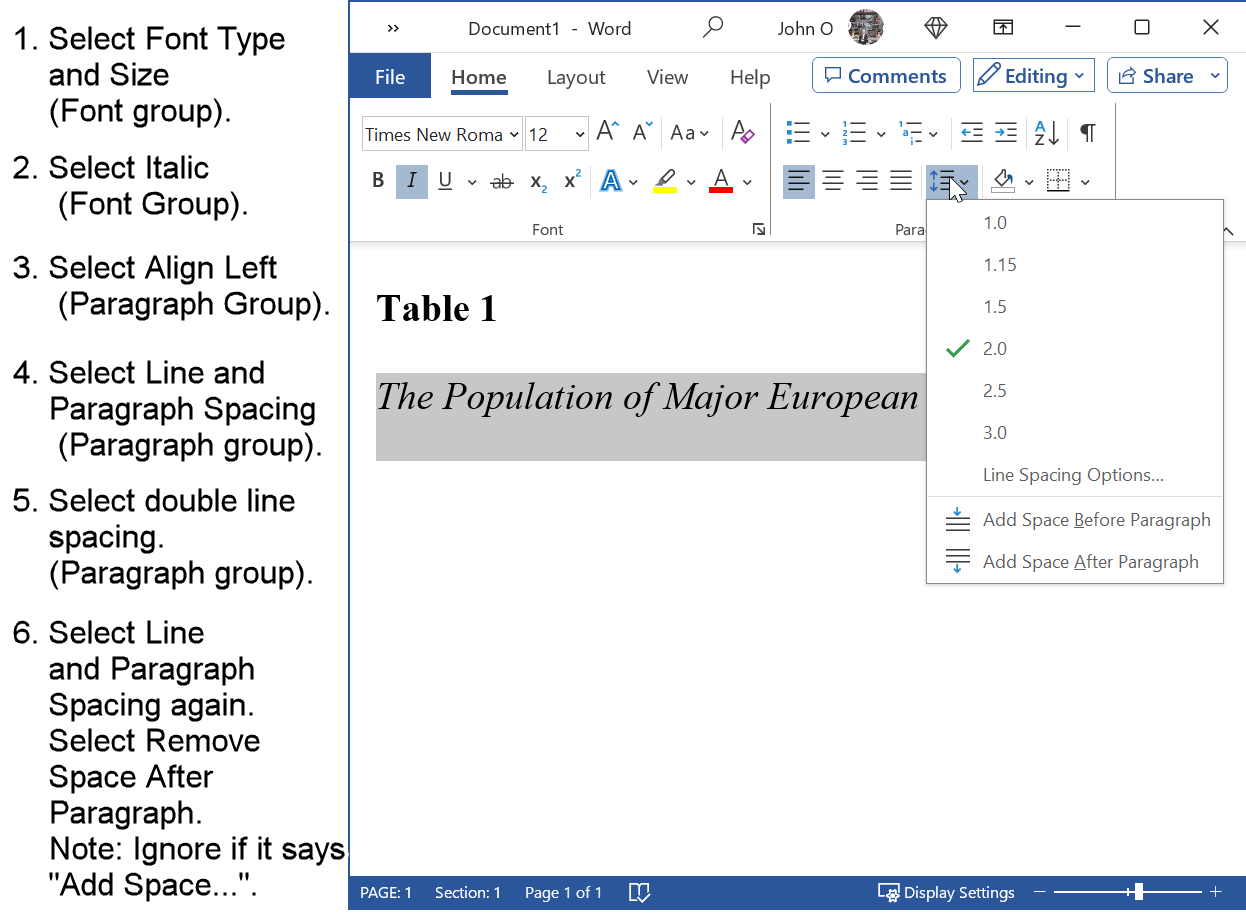 Figure 3: Formatting a Table Title in APA Style
Format the table title as follows:
- Enter the title in title case on the line below the table number, for example, The Population of Major European Cities.
- Select the table title.
- Apply the same font type and size used in the rest of your document, for example, 12-point Times New Roman.
- Select Italic in the Font group.
- Select Align Left in the Paragraph group.
- Select 2.0 to apply double line spacing.
- Open the Line and Paragraph Spacing menu again.
- Remove any additional spacing before or after the paragraph, if present.
Table
Table Alignment and Line Spacing
Figure 4 shows how to align a table against the left margin.
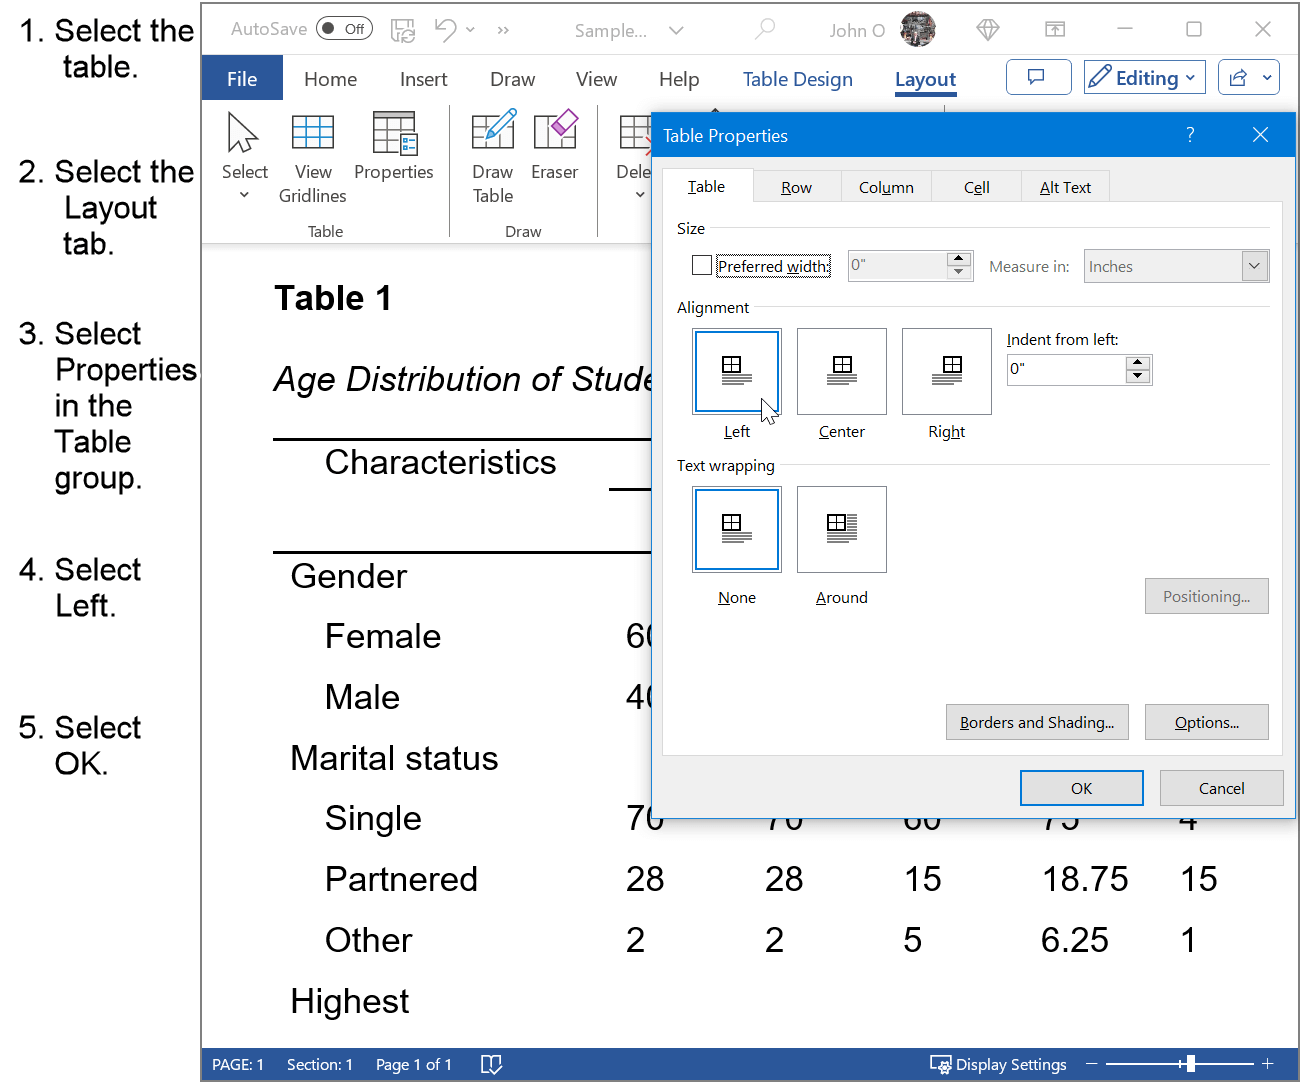 Figure 4: Left Aligning an APA-Formatted Table
Left align the table as follows:
- Select the table.
- Select the Table Layout tab.
- Select Properties in the Table group.
- Select the Table tab in the Table Properties dialog box.
- Under Alignment, select Left.
- Select OK.
Figure 5 shows how to adjust the line spacing within a table.
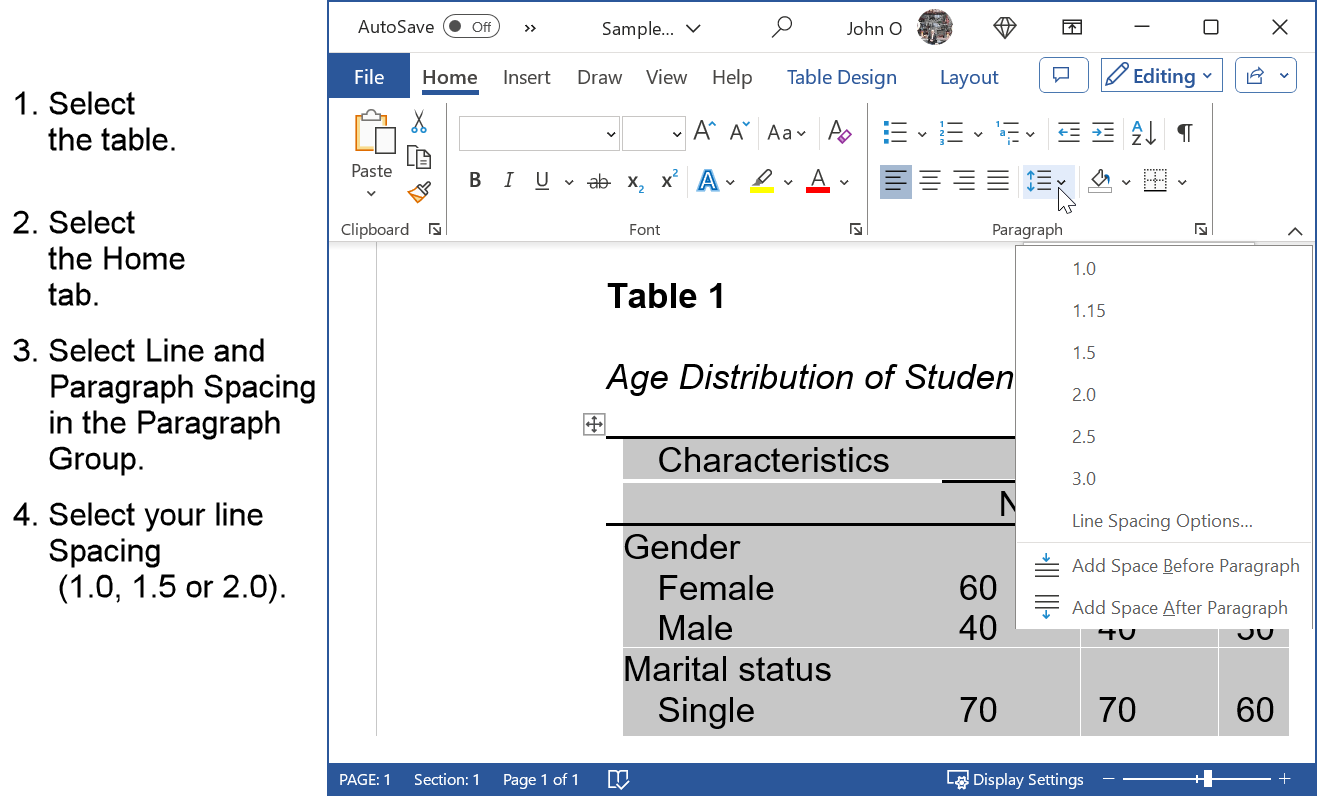 Figure 5: Adjusting the Line Spacing in an APA-Formatted Table
Set the line spacing as follows:
- Select the table.
- Select the Home tab.
- Select the Line and Paragraph Spacing icon in the Paragraph Group.
- Select 1.0, 1.5, or 2.0.
The text inside an APA table does not have to be double-spaced. Use the spacing required by your instructor or choose the option that makes the table easiest to read.
Use the same line spacing throughout the table unless a different spacing is needed to improve clarity.
Column Headings
Figure 6 shows how to format the column headings.
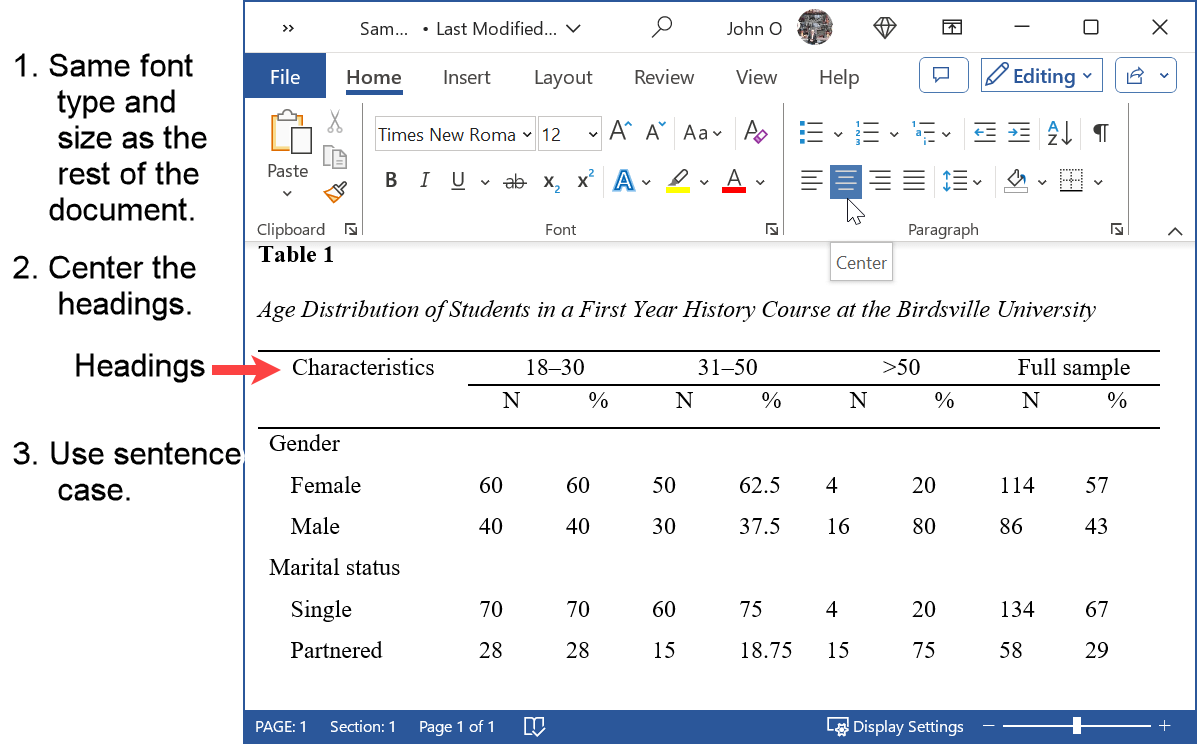 Figure 6: Formatting Column Headings in an APA-formatted Table
Format the column headings as follows:
- Select the column headings.
- Apply the same font type and size used in the rest of your document.
- Center each heading above its column.
- Write each heading in sentence case.
Include a heading for the stub column as well as for the columns containing data.
Table Entries
Stub Column
The stub column is the left-hand column of the table. It normally identifies the categories or variables described by the information in the other columns.
Figure 7 shows how to format entries in the stub column.
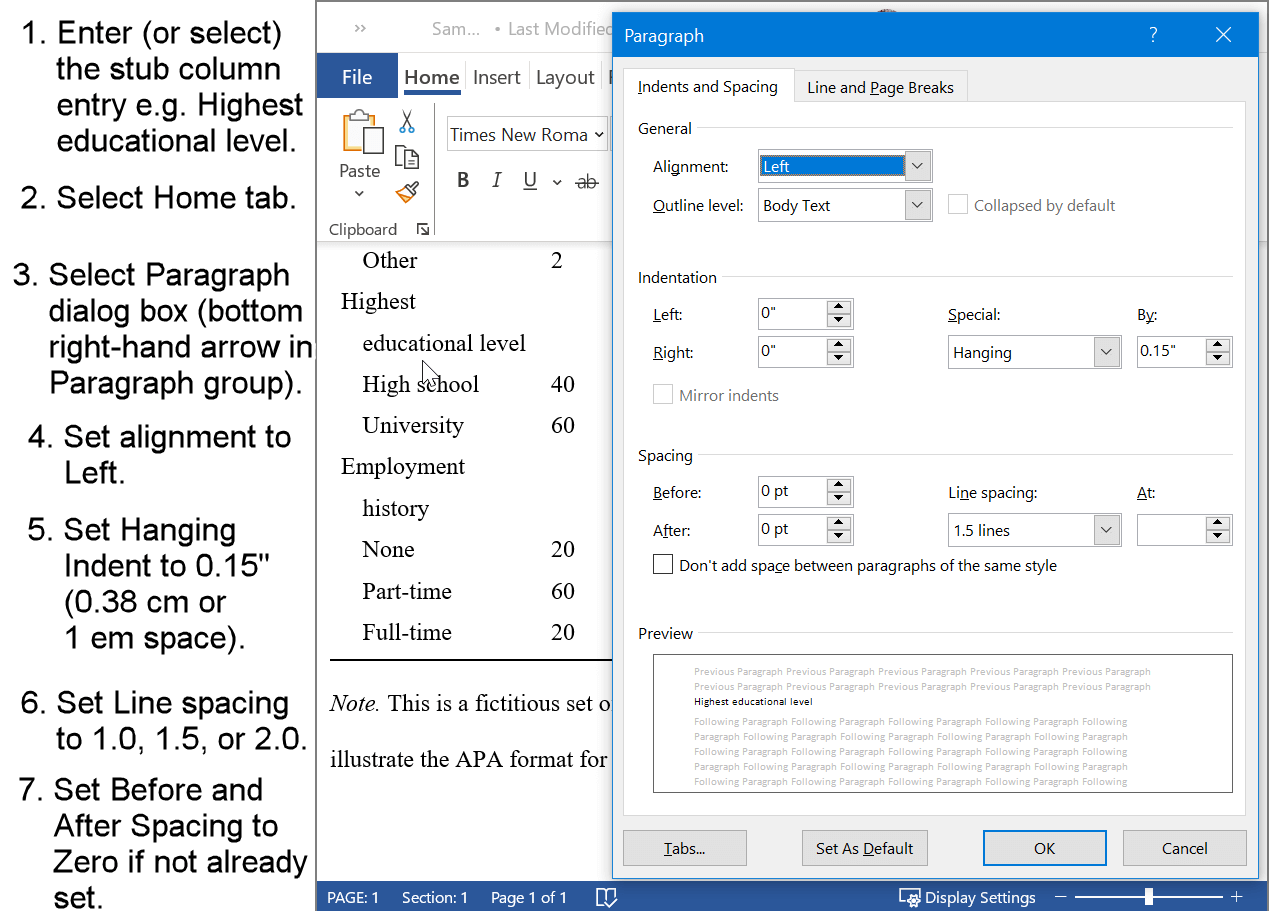 Figure 7: Formatting Stub Column Entries
 Format stub column entries as follows:
- Select the entries in the stub column.
- Apply the same font type and size used in the rest of your document.
- Write text entries in sentence case.
- Left align the entries.
- Open the Paragraph dialog box by selecting the arrow in the lower-right corner of the Paragraph group.
- Apply a hanging indent of 0.15 inches (0.38 centimetres) or one em space to entries that extend over more than one line.
- Set the line spacing to 1.0, 1.5, or 2.0.
-
Use the same line spacing as the rest of the table.
Subcategories in the Stub Column
Subcategories are subordinate entries placed beneath a main category in the stub column.
Figure 8 shows how to format these subcategories.
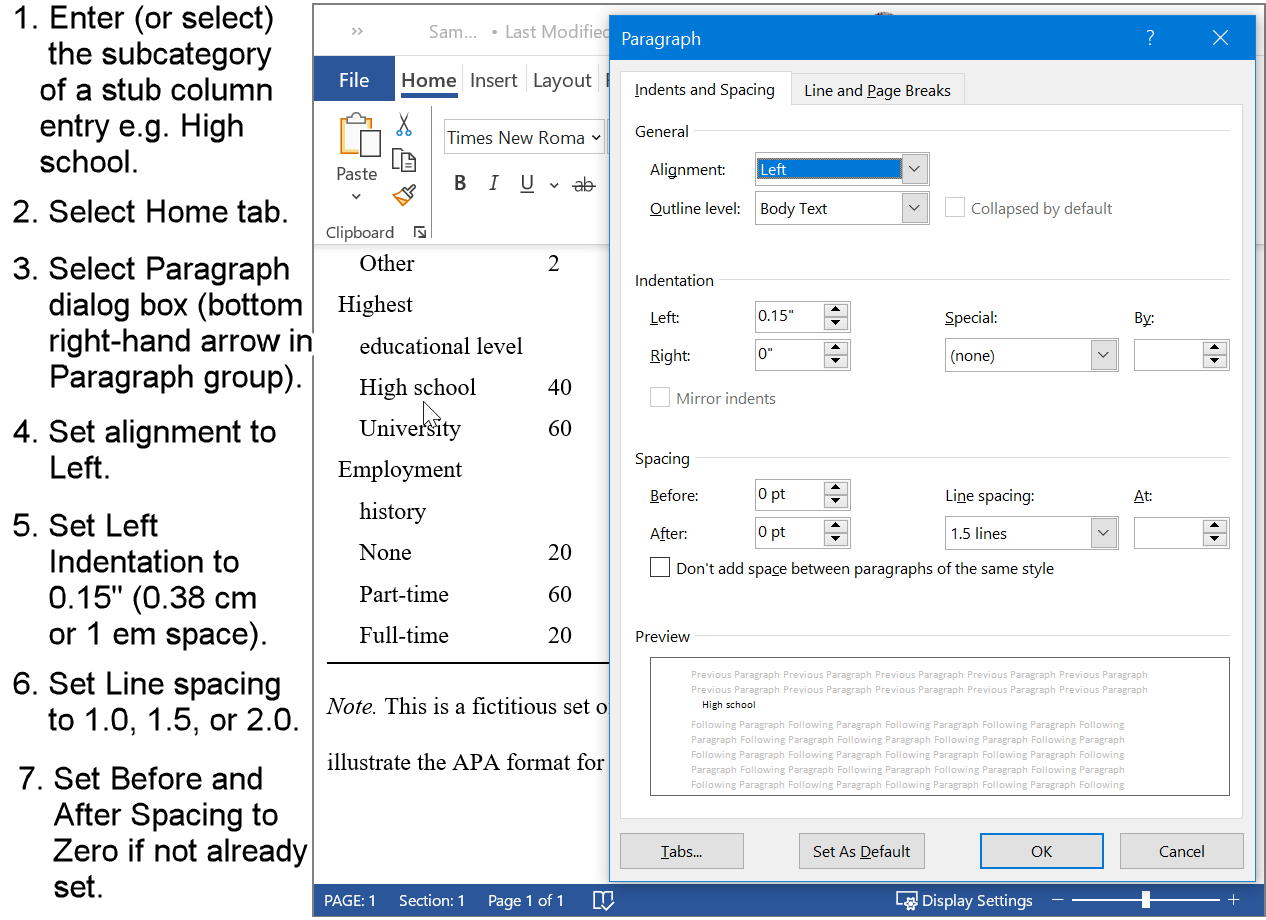 Figure 8: APA-formatted Subcategories in the Stub Column
Format subcategories as follows:
- Select the subcategory entries.
- Left align the entries.
- Open the Paragraph dialog box.
- Indent each subcategory by 0.15 inches (0.38 centimetres) or one em space.
- Set the line spacing to 1.0, 1.5, or 2.0.
Use the same line spacing as the rest of the table. - Set the spacing before and after each paragraph to 0 pt.
Body of the Table
Figure 9 shows how to format the entries in the body of the table.
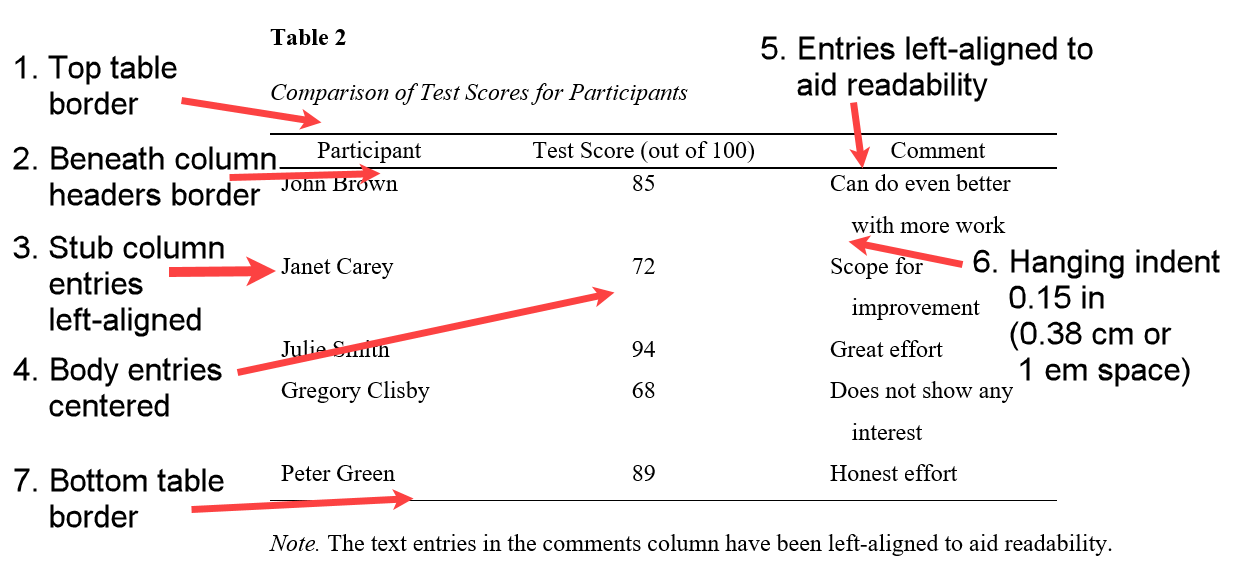 Figure 9. APA-formatted Body of a Table
Format the body of the table as follows:
- Apply the same font type and size used in the rest of your document.
- Center numerical entries unless another alignment makes the values easier to compare.
- Center short text entries where appropriate.
- Left align longer text entries when this improves readability.
- Write text entries in sentence case.
- Set the line spacing set to 1.0, 1.5, or 2.0.
Use the same line spacing throughout the table. - Apply a hanging indent of 0.15 inches (0.38 centimetres) or one em space to longer entries when required.
- Set the spacing before and after each paragraph to 0 pt.
You do not normally need to align numbers by their decimal points. However, decimal alignment may be useful when readers need to compare a column of decimal values.
See discussion on whether to align decimal points for a set of numbers.
Table Borders
When you insert a table by selecting Insert and then Table, Microsoft Word normally places a border around every cell.
These are actual borders. They are not the same as the nonprinting gridlines that Word can display while you edit a table.
APA-formatted tables generally do not use borders around every cell. Remove the existing borders before adding the horizontal lines required for the table.
How to Remove the Existing Borders
Figures 10 and 11 show how to remove the borders from a newly inserted table.
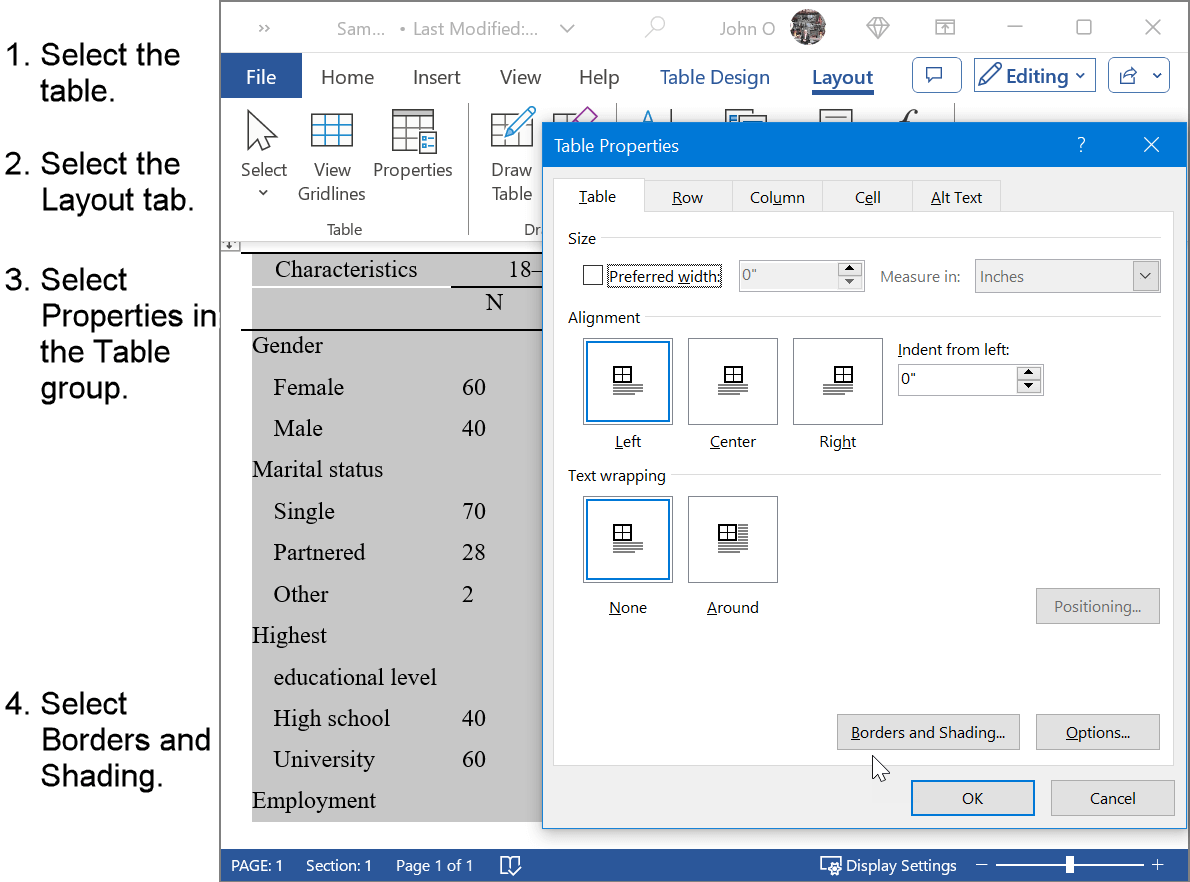 Figure 10: Opening the Borders and Shading Dialog Box
Remove the borders as follows:
- Select the table.
- Select the Table Layout tab.
- Select Properties in the Table group.
- Select Borders and Shading.
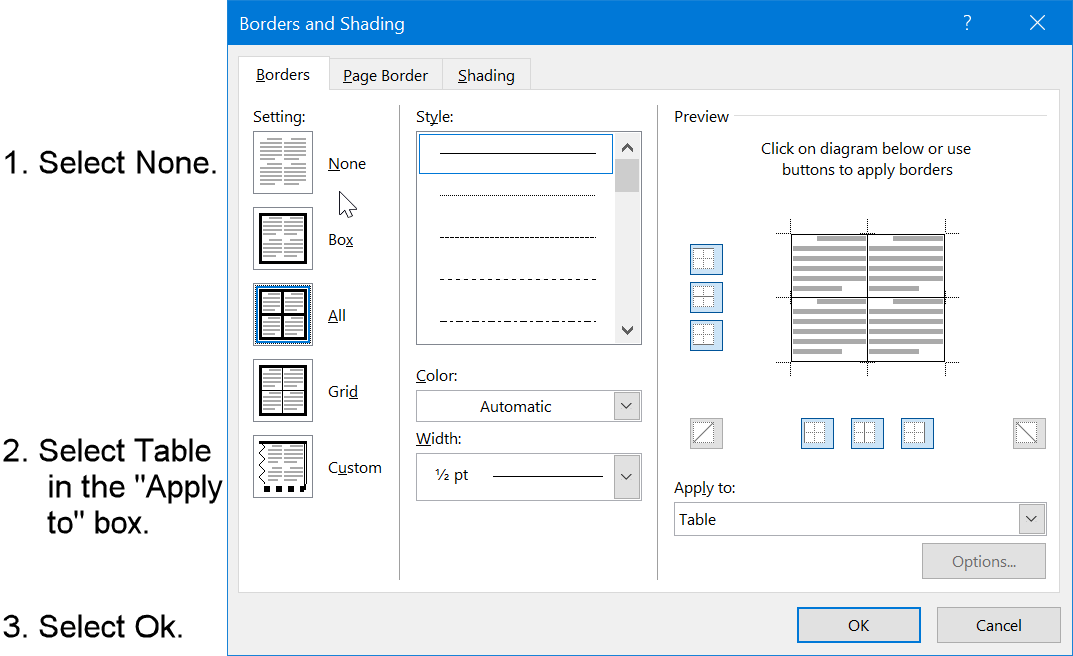 Figure 11: Removing All Borders from a Table
Remove the borders as follows (continued):
- Select the option that removes all borders.
- Make sure that Apply to is set to Table.
- Select OK.
Top and Bottom Table Borders
Figures 12 and 13 show how to add borders to the top and bottom of the table.
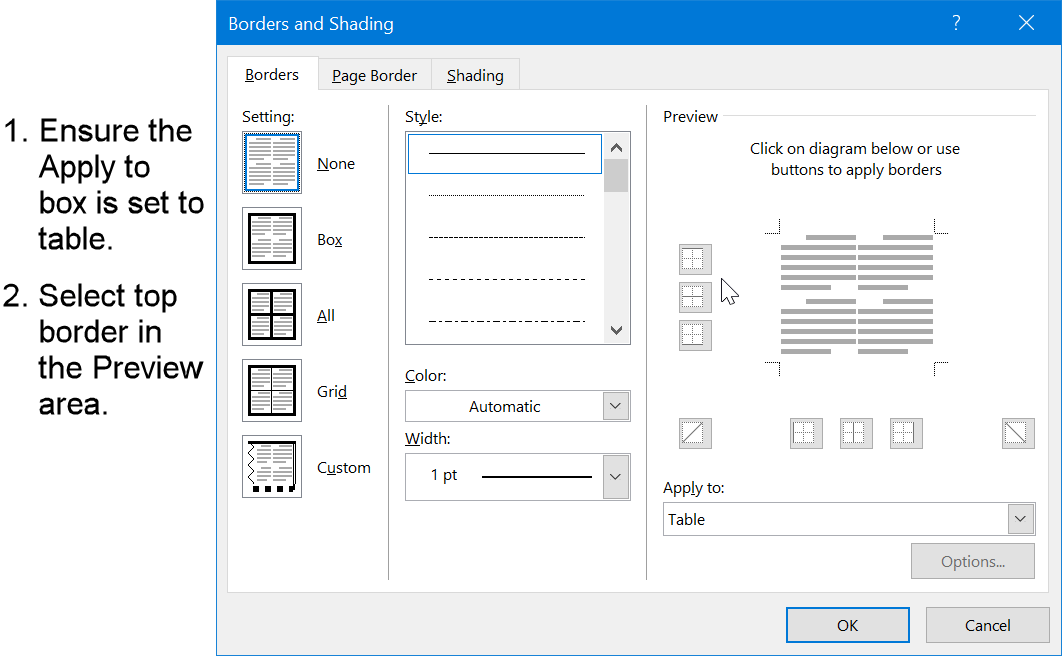 Figure 12: Adding a Border to the Top of a Table
Add the top border as follows:
- Make sure that Apply to is set to Table.
- In the Preview area, select the top border.
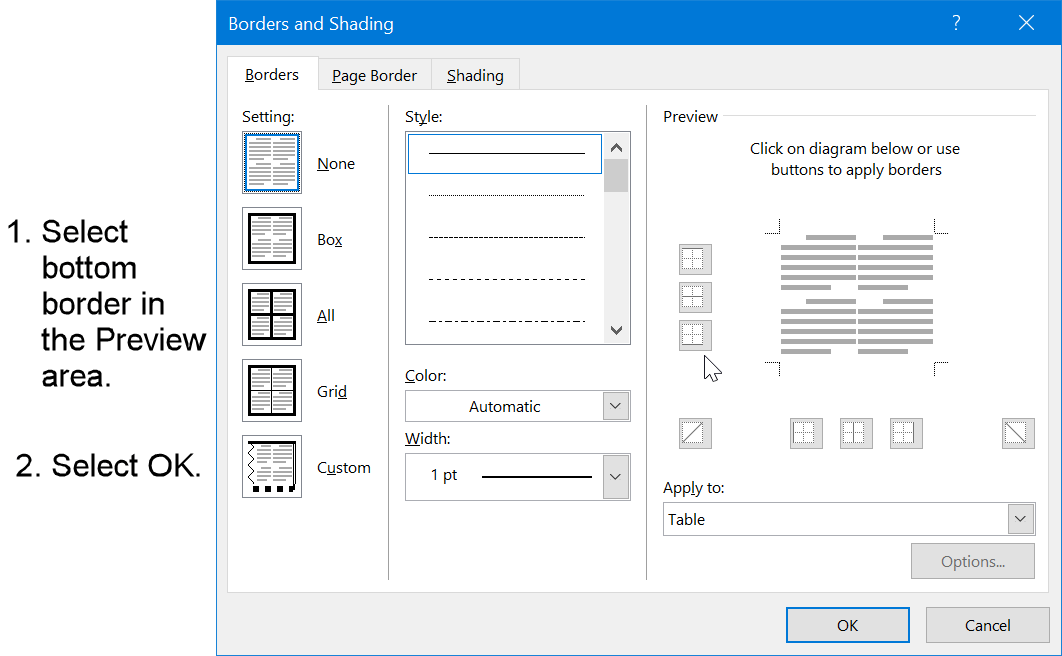 Figure 13: Adding a Border to the Bottom of a Table
Add the bottom border as follows:
- In the Preview area, select the bottom border.
- Select OK.
Top and Bottom Heading Borders
A horizontal line is normally placed beneath the column headings.
A line may also be placed above a spanner heading when required.
Figures 14 and 15 show how to apply a border to selected heading cells.
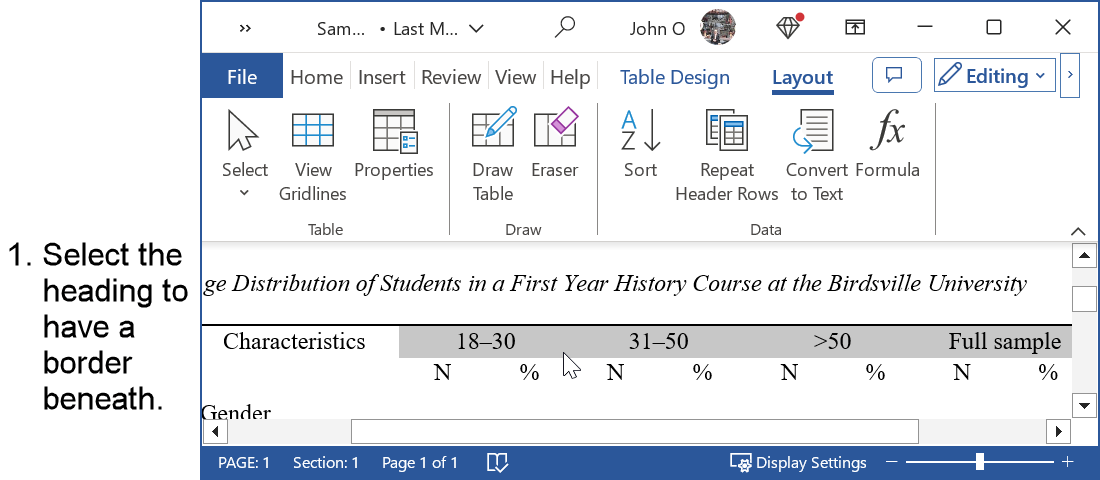 Figure 14: Selecting Heading Cells for a Border
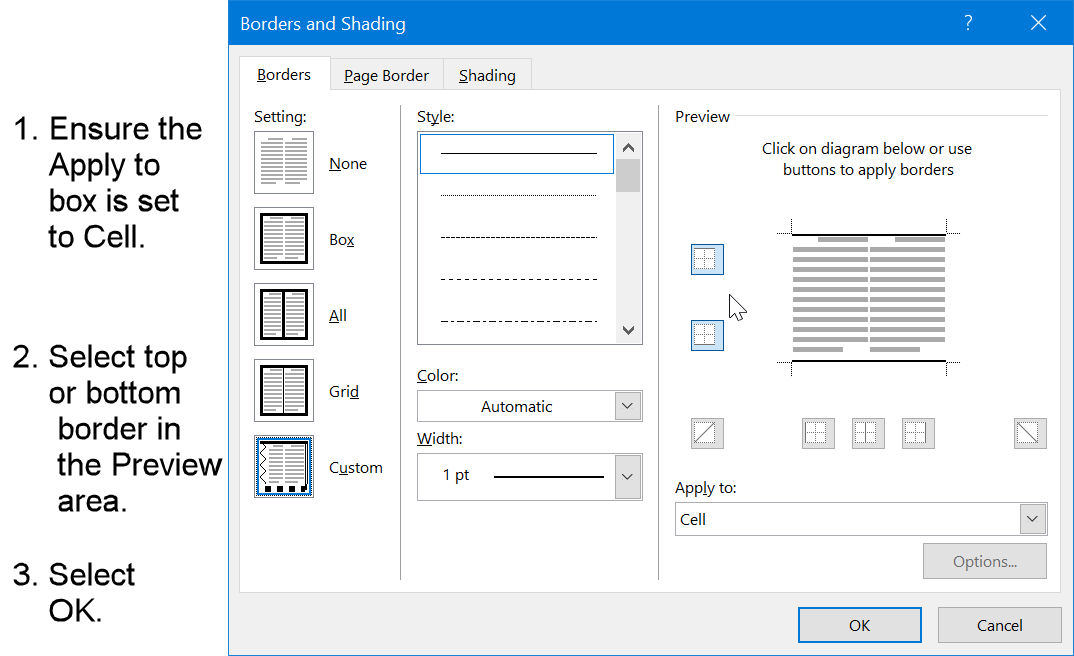 Figure 15: Adding a Border to a Table Heading
Add a border to a heading row as follows:
- Select the cells in the heading row.
- Open the Borders and Shading dialog box..
- Make sure the Apply to box is set to Cell.
- Select the top border if you are placing a line above the heading.
- Select the bottom border if you are placing a line beneath the heading.
- Select OK.
Table Notes
See Figure 1 (above) for an example of a note placed beneath an APA table.
Add and format the note as follows:
- Place the note immediately below the table.
- Align the note flush left against the left margin.
- Double-space the note.
- Begin with the italicized word Note. followed by a period.
- Enter the explanatory information after Note.
Do not add a table note unless it helps readers understand the table.
Summary
An APA-formatted table contains a table number, a title, the body of the table, and notes when required.
Figure 1 shows a complete example of an APA-formatted table.
Figures 2–15 show how to create and format the different parts of an APA-formatted table using Microsoft Word.
The following are examples of APA-formatted tables:
Frequently Asked Questions
What are the main parts of a table in APA format?
What are the main parts of a table in APA format?
A table in APA format usually includes a table number, a title, the body of the table, and notes if they are needed.
Does a table in APA format have to be double-spaced?
Does a table in APA format have to be double-spaced?
The table number, title, and notes are usually double-spaced. The body of the table may use single, one-and-a-half, or double line spacing. Choose the spacing that makes the table easy to read, unless your instructor gives different instructions.
Should every cell in a table have a border?
Should every cell in a table have a border?
No. A table in APA format normally has a border at the top and bottom of the table and a line beneath the column headings. Vertical lines and borders around every cell are usually not used.
How should the table title be formatted?
How should the table title be formatted?
Place the title below the table number. Align it to the left, italicize it, and write it in title case. Do not place a period after the title.
Do numbers in a table have to be aligned by the decimal point?
Do numbers in a table have to be aligned by the decimal point?
No. Numbers do not normally have to be aligned by the decimal point. However, decimal alignment may be used when it makes the values easier to compare.
When is a table note required?
When is a table note required?
A table note is required only when readers need additional information to understand the table. A note may explain an abbreviation, identify a source, or clarify part of the data.