Styles in Word - What a Way to Save Time!
(and produce work that is more professional and improve your chances of success)
Why use styles in Word?
Styles will make you more productive, your work will be more consistent, and your work will be more accurate.
Master styles and gain an advantage over your peers.
What is a style in Word?
A style in Word is a set of predefined formats.
You can use the style over and over again.
You are probably already using styles in Word because Microsoft provides several of them.
For example, if you click on Heading 1 in the Styles gallery in the Home tab, your text will be formatted according to that style (e.g. Calibri light font, 16 pt).
But what if the format you want is not one of the predefined styles (e.g., Times New Roman 12 pt, 1/2 in or 1.27 cm hanging indent, double line spaced)?
Then you create your own!
How to create Styles in Word
- Select the Home tab.
- Click on the arrow in the bottom right-hand corner of the Styles group.
The Styles panel will appear (see Figure 1).
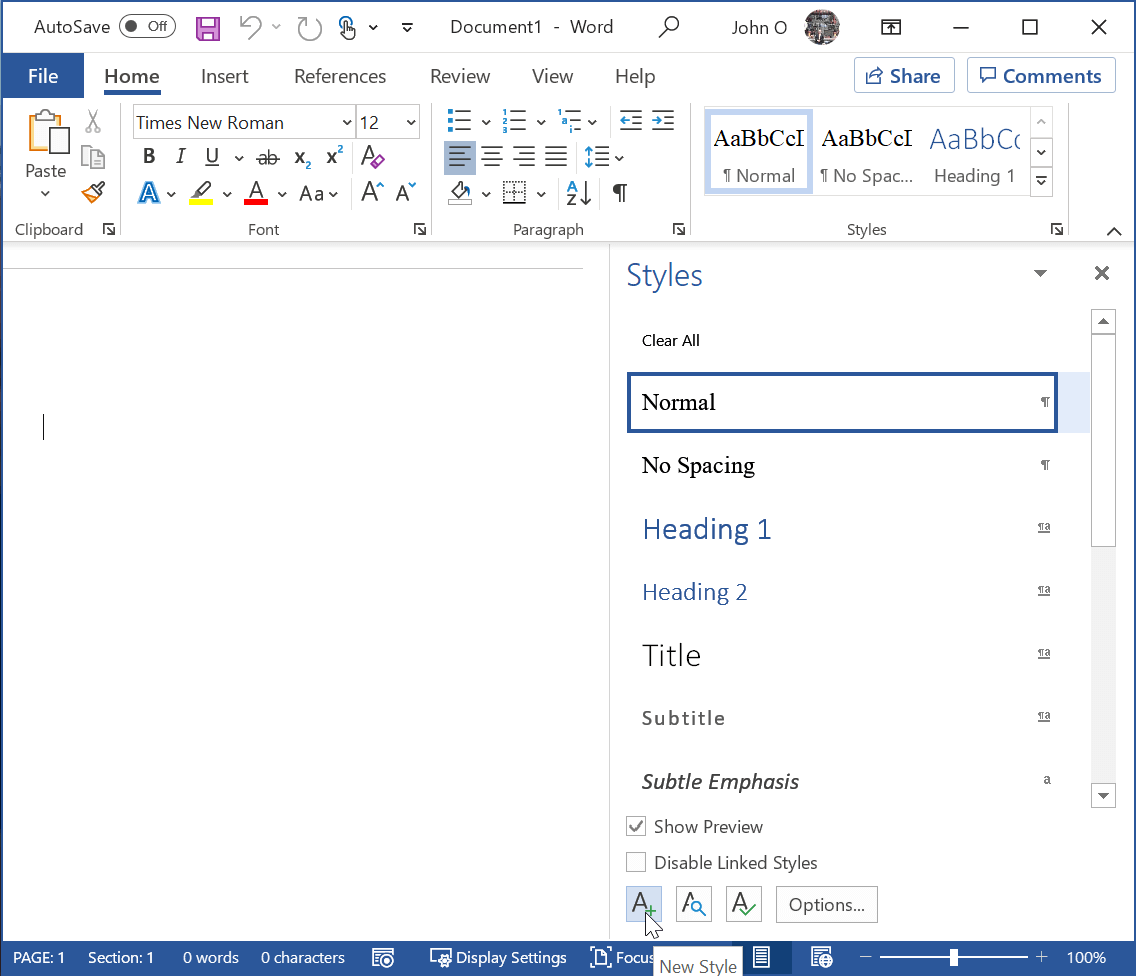 Figure 1: In-built styles in Word
- Click on the A+ button at the bottom of the Styles Panel.
The Create New Style Window will appear (see Figure 2). - Complete the following in Properties:
- Name - enter what you would like to call the style sheet, for example, MyOwnStyle
- Style type - select one of the following from the drop-down menu:
- Paragraph - the style applies to the whole paragraph, even if you select some text within the paragraph.
- Character - the style applies to the selected text only. You can only format text, such as font type, size and color.
- Linked - the style applies to selected text, or if no text selected, it applies to the paragraph.
- Style based on - select a style from the drop-down list.
I prefer no style so that my style is not affected by another style. - Style for following paragraph - What style do you want for the following paragraph?
Is it the style you are creating here? Is it a different style?
For example, if you are creating a Heading style, you may want a paragraph style after that.
If you are creating a paragraph style (e.g. MyOwnStyle), you would have a paragraph style for the following paragraph. - Complete the following shortcuts in the Formatting part (if you don't do it here, you can do it in a later step):
- Select the font type,for example, Times New Roman.
- Select the font size, for example, 12.
- Select Bold, Italic and/or Underline if you wish.
- Select Alignment - Left, Centered, Right or Justified.
- Select Spacing - Single, One and a Half, or Double line spacing.
- Increase or decrease space between paragraphs.
- Increase or decrease paragraph indents.
- Complete the following at the bottom:
- Add to the Styles Gallery (if not already checked).
- Select "Only in this document" if this new style is just for this document
OR Select "New document based on this template" if this style is to be available for future documents as well - especially useful if you are writing more documents with the same formatting. - Click on the Format button.
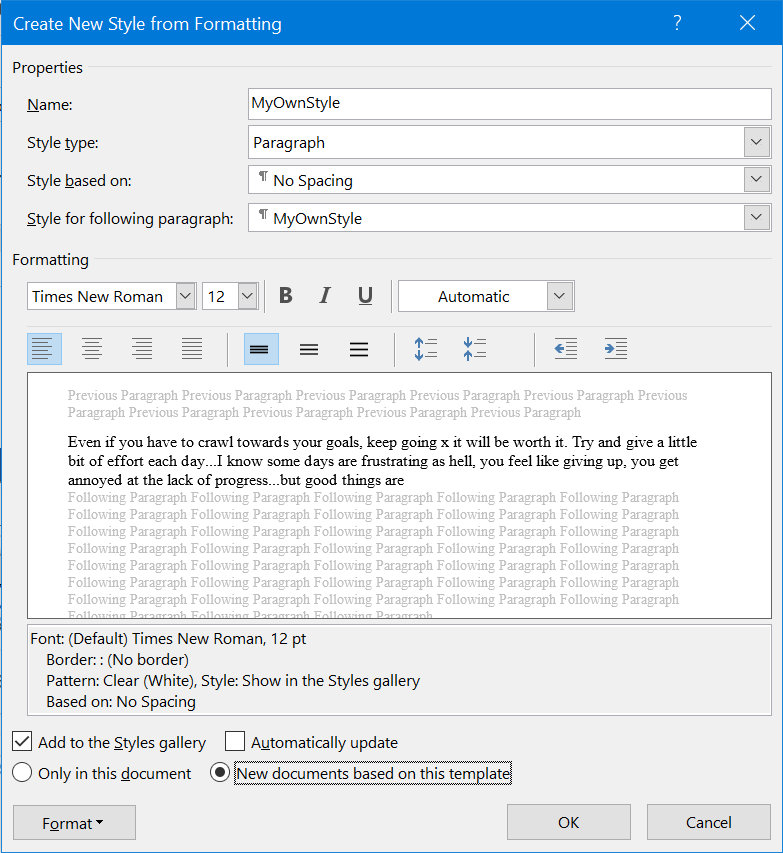 Figure 2: Create a new style that suits your requirements
- Click on Font if you want to do more font formatting, or if you didn't do the font formatting in the previous step (see Figure 3)
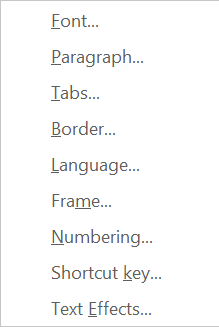 Figure 3: The Format submenu for the new style
- Complete the font properties that you haven't yet entered in step 5 (see Figure 4).
Note - Font properties that you entered in step 5 will appear in this dialog box. You will not lose any information.
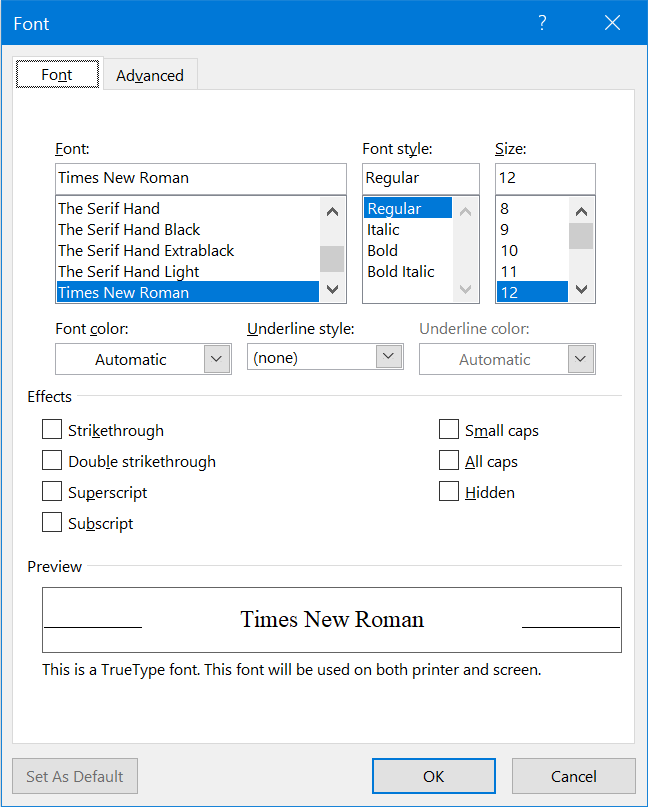 Figure 4: Formatting the font in the new style
- Complete the paragraph properties that you want but didn't enter in step 5 (see Figure 5).
Note -Paragraph properties that you entered in step 5 will appear in this dialog box. You will not lose any information. - You may want to add additional properties such as:
- Indents and Spacing
- Outline level - Levels 1, 2 and 3 (usually for heading levels so they can appear in the Table of Contents) and Body text (which is your normal paragraph level).
- Special - First line and Hanging indentation
- Line and Page Breaks
- Page break before
- Don't hyphenate
- Complete the following in Indents and Spacing (see Figure 5):
- Alignment - Select Centered if not already selected.
- Outline level - Select Level 1 from the drop-down menu.
The level is used in the Outline View.
The level is used in creating a Table of Contents. - Select Double Line spacing
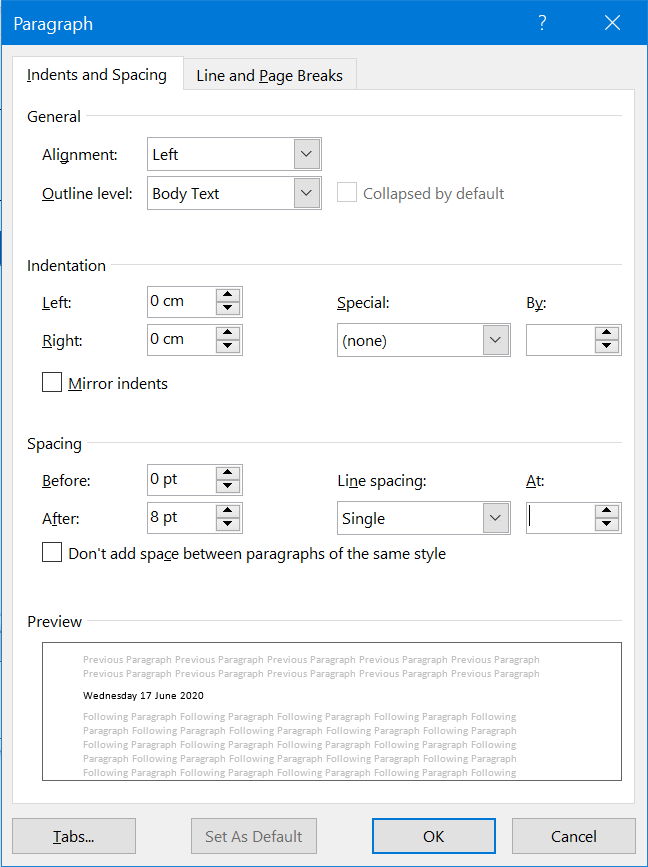 Figure 5: Formatting the paragraph in the new style
- Complete the following in Line and Page Breaks (see Figure 6):
- Select Widow/Orphan control if not already selected.
- Select Page break before if you want Level 1 Headings to start on a new page.
- Select Don't hyphenate.
- Click OK.
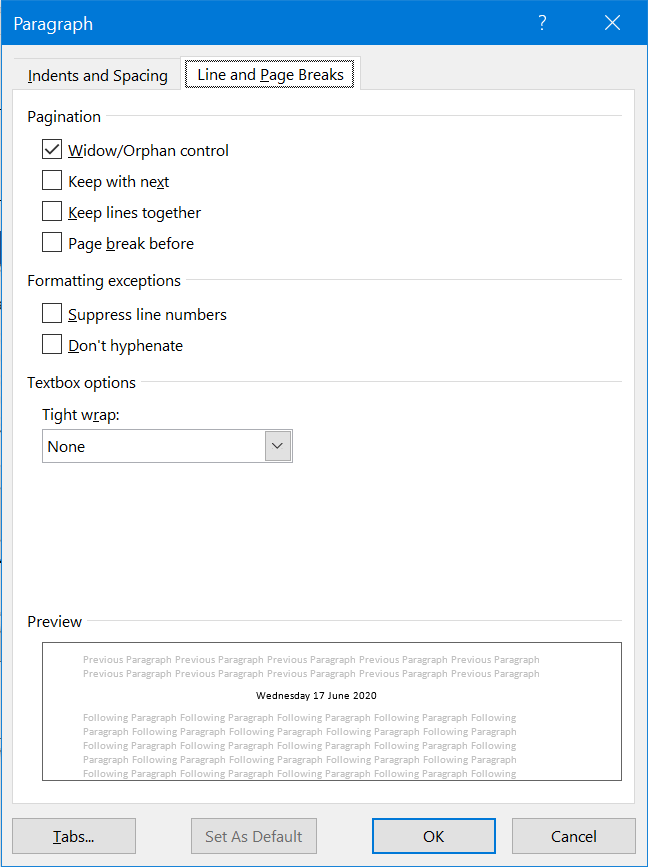 Figure 6: Adding paragraph format to the new style.
- Click on OK to close the open windows.
How to use the styles in Word you have created
To type text in the format you defined in your style:
- Click on the style you created in the gallery (see Figure 7).
- Enter your text.
If you have already typed the text but not in the style you created:
- Place the cursor inside the text.
- Click on the style you created in the gallery.
If the style you created is not in the gallery (maybe you didn't select Add to the Styles gallery):
- Click on the arrow in the bottom right-hand corner of the Styles group.
- Click on the style that you created previously (see Figure 8).
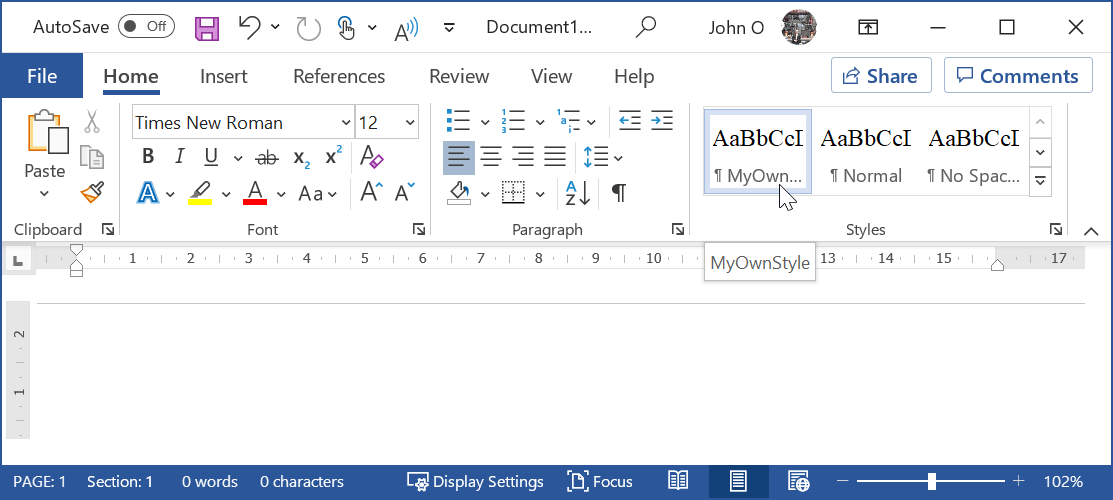 Figure 7: Select your style from the Style gallery
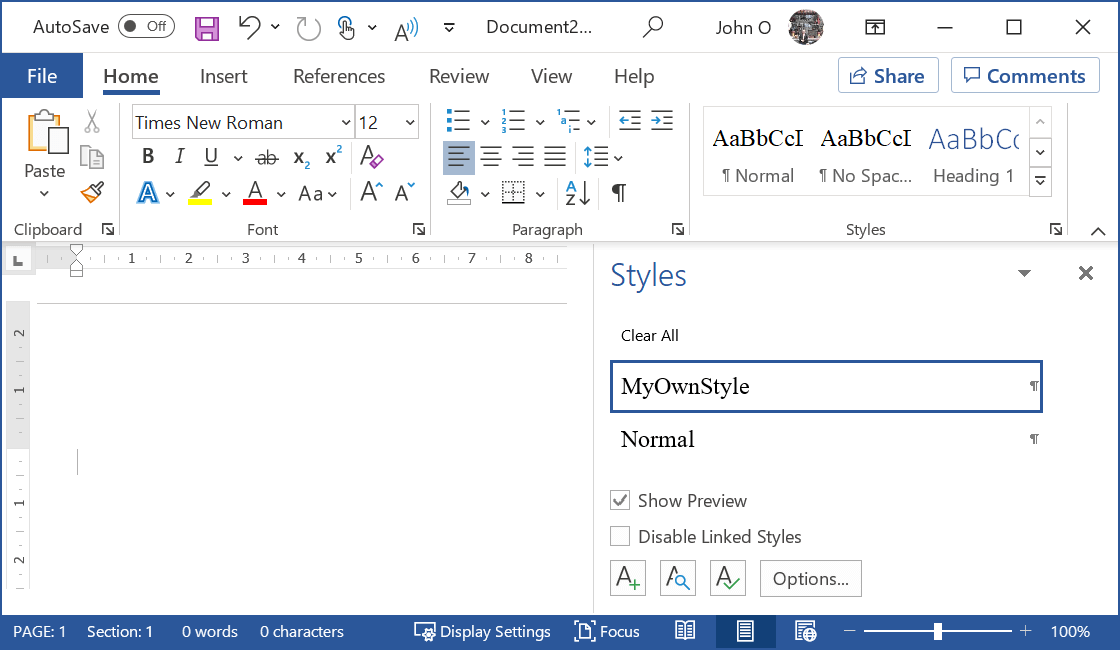 Figure 8: Choosing your style from the Styles pane
Summary
Can you see how much time you can save by using styles in Word?
You could create several documents in Microsoft Word using the same formatting rules - create your style (takes a little time, I know) but then apply it over and over again.
What if the formatting rules change? For example, your organization or institution decides to change the font type for paragraphs from Calibra to Times New Roman.
Do you go through and modify every paragraph?
No - not if you have made a style for it!
You just modify the style and all the paragraphs in all the documents will be updated when the document is opened.
Click here for help on modifying styles in Word.
Using styles in Word is a great productivity aid if you have several documents with formatting requirements not covered by the standard Microsoft Word styles.