How to Create a Flowchart in APA Format Using Microsoft Word
A flowchart in APA format has the following elements:
- figure number
- title
- flowchart
- notes (if required)
Details of the APA format for a flowchart are as follows:
-
Figure Number
- Use the same font type and size as the rest of the text.
- Align flush left against the left margin.
- Apply a bold format, for example, Figure 1 (no period).
- Number the Figures consecutively in the order in which they are mentioned in the main text.
- Set the line spacing to double so that there is a blank line beneath the figure number.
-
Title
- Use the same font type and size as the rest of the text.
- Align flush left against the left margin.
- Italicize the title.
- Use title case, for example, Cost Management Plan Creation (no period).
- Set the line spacing to double so that there is a blank line beneath the title.
-
Flowchart
- Align the flowchart flush left against the left margin.
- Use a sans serif for text within the flowchart.
- Use a font size between 8 and 14 for text within the flowchart.
- Use sentence case for descriptors
-
Notes (if required)
- Use the same font type and size as the rest of the text.
- Align flush left against the left margin.
- Introduce with the word "Note." (Italicized followed by a period, no quotes).
- Set the line spacing to double.
You can draw the flowchart in APA format easily in Microsoft Word.
The easy-to-follow instructions below show you how.
You will be able to:
- format the Figure Number
- format the Figure Title
- draw a flowchart using the Microsoft Word Shapes tool
- format text inside the shape
- write note(s)
in APA format.
Step 1 - Write the Figure Number and Figure Title in APA Format
The APA format for the figure number and the figure title is as follows:
- the same font type as used elsewhere in the paper
- the same font size
- double line spaced
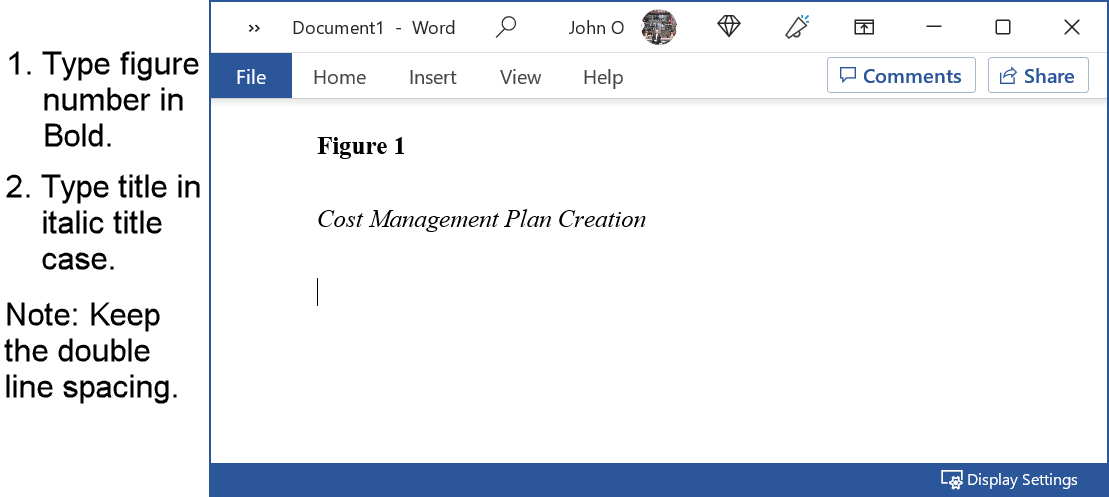 Figure 1: Flowchart Figure Number and Title in APA Format
Written instructions for Figure 1 are:
- Enter the figure number in bold and left justified.
- Enter the figure title in italics, title case and left justified.
- Set the figure number, title and image to always appear on the same page.
Select the figure number, title and the position where the flowchart is to be inserted.
Then Home→Paragraph→Line and Page Breaks→Keep with Next. - Set line spacing to double.
Select the figure number, title and the position where the flowchart is to be inserted.
Then Home→Paragraph→Indents and Spacing→Line spacing - Double.
Step 2 - Create a New Drawing Canvas
Place the cursor one double spaced line after the Figure Title.
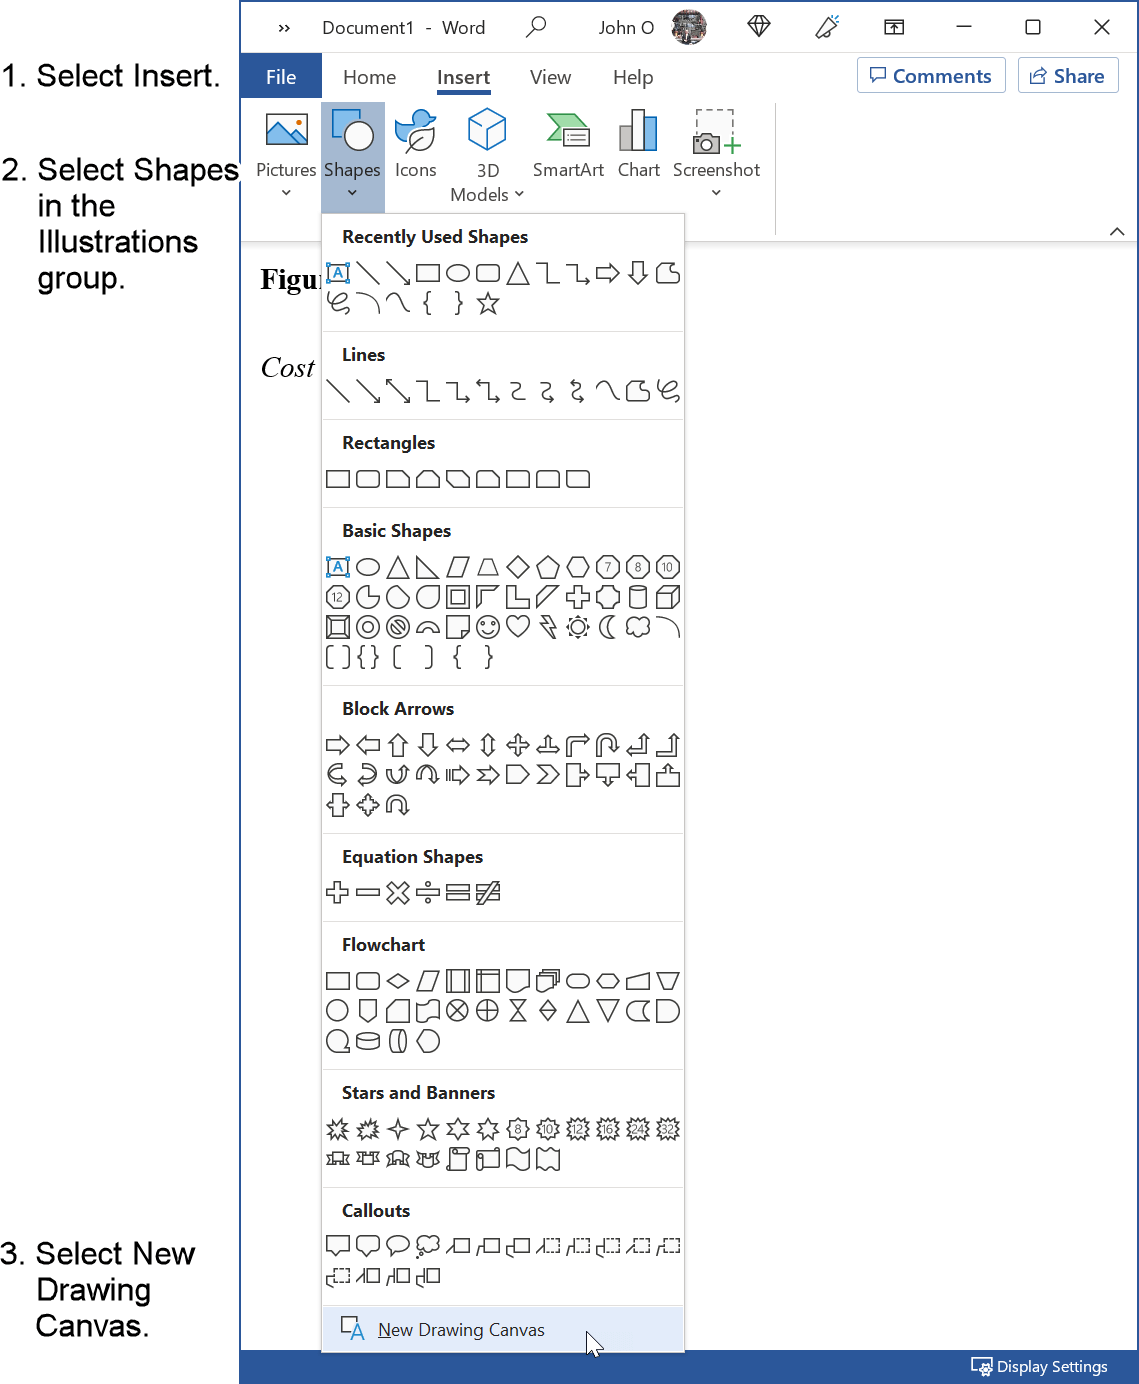 Figure 2: Drawing Canvas for Flowchart in APA Format
Written instructions for Figure 2 are:
- Place the cursor one double spaced line after the Figure Title.
- Select the Insert tab.
- Select Shapes in the Illustrations group.
- Select New Drawing Canvas.
Note: You can draw shapes without creating a drawing canvas. However, I recommend that you do because:
- It is easier to organize your shapes, for example, you can move the whole flowchart by moving the canvas.
- You can add connectors to your shapes for ease of drawing lines between shapes.
See reasons for using a drawing canvas (opens in a new window).
Step 3 - Select and Draw Flowchart Shape
Figures 3, 4 and 5 show how to draw your first shape.
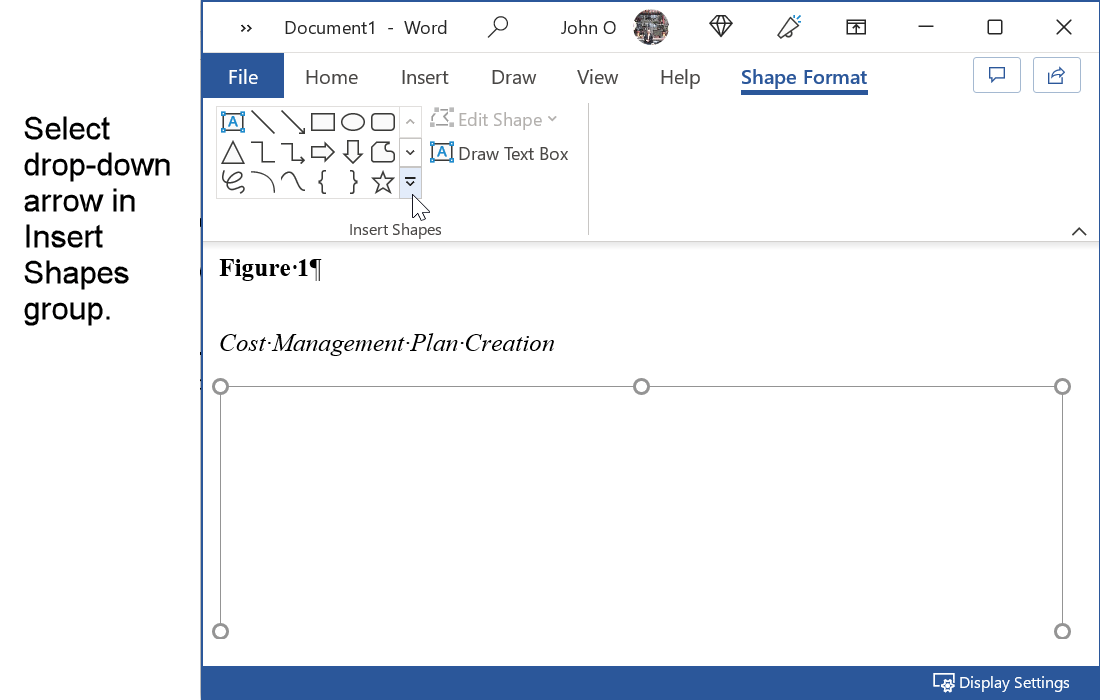 Figure 3: Display Available Flowchart Shapes
Written instructions for Figure 3 are:
- Select the Insert tab in the Ribbon.
- Select drop-down arrow in the Insert Shapes group.
The available shapes, including flowchart shapes, will appear.
Note: A small sample of recently used shapes is displayed. You can select a flowchart shape from here if it is available.
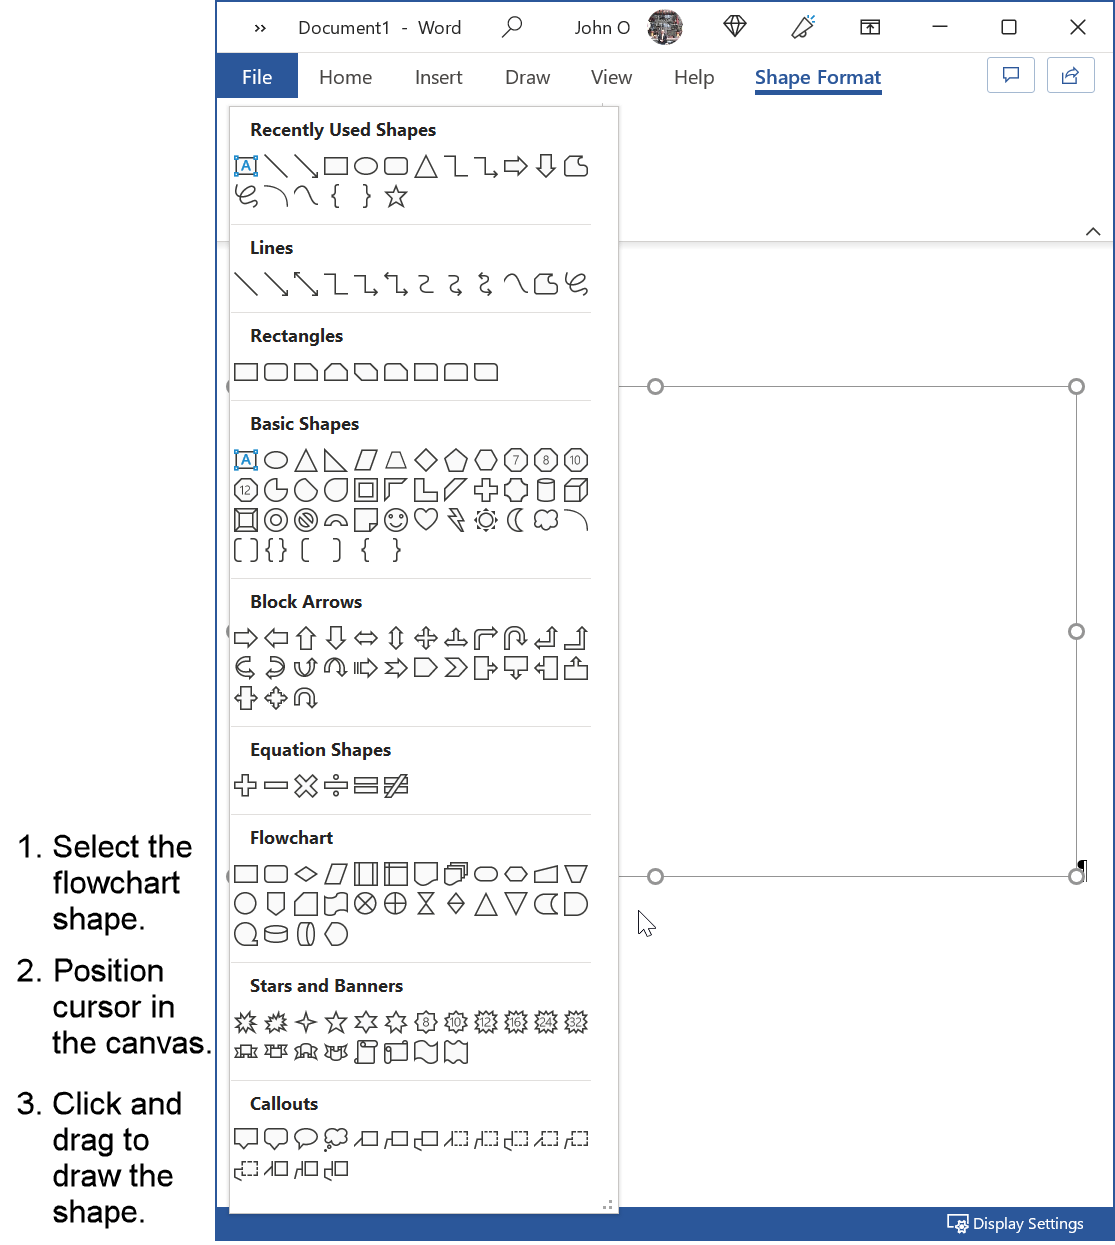 Figure 4: Draw Flowchart Shape
Written instructions for Figure 4 are:
- Select the first shape to draw, for example, the document symbol.
Hover the cursor over the shape for a description of the shape. - Select that shape.
- Move the cursor to the point on the canvas where you want to draw the shape.
- Click and drag to draw the shape.
Step 4 - Format the First Shape of the Flowchart in APA Format
The shape will (most likely) have a default appearance different to the required APA format.
A flowchart symbol will have a white fill and a black border.
Figures 5, 6 and 7 show how to format the shape, and set as default.
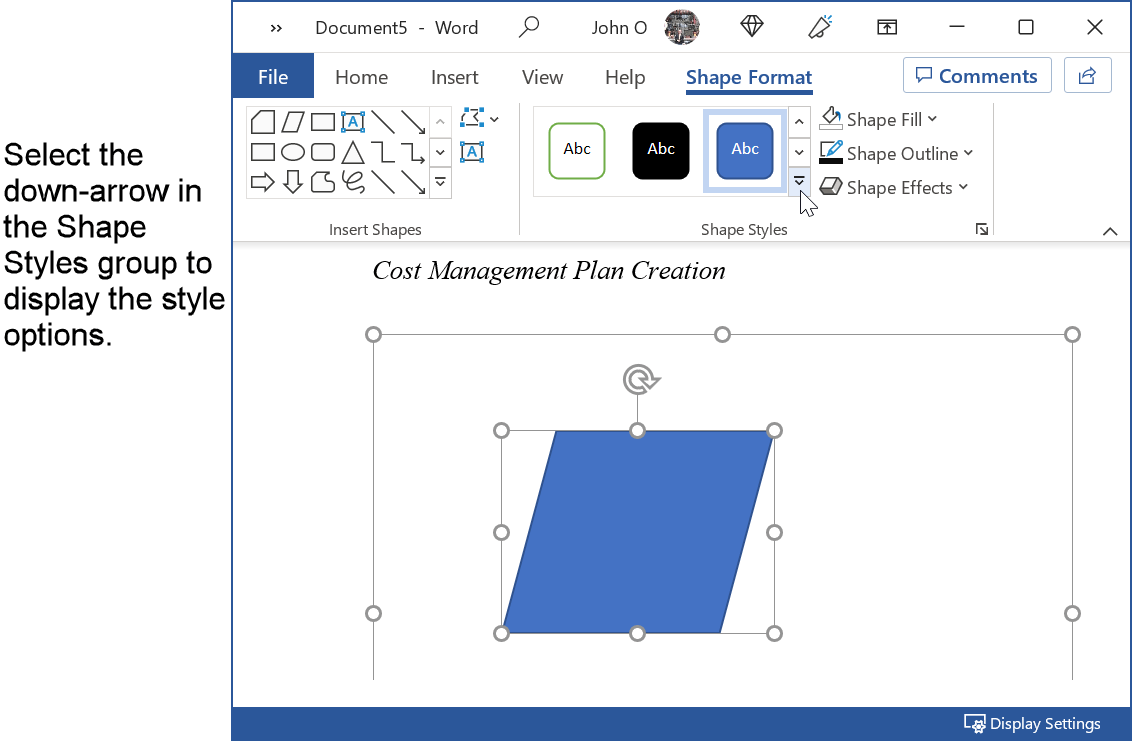 Figure 5: Display Different Shape Formats
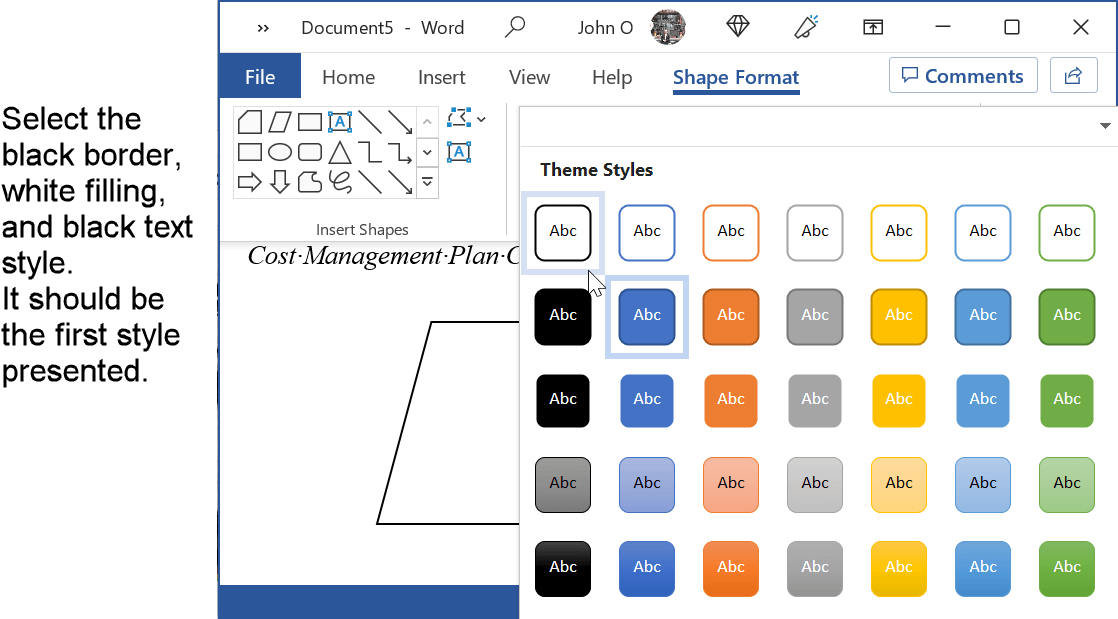 Figure 6: Select the APA Format for Flowchart
Written instructions for Figures 5 and 6 are:
- Select the down-arrow in the Shape Styles group to display the different styles.
- Select the white fill, black outline shape.
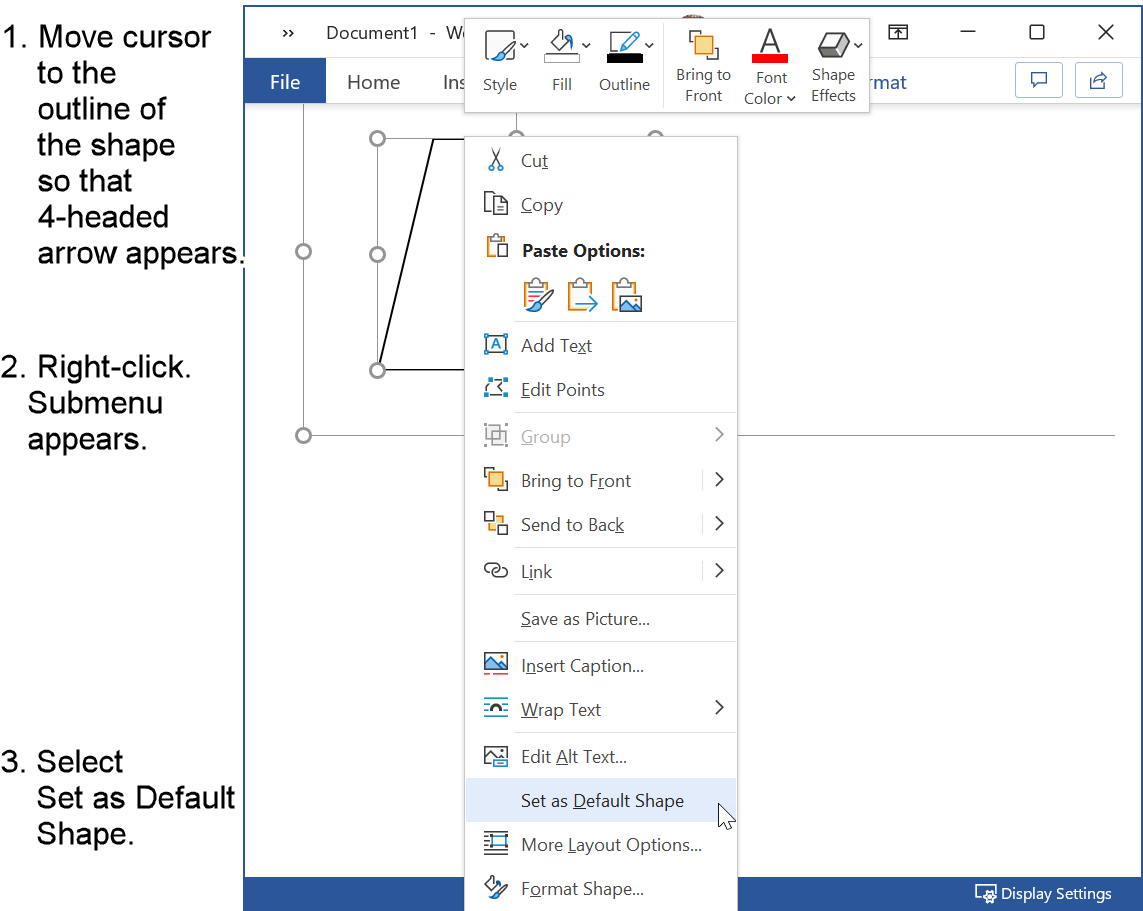 Figure 7: Set APA Format as Default
Written instructions for Figure 7 are:
- Right click on the outline of the shape to display the submenu.
- Select Set as Default Shape.
All the shapes that you draw will now be in APA format.
Step 5 - Draw a Connector Line
You now need to set up your connector lines (arrow head line joining two shapes).
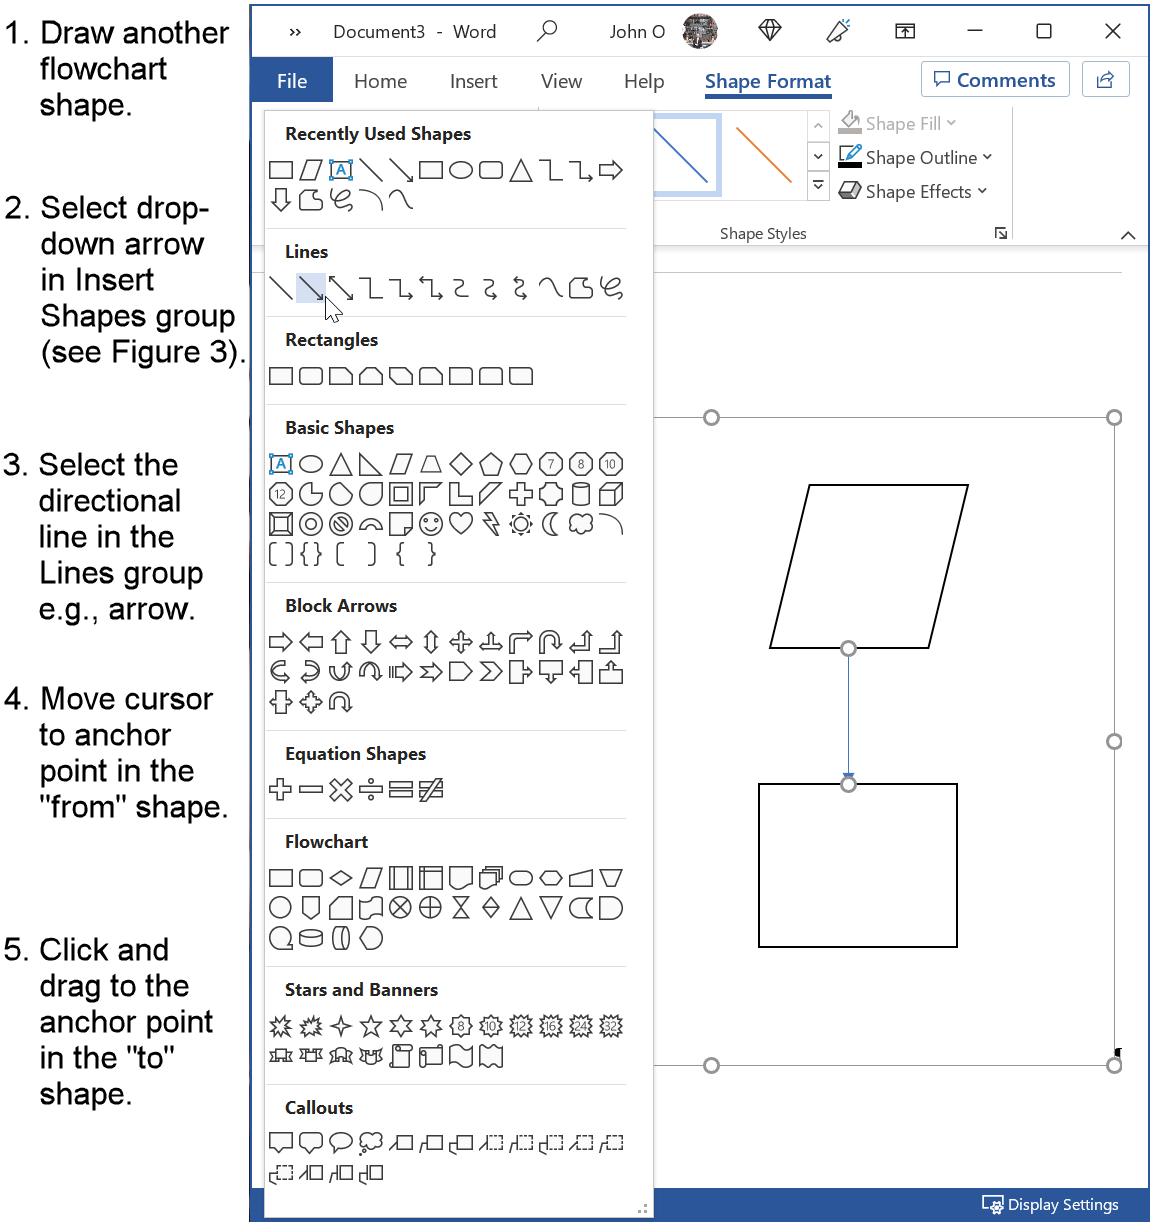 Figure 8: Draw a Connector Line
Written instructions for Figure 8 are:
- Draw another flowchart shape so that you can draw a line between them.
- Select the appropriate line in the Lines group, for example, the arrow-headed line.
- Move the cursor to an anchor point in the first shape.
- Click and drag the line to anchor point in the second shape.
Most likely, the arrow will be in a default color such as blue. This needs to be changed to the APA format.
Figures 9, 10 and 11 show how to format the line, and set as default.
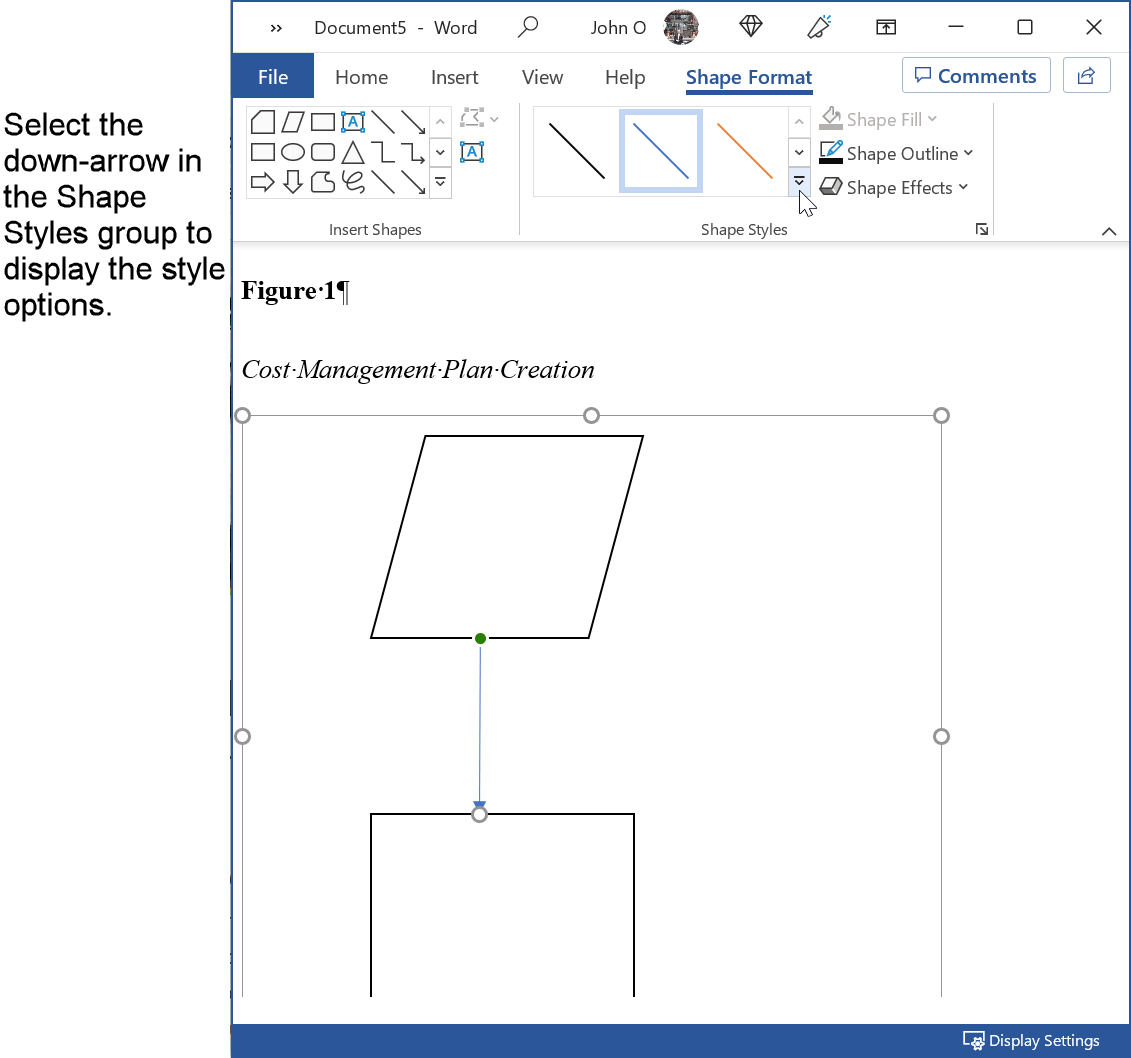 Figure 9: Display Different Line Formats
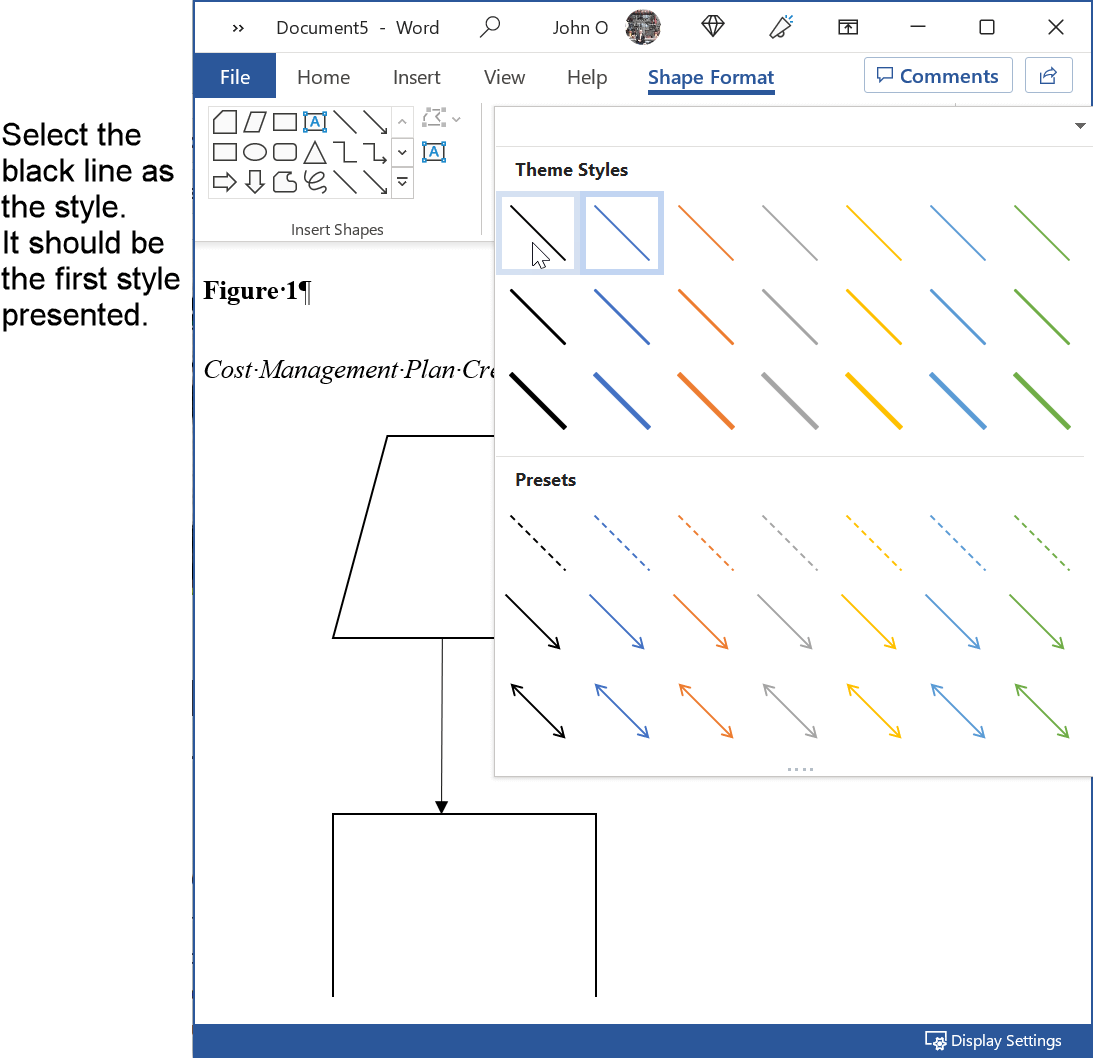 Figure 10: Select the Black Line Format
Written instructions for Figures 9 and 10 are:
- Select the down-arrow in the Shape Styles group to display the different styles.
- Select the black line.
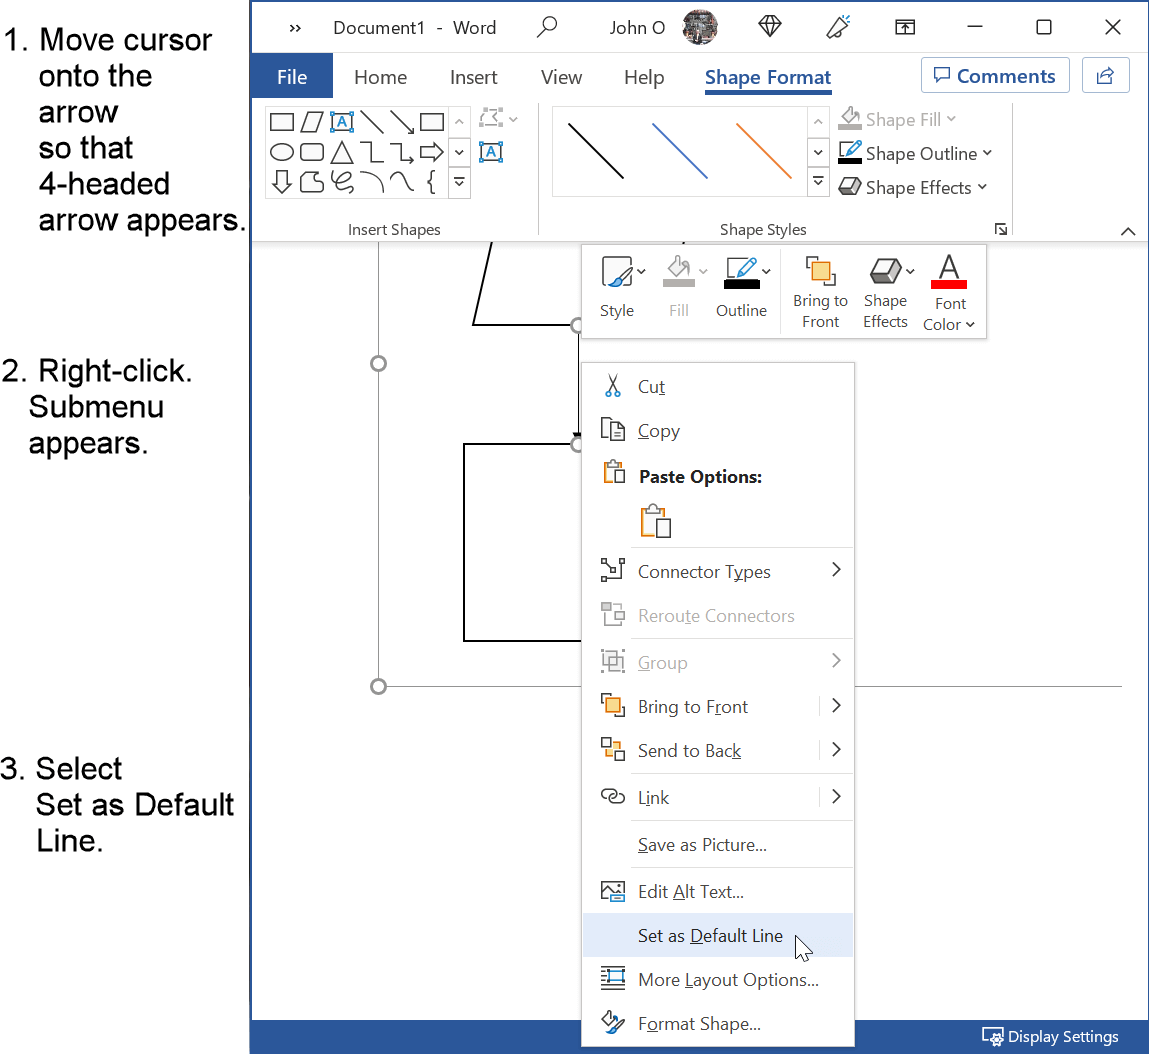 Figure 11: Set APA Format as the Default
Written instructions for Figure 11 are:
- Right click on the arrow-head line to display the submenu.
- Select Set as Default Shape.
All the lines that you draw will now be in APA format.
Step 6 - Add Text
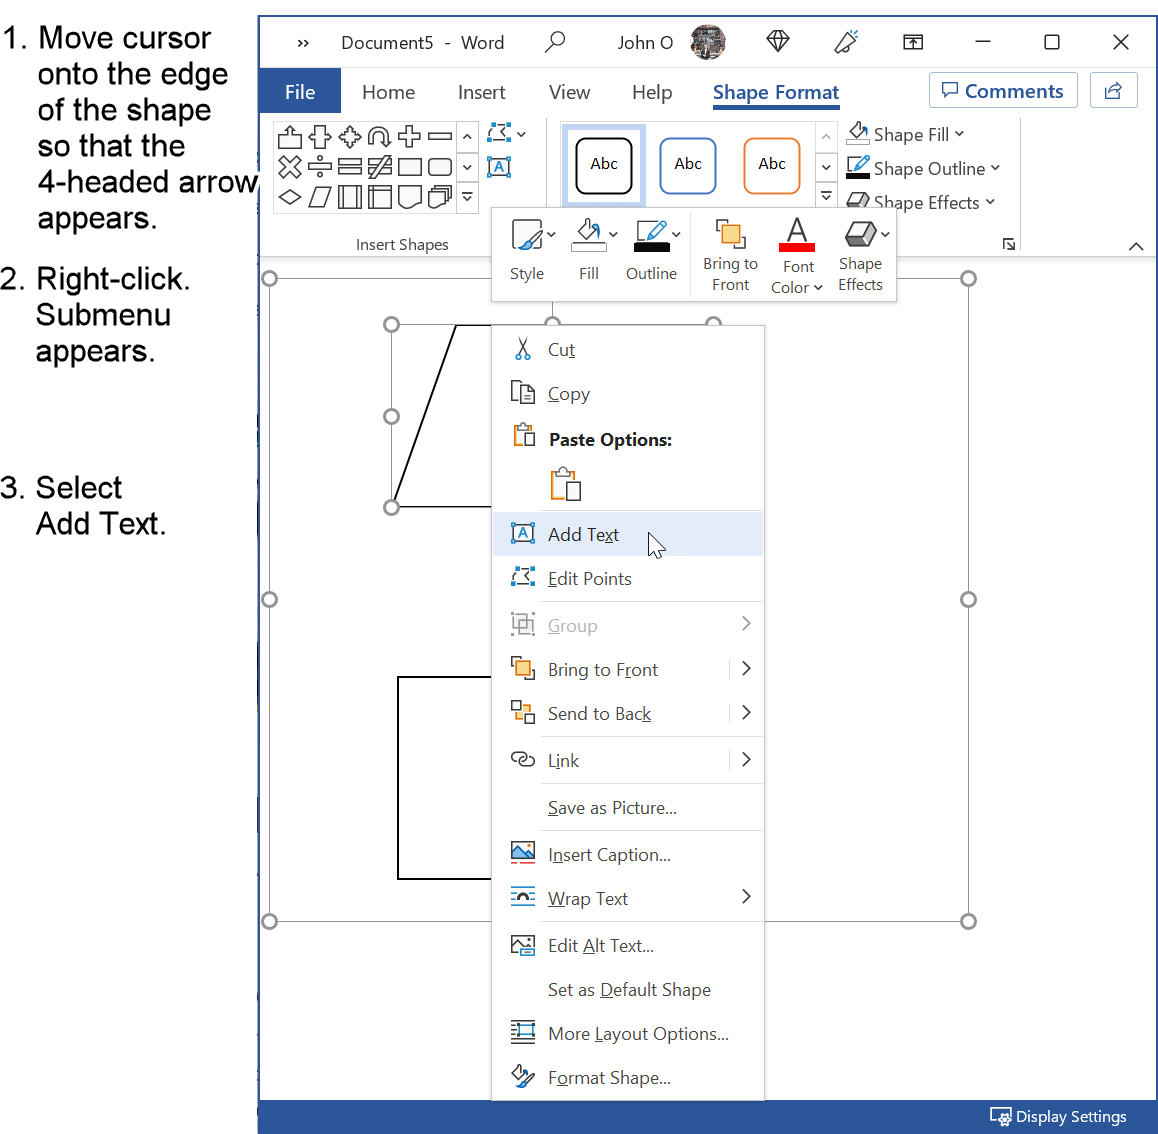 Figure 12: Add Text in APA Format
Written instructions for Figure 12 are:
- Move cursor to the shape so that 4-headed arrow appears.
- Right-click. Submenu will appear.
- Select Add Text.
- Enter your flowchart shape description, for example, "Survey data".
Use sentence case for the flowchart shape descriptors.
Make the font size between 8 and 14 - use your judgement.
Note: Instead of using the submenu, you can double-click in the flowchart shape and then add the text.
You can now draw your flowchart.
Is there more to do to get your flowchart in APA format?
It depends!
APA guidelines say to use a sans serif font, for example, Arial, for your descriptors.
If you have used a sans serif font throughout your paper, then you do not have to do anything else to your flowchart.
If you have used a serif font, for example, Times New Roman, then you must format your descriptors in a sans serif font such as Arial.
If you do change your font for the flowchart, remember to change it back to the serif font when you resume writing the text in your paper.
Add Notes if Applicable
You may want to add an explanation to your flowchart. This is done by adding a note after the flowchart.
This is not mandatory; you only add the note if you have a need to.
Write the word "Note" in italics followed by a period and left aligned.
Figure 13 shows the completed flowchart with a note added.
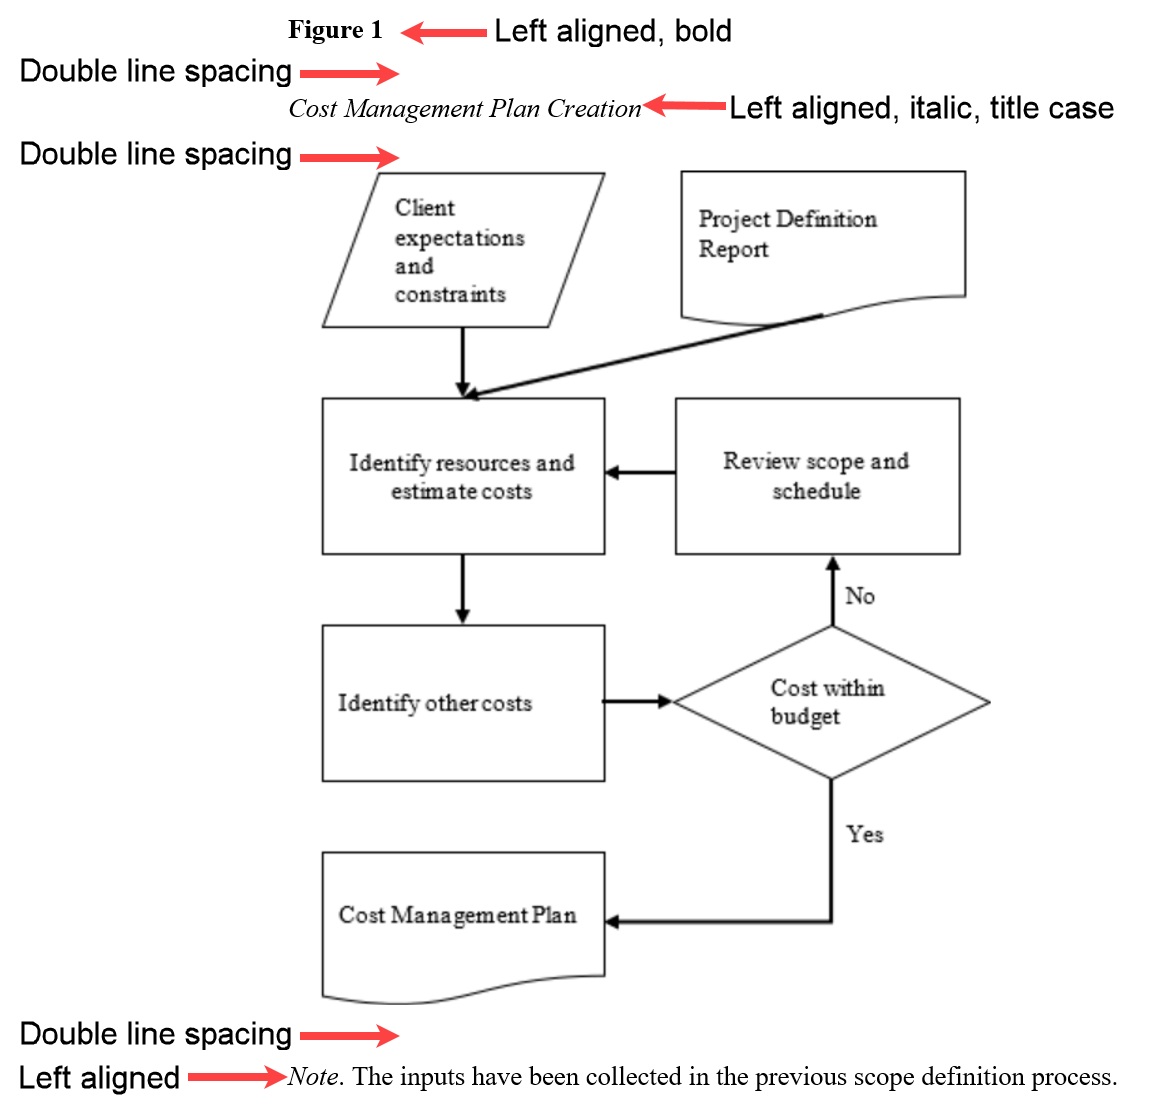 Figure 13: Flowchart in APA Format
Summary - Flowchart in APA Format
The Microsoft Word Shapes function should be sufficient for your flowcharting needs in your APA formatted paper.
Figures 1 to 13 show you how to create a flowchart in APA format using Microsoft Word. The flowchart will be part of your document. You do not need to create the flowchart in another program such as Visio, and then insert it into your paper.
Reference - APA Publication Manual (opens in a new window).